Pages

5.26.2014

Introducing Ava and Betsy

Guess what peeps?  Not only is it a holiday Monday here in the states, but it's also new Bluegingerdoll pattern time. Woo Hoo, let's party with grilled burgers and sewing! Just don't mix the two unless fire and grease stains are how you like to unwind.

But enough of my nonsense, let me introduce you to the Ava Jacket and the Besty skirt.
The Ava Jacket is a slightly cropped kimono affair with 3/4 length cuffed sleeves. You can make it with a contrast collar/cuff, like I have, or use the same fabric for the entire jacket. My Ava has a 100% viscose shell and silk charmeuse collar, cuffs and lining.

Oh hello, pleased to meet you gallant prince outside of my photo frame. Check out my cufffffs.
Betsy is a pencil skirt with 3 different views. I'm wearing the high waisted view C, made up in silk satin. As you can see this baby has several style variations to tickle your fancy. Mmmmm so many pencil skirts, so little time.
I like multiple darts for my butt and I can not lie.  Sadly this pic doesn't show the great detail that is pleated kick pleat. Let me assure you that it is awesome.
For more in depth descriptions of the patterns and much better pictures than mine, hop on over to the Bluegingerdoll blog.  If you like what you see, you can pick up the new patterns in PDF and paper form over at the store at 10% off through the 28th. Hot patterns right off the printer, YUM!
.
P.S. I'm wearing the Closet Case Files Nettie bodysuit with Ava and Betsy.  More on that later cause it deserves it's own post.

5.22.2014

All is Quiet on the Eastern Front

Hello All, long time no blog post.  Wish I had a really fun excuse to relate, like I inherited a chunk of cash and ran away to join the circus.  Sparkly leotards at last! Instead my May has contained a heap load of pattern testing related sewing, combined with more than the usual amount of weekends way from the sewing sweatshop. Usual being zero, hermits gonna stay close to the old hermitage else some other hermit takes over your turf. "I'm the hermit in these parts, See!"  While I'm super happy to be on the pattern testing circuit, it does make for a lack of bloggy content in the short term. I've tried to talk Froggie into sewing some outfits for me, but he seems content to nap in a fabric box instead. Guess that's what you get when you pay in M&M's.

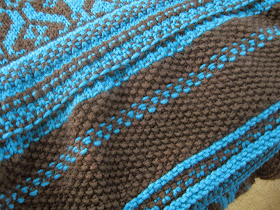
However, I do have a knitting related FO to show off, it's the Ukrainian Tiles Afghan. - Rav pattern link for those of you who also knit.
This baby sat in the UFO pile for years cause I hate knitting seed stitch.  LOVE looking at it, but hate, hate hate knitting it. Guess what all those borders are?  Yup seed stitch and that really annoying color work that doesn't make a pattern.
Past me had actually done a pretty good job motoring through the first couple sides. All that remained was the final short end to knit.  It was time to buckle down, put on a few episode of  "Fringe" and crank this baby out. Good old Walter kept me amused and the blanket was finished just before the warm weather broke. Thank the lord, cause I don't consider sweating under a half knitted blanket a character building experience
The yarn used is Berroco "Comfort" Chunky weight, which is a fairly nice Acrylic/Nylon blend. The hand of this stuff is soft, without that annoying squeakiness of cheap Acrylic yarn.  While wool will always be my favorite fiber, sometimes it's nice to have something you can just throw in the washer. Say if your toddler decides to wipe 2 T worth of peanut butter over the sofa instead of eating it. Not that I would know what's that like or anything.  So hooray for finally finishing old UFO's that were wasting away in a dark corner of some room. Now I can throw another box of fabric there....I kid, I kid...maybe.
Some of my super secret sewing was for 2 new Bluegingerdoll patterns which will be released this coming Monday the 26th.  Soon I'll have some pretty new garments to show you soon.  Huzzah!

Now excuse me, I gotta hide this afghan where husband can't find it. Otherwise it will join all the other hand knit afghans as padding for the futon.  Sniff, sniff, can't I just keep one for my knees in the depths of winter?

5.15.2014

Bow Before the Tiki Goddess

*So I was at the grocery store the other week and the strangest thing happened.  I stumbled, fell into an end cap of expired strawberry daiquiri mix and bashed my head.  While unconscious the sweetened liquid seeped into my pores and mutated my genes.  Upon waking I found that I had the power to make decorative leis out of any craft supplies, knew how to mix any frozen drink and could play the ukulele despite never touching the instrument before.  I had been reborn as "The Tiki Goddess!!!" - rights pending.
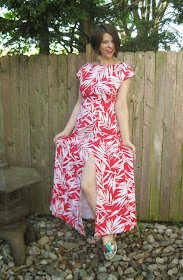
Much like Michelle Pieffer in "Batman Returns," I was compelled to sew my own alter-ego outfit. But being in a much less mentally disturbed state, I decided to pass on a faux leather catsuit.  Let's face it, faux leather chaffs in the tropics. Instead the BHL Anna pattern was unearthed and paired with the tropical red and white print previously mentioned in the ridiculous dress sewing list post. Sure this fabric supposed to be for Butterick 6019, but no one tells the Tiki Goddess what to do.  Unless they are itching for a frozen drink thrown in their face.  Do not cross the Tiki Goddess my friends, she might be smuggling tiki torches under her skirts
Sewing this was pretty straight forward since I'd already fit the bodice for my Anna/Emery mash-up.  Basically all I had to do was cut the skirt down to non-amazonian height.  After all the Tiki Goddess is devoted to sandals since she has to attend a lot of beach parties. Spike heels and sand do not mix.

Pattern
By Hand London Anna.  I used the slash neck bodice and maxi skirt length with the slit.

Fabrics used
Vintage light weight cotton snagged on Etsy last year. Not that vintage since the fabric width was 56" wide, but who could resist such a great print.   The white palm leaf areas were semi-transparent, so the entire dress was underlined with some siri lining.
Pattern changes/alterations
1. I traced a straight size 10 and needed a little bit more ease in the waist area. About 1" extra ease split between the skirt panels.
2. Did a 1/2" hollow check adjustment on the bodice front.
3. Standard 1/2" forward shoulder adjustment.
4. Lengthened the bodice 3/4".
5. Lowered thigh slit 2".
6. Took  6" of length off the skirt.  Of course then I like the length of the skirt unhemmed.  Anyone else have this problem all the time? Because of that I did a very narrow rolled hem instead of my regular 1- 1 1/2" skirt hem.

Confessions/Advice
1. While making the Anna bodice the first time, I didn't read the directions at all and wondered why the armhole area was such a pain in the ass to hem.  This time I actually consulted the booklet and found you were supposed to hem the sleeves before sewing the side seams.  This does work a whole lot better...durrrrr.
2. Man is is easy to confuse what skirt panel is what, especially when you're a dum dum who seems to miss cutting half the notches. If I make the skirt again paper labels for each panel will be in order.

Husband Comment
"It's long and pretty."   He must like this one better than most.
My Final Thoughts
I didn't jump on the Anna bandwagon last summer, sticking to my staunch party line of "maxi dresses aren't my thing." But now I get it. They're pretty awesome, especially in Hawaiian-esque prints.  Froggie book me a flight to the islands, there are tiki parties that need my blessing. Make sure my minions meet me at the gate with a cart full of Mai-Tais. The Tiki Goddess demands libations!

* I contend that my made up origin story is no less ridiculous than some presented in comic books or movies. Thrown from a window and revived by cats? Please.

5.09.2014

Fauxneta

I have a shocking admission to make today that goes against my "twitter cred" of buying all the patterns. So  here goes....instead of buying the new Moneta pattern to add to my hoard, I saved my money and knocked off the look.  "What!  You didn't buy a pattern?!  How dare you call yourself All the Patterns Heather.  Don the Ribbons of Shame woman!"

While Froggie is digging out the ribbons of shame, let me just explain myself a bit.  I have a problem with Colette patterns, a general problem that perhaps some of you have had with someone's designs.  The problem is that I like their design aesthetic, but the majority of their patterns don't suit me.  For unknown reasons I have to walk a thin line between looking ladylike or looking like a grown women dressing like a little girl in the porniest way possible.  Let me tell you from personal experience that donning a peter pan collar is a one way ticket to the wrong type of attention.  So here's the thing, even though I liked Moneta pattern it only took one look to know that most of the design elements wouldn't work for me.   After stripping all those things away what was left was a Lady Skater with a gathered skirt.  So I made a Lady Skater with a gathered skirt.
It's not even a modified Lady Skater skirt. Oh no, I went the supremely lazy way and put the Emery skirt on the Lady Skater bodice.  Cutting woven patterns on knits, dogs and cats living together, total pandemonium.
Ok, maybe all that happened was swishy skirts.
The Lady Skater bodice was modified a bit to mimic the Moneta look.  I raised the scoop neck about 1.5" and shortened the sleeves to a cap length of 3.75".
The bodice is lined both as a design element and to make use of this fern like burn out knit in the stash. Man, Past Heather bough a lot of burn out jerseys. But she also bought a lot of white rayon knit, which allowed me to solve two stash problems at once. High five past me.

The finishing process on this dress is pretty similar to the Lady Skater I made out of sweater knit earlier in the year.  The only change was to use iron on knit stay tape instead of clear elastic to stabilize the neck. Mostly because I thought the elastic might be seen through the burn out areas. The rest of the finishing is the same, using the inside layer as a lining and taking down the edge with a cover stitch.
The gathered skirt was attached with the serger, but I made the seam allowance larger by adding a line of stretch stitching about 1/4" away.  Now I don't worry about that heavy skirt ripping away from a tiny 1/4"  seam allowance at an inopportune moment.
I treated the two layers as one on the sleeve and skirt hems, turning up the edge and coverstitching it into place.
In the interest of "keeping it real" here's the dirty secret on the inside of my dress.  Gasp! What are those cut edges doing there?
Despite sewing several cap sleeves last summer I forgot that they tend to wing out weirdly without adjustments.  After the dress was finished I had to go back in and bevel the underarm seam to reduce the diameter of the sleeve. This is why I usually make muslins people. I can't be trusted to sew things correctly the first time.

So other than my sleeve gaff this baby turned out pretty darn cute as well was ticking the following boxes. Box one - use up a bunch of stash,  Box 2 - mess with Kitschy Coo patterns some more, Box 3 - keep up my Stepford wife facade.  "Would you all like to some inside my house for some fresh bread?  I promise it isn't laced with anything that makes you tell me your credit card numbers. Froggie get a pen!"

5.03.2014

Madewell Boxy Tee Knock-off

Sooooo I was lurking around the Madewell site the other day cause I like to pretend that I'm a 6 foot boho chic kind of girl.  The kind who has lobster bakes on the beach and thinks casual games of volley ball are great fun. Of course the reality is that I'm 5' 6" and way to curvy to look anything but frumpy in the baggy unstructured styles. Volley ball is my mortal enemy and I don't much care for the beach. "The sunlight, it burrrrrnssss! Where is a grotto where I can lay on a cold rock?"  But I will take any lobsters you have on hand and a giant mug of melted butter. Get into my belly undersea creatures!

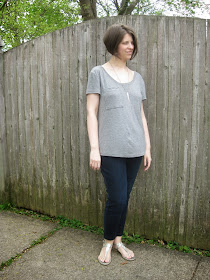
Now where were we? Oh yes, talking about the Madewell site.  I had one of those, "Pfffft, I can make that," moments upon seeing this knit linen T-shirt.  My normal MO is to think that, pinterest it and then do nothing about it for a year.  But this time being desperate for some tops that fit, I got out the Lady Skater pattern and made it happen. 
The Lady Skater pattern you say? Are you in some sort of secret contest to hack Kitschy Coo patterns as many times as possible?  Weeeeell, let's just say Froggie and I have a little side beating action going on in that department.  Even so, using the Lady Skater seemed practical since it has the exact neckline needed for the top.  All a girl had to do was play around with proportions.
For my first go at the T-shirt I decided to trace the Lady Skater pattern 2 sizes larger than the recommended size.  The bodice was then lengthened, with a little checking against the Trifecta top, and I decided on about 2" of ease around the hip.  The Madewell garment looks more roomy at that area, or else it's just that the models have no hips.  I've found for my figure just a little bit of of ease in that location is best.
What did I get?  A proper over sized 80's T-shirt. I just needed some gathered yoke jeans to tuck it into.  *Side note -Is anyone else completely horrified that gathered yoke pants are coming back into Vogue? I want to yell at the young kids, "Don't do it, learn from your elders who made that mistake!"*  So as I was staring at my 80's T-shirt in the mirror it dawned on me that the neckline area was fine.  The problem was with the sleeves being too long/baggy.  I went back to the drawing board and retraced the armhole area/sleeves in my recommended size.  The rest of the shirt was left over sized and I mocked up another muslin. Guess what? It was perfect! 
I've broken out the hacking steps below, so you don't have to read all my drivel while you hack. The steps are exactly the same for the front and back pieces so I've only shown the front.

Hacking Steps
1. Trace Lady Skater neckline/shoulder and neckband two sizes larger than your regular size.
2. Trace armhole and sleeve in your recommended size.  I added an extra 1" of length to the sleeve so it could be hemmed instead of attaching the sleeve band.
3. Extend the CF/CB line down to the length you want the shirt to be. I used the trifecta top pattern as a guide for my length, but you could use any T-shirt you like.
4. From your desired hem length, square out a horizontal line from the CF/CB.  The length of the line should be 1/4" of your hip circumference plus the amount of ease you desire.  On my shirt I wanted about 2" of ease at the hip for my 40" hip circumference.  Both my front and back pattern pieces have a 10.5" hemline.
5. For the side seam connect the hemline and bottom of the armhole with a diagonal line.
6. You can leave the hemline straight or go back and slightly curve it up a the side seam area.
7. Finished pocket dimensions are  4.5" wide and 5" long.  Draw a rectangle that size and add about an 1.5" to the top of the pocket so that it can be folded over and stitched. Add a narrower seam allowance to the other edges of the pocket.
Construct as you would any knit T-shirt, though I would recommend sewing the pocket on first thing.  It's a lot easier to do on a flat piece of fabric. I used my sewing machine with a little longer than normal stitch length to attach the pocket. All other seams were serged and the hems were coverstitched.

You will want to make up this style in a knit that has some drape.  My shirt is made out of a 2 ply rayon knit, it has good cross wise stretch but limited length wise stretch.   If you'd like to try a linen knit, like the original shirt, then you can pick up some yardage at Marcy Tilton, Emmaonesock and Mood Fabrics. Scroll around and look for "knit" in the description since these are grouped with the normal woven linen fabrics.
As always, happy hacking my dears.  In the meantime I'll be in my evil lair thinking of more ways to cut up patterns. Muhaaaaa!