Hello everyone, today I'm pretty pleased with myself because operation "Secret Pajamas" is off to a great start. Soon we will rule the world in comfort.....oh no I've said too much. Here stare into this animal print until you forget everything and find yourself dancing through the streets of London like the end of "The Prisoner" (Original version people) I give you the Lady Skater pattern with just a few tweaks, boat neck and pleats at the waist. Snowy fence not included.
Why yes I did wear 3" heels in the snow. "It's all for you
Damian, blog readers, It's all for you." Somewhere in the middle of taking these pictures, the neighbor who owns this fence came back from an errand. He got out of his car and asked me if I was "Alright". Fine, fine, sir just taking pictures for my sewing blog. Does that sound made up? I assure you that it's a "Thing." Then I almost fell over into the snow. Really you can't make this shit up.
Anyway.... I mentioned earlier this week that this fabric is a jersey sweater knit. So far as I can remember, it's a wool blend with a hint of Lycra in it. The fabric has 2 way stretch in the width wise direction, pretty decent stretch recovery for this type of fabric, and is printed on one side. I did find that the stretch recovery was not great on the cut edges and some extra stabilization seemed in order. On the neckline I zigzagged some clear elastic on the wrong side to keep it from bagging out.
The elastic was pulled taunt just a little bit as I sewed. Not so much that the fabric gathered, just enough to snug the neck edge back to it's original shape. On the hems
knit stay tape was fused to the edge before cover stitching them up.
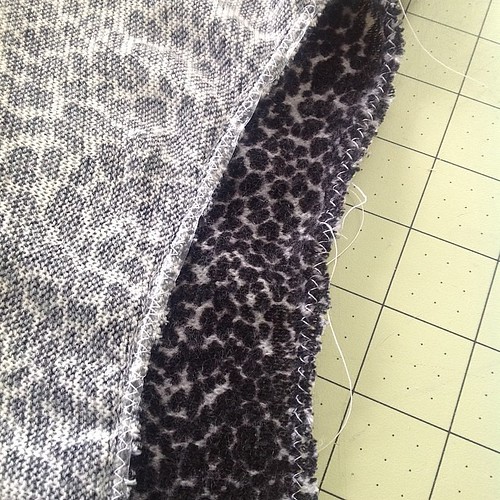
Because the main fabric is a tad itchy and would catch on tights, I decided to put a full lining in this dress. My lining is some cheap rayon jersey that I didn't mind sacrificing. A complete dress was made out of both the sweater knit and the rayon jersey. After adding the clear elastic to the self fabric, the two were attached at the neckline, right sides together. Lastly a line of cover stitch was added to the neck edge to keep the lining from popping out.
On the sleeve hems I serged the two layers wrong sides together. Then turned the hem up 3/4" and cover stitched.
The skirt hems were left separate and cover stitched in place. Self fabric was hemmed up 3/4" and the lining 1 1/4".
Pretty cool right? You get a nice warm dress without having to worry about wool itch or weird static cling.
OK it's time for me to drop some pattern drafting knowledge into your heads. Open up your brain hatches right after inputting that very important number code....4, 8, 15, 16, 23....
Pleated Skater Hacking Instructions
1. Change neckline to a boat neck shape. This can be done the same way as in the Renfrew
tutorial here.
2. Add extra length to the sleeves so they can be hemmed. I added an extra 2" to the bottom of the sleeve.
3. To add pleats to the skirt trace the pattern and label the CF.
4. From the CF measure over to mark the placement for your first pleat. I used the distance of 2 1/4".
5. From the first pleat placement mark, measure over another 2 1/4" and mark for the second pleat.
6. Use the pleat marks to draw two lines down through the length of the skirt.
7. Cut along these lines from the waist almost through to the hem. Leave a little paper hinge at the hemline.
8. Place some scrap paper behind the skirt pattern and start spreading open the cut areas. These will be your pleats. I decided to make my pleats the width of 2 1/4" as well.
Measure at the waistline edge and tape down the skirt pattern when the cut areas are as wide as you want them.
9. In the pleat area measure down 2" from the waist edge and draw in a parallel line. This is the bottom of your pleat.
10. Mark the center of the pleat both at the top edge and at the bottom edge of the pleat. In my example the middle is 1 1/8". Draw a line to connect them.
11. On the bottom edge of the pleat measure out from the center mark (1 1/8") to mark the outside edges of the pleat. Connect these marks with the top cut edges of the pleat area. Now you have a nice box pleat marking. The pleats will be folded to the center so you can draw arrows to remind yourself of this.
12. Fold the pleats closed, like how you will sew them, pin in place.
Cut the excess paper off across the waistline. Remove the pins and flatten out your pattern again.
13. Down at the hem you'll need to "true" up the curve a bit because there will be small lumps from the adjustment. Add a little extra paper and draw in a smooth hem curve.
Trim off any excess paper and your pattern is done.
When sewing pleats in knits I usually secure them on the sewing machine first. Make sure to switch to a stretch or ball point needle first. Then set your sewing match for the largest zig-zag stitch and use this to baste the pleats down. After the waist seam is sewn on the serger, the basting can be removed.
Alrighty, go make yourself some pleated Lady Skaters and then have an awkward conversation with your neighbor. "I don't usually wear 3" heels in the snow, but I do for the blog. No I'm going to sue you or anything. I'm not going to fall over." *Almost falls over*


Nicely done, who doesnt make use of the local architecture for appropriate backdrops, sheesh!?
ReplyDeleteFabulous! And your poor bemused neighbour!
ReplyDeleteLOL, You gotta love neighbors.
ReplyDeleteGreat job on the hack. I really like the boat neckline on you - very flattering. The pleats look great too!
very nice! love the pattern hacking you did. and i'm super impressed that you braved the cold *and* snow in heels!
ReplyDeleteNext thing you know that neighbor is going to start charging you rent for his photoshoot location. ;-) Love the dress, I had some very similar fabric that I made into a sweater, and I wish I would have been as smart as you and stabilized the neckline because it seriously stretched out. :-(
ReplyDeleteThis is so cute! I love it on you!
ReplyDeleteSuch simple tweaks made a really different dress! Thanks for the hints on the lining too.
ReplyDeleteAwesome! I love it! And it looks snuggly warm!
ReplyDelete"Get off my fence sidewalk!" hee hee.
ReplyDeleteMaybe I should switch it up and use the neighbors fence across the street. Hello morning commuters!
ReplyDeletePoor guy, he was so worried I was going to sue him or something. Just don't it for the pictures sir.
ReplyDeleteHello and Thank you ShanniLoves! I like to keep it a little goofy over here. ;)
ReplyDeleteThanks Kristin, I bet we could all swap stories about weird things that happen when trying to take blog pics.
ReplyDeleteThanks Lisa. I was really happy to have long sleeves this time after snapping those Winifred pics in 30 degrees. I'm ready for Spring now.
ReplyDeleteHaa haa! But Sir I'm making your fence "famous." Isn't that payment enough? I'll admit right now that I didn't stabilize that neckline and then ripped out the lining and did it.
ReplyDeleteThanks Ginger, I'm in the mood to sew another one in some plain jersey.
ReplyDeleteI was surprised how different it looked too! Even when I can picture something in my head it's a little surprising if it turns out.
ReplyDeleteThanks Melanie. It is snuggly and my husband thinks it pretty too. Bonus.
ReplyDeleteThanks Andrea. I double wool socked my feet and now they are warm again. Well warm until the house cools down again.
ReplyDeleteThanks Wendy! I agree about the blog pictures and will continue to lurk around his fence. Muhaaaa haaa Excellent /\.
ReplyDelete