Darling Ranges Dress - The final stash project

7.30.2012

The Darling Ranges dress was one of those patterns I started started seeing all over the net and loved on everybody.  Months ago after buying the pattern I excitedly mocked up a muslin only to decide that the style didn't look all that great on me. I stuffed the muslin in my muslin graveyard and moved on with other projects.  After entering the pattern stash contest this month I was inspired to pull out that muslin and give it another look.  My new conclusion was that the bodice needed more fitting work and that the dress would look better on me sewn up in a lightweight fabric like this stashed silk georgette.

Due to my large bust, sway back, wide upper back and stomach pooch I needed to make a lot of adjustments to the pattern.  Here's a list of everything I did along with pictures of my final bodice pattern pieces.

1. Did a FBA adjustment of 1" and then dropped the bust dart an additional 3/4". Decreased length of dart about 1". The Darling Ranges dress already has a rather large dart so the FBA made a monster one. I took the extra dart intake and rotated it into the shoulder to compensate for the additional width added to the back. This still made the front bodice shoulder too wide so I just cut off the extra, basically cutting a new neckline as it were. This shouldn't have worked but it did.
Final front bodice pattern. I should buy some scotch tape stock.

2 Increased width across the back 1".
3. Increased length of front and back bodice 1 1/4".
4. Added 1" wide darts to back bodice.
5. Forward shoulder adjustment a rather large 1".
6. All this messing about with the front and back bodice seemed to make the back neck too scooped. I filled in back neckline 1" at CB blending into the existing neckline.
Final Back bodice pattern.

7. The side seam was too far to the front on me so I added 1 1/2" to front bodice side seam and reduced back bodice side seam the same amount.
8. Did the same rebalance of the side seams on skirt front and back.
9. Increased length of dress 1 1/2".  Also did a narrow shirt tail hem to keep some length.
10. Did not gather sleeve hems but added sewn on cuffs.  Cuffs just seemed to be something that would look super cute with this style.
11. Left off the back ties since I'm planning on wearing this with a belt.
12. I added fashion sewing supplies tricot interfacing to the facings and to my cuffs.
After 3 muslins sewing this baby up was going to be a breeze right?  Maybe if I'd grabbed some trusty cotton, but no I had to pick the silk georgette. 
I used the cutting trick of putting the fabric on top of some muslin which had worked so well with my crepe de chine blouse.  Sadly the georgette was not so accommodating.  The cut out pattern piece would look great on the table but as soon as I picked it up the fabric would shift all over the place.  In hindsight I probably should have used that trick for chiffon of washing the fabric in some gelatin.

Sewing was also challenging especially since most of my pattern pieces where not the correct shape. (Thanks to my shoddy cutting job)  I had to do some recutting and little bit of crazy easing in places.  After resewing the bias binding on the neckline about 5 times I gave up and decided the neckline was not going to lay flat in this fabric.  Getting the hem line semi-straight look days since I have no dress form or close by friend to sucker into pinning the hem while I was wearing the dress. Basically my husband was wondering why I was ranting about sewing for a couple of days.  Sorry honey, I really need to bone up on my georgette sewing skills.

Despite all the self made aggravation I really like this dress in georgette, the pattern just seems to mesh well with the design.  The dress it's self is very cute with it's V-neck, handy skirt pockets and 3/4 length sleeves (I love my little addition of cuffed sleeves.)  The gathered skirt is probably not as flattering on me as a darted one but with a belt I can pull it off.  I'm planning on wearing it with some gray tights in the fall and maybe a little blazer if one happens to get sewn up by then.  So thumbs up to Megan Nielsen for an awesome pattern. Maybe I'll make another one in some fabric that easier to handle. :)

Flickr set here if you want to see some inside shots of the dress. 

Kimono Sleeve Dress - the muslin that turned into the real thing

7.28.2012

The plan was to blog about the Darling Ranges dress next, but I'm not at home and able to measure the pattern for exact alteration details.  Then I remembered that the Kimono Sleeve dress fell on the wayside during my period of muslin mayhem.

I did use the polyester charmeuse to make a muslin, but then liked it so much I decided to turn it into the real dress and do all the facing and finishes.

The dress is a pull on style with an elasticised waist and back keyhole opening which is closed with a self covered button and rouleau loop.  A large belt really pulls the look together and makes the whole outfit more chic. 

I mentioned back at the beginning of the month I'd bumped up the sizing to XL.  That's partially true. My upper body measurements fit the size Large just fine so only the skirt portion needed to be altered.   This process was easy due to the skirt pattern being one large rectangle for the front and back.  I kept the waist measurement the same and then used a hip curve to bump out the side seams a few inches down from the waist.  Added about 1.5" to each edge of the skirt and 2" additional inches of length.

If I did sew this again I'd make 2 changes.  First would be to leave off the sleeve facings.  Even when you tack them at the seams they still flip out on a regular basis.  Instead of facings I'd use my serger to do a thin rolled hem on the sleeve edge.  Secondly, I would ignore the instructions for elastic insertion at the waist.  They say to sew on top of the waist seam on the right side while stretching the elastic underneath.  Trying to keep everything under the needle this way is a giant pain.  There's plenty of seam allowance at the waist and sewing the elastic to that works just fine.

This was a fun little dress to put together and I think the pattern could be a good base for future projects.  However fall sewing seems to be looming on the horizon and I might just put this pattern away for now.

Next post, the Darling Ranges dress.... this time for reals.

Burda 109 - A Simple Sheath

7.27.2012

No pattern stash contest would be complete with a rummage through the bin of Burda Style magazines.  Number 109 from Issue 5-2010 caught my eye, it seemed like just the thing for some textured silk purchased this spring.  

If you look closely at the photo above you'll see it says, "Use only fabric with crosswise or two-way stretch."  Did I notice that before I cut my non-stretch silk? Nope.  Oh Heather, you bad instruction skimmer, when will you ever learn.  (Hint, Never)

My top half is still a Burda 44 but my bottom half is now in the Burda plus size range. Not a problem though because you can use the existing grading to grade up the bottom closer to your size.  Trace the largest size (in this case 44) and then shift that traced line over a smaller size and retrace.  I needed to grade the bottom 2 sizes up so I traced size 44, shifted my paper over to line up on the size 40 and retraced the size 44 line.  Needed to do a bit of blending at the waist since I wanted to keep the top a size 44.   This combination 44 top and 48 bottom got me in the ballpark but then I needed to make the following adjustment for a better fit.

1. Increasing the back dart intake 1/2".
2. Taking the two front princess seams in 1/4"
3. Took in the side seams 1/4" just from the waist to the hip curve.
4. Took in the shoulder seams an sizable amount 1 1/5". There just seemed to be a lot of extra fabric there that was making the neckline gap.
5. The very top of the princess line seams were taken in an additional 1/2" to prevent gaping of the neckline.
6. The facings needed to be adjusted to reflect the neckline and shoulder changes.


The trickiest sewing part is the combination facing, especially in my case since the facing size needed to be drastically changed due to my changes.  There was a bit of last minute trimming around the armholes to get the fabric to lay correctly.  I did understitch the neck seam but not the armhole seams.

Overall this pattern worked fine with a non-stretch fabric, thank god.  The only odd thing is that this silk does not seem to hold a press.  I've gone over the seams numerous time and they still look puckery in places. I'm a much better presser than these photos would lead you to be believe.
Flickr set here for some close up pics.
Despite the puckering issues I like this dress, it's simple and elegant.  The muted pastel print works well with the design and I thought it was the perfect match for my giant vintage butterfly pin.
Just hanging out on this dress until I spot some sweet flowers.

Next post will be the last of my 3 dress set, the Darling Ranges dress.  Otherwise known as the dress of a thousand alterations.


Simplicity 2588 - From the pattern stash

7.24.2012

The pattern stash contest started off with sensible separates, but then it quickly devolved into make as many dresses as you possible can.  The first off the machine, Simplicity 2588, which I bought after seeing one made up on the Tessuti blog.  It's a very interesting design in that there are enough options that you could sew up several different looking dresses.  My version consists of the thinner yoke, non gathered sleeves, slim skirt and no belts or other sewn on waist accents.

 I'm so gonna be Roger Sterling 3rd wife.
Also can you say double stash busting? Yes that's right, the fabric is also from a semi-deep strata of the stash. It's an extra wide cotton (60"!) with a very dark brown flora print, purchased from sawyerbrook.com.  Very similar in hand to everyone's favorite pre-baby feather print dress. (I can't fit into that anymore and it makes me weep big salty tears.)

Another great thing about this pattern is that it needed 2, count them 2, fitting adjustments.
The first was sizing the bottom half up one dress size -  Top simplicity 16, bottom simplicity 18 with the skirt waist blended down to the size 16 measurement.
The second was taking in the top of the armhole princess seam about 1/4" and adjusting the front sleeve to reflect that change.
That is it..... which is craaaaaazy.  Though maybe it's some sort of karma for the insane number of adjustments I've made for another contest dress.

I broke out all the turquoise accessories for this little number.  One great thing about sewing so many dresses is now I have an excuse to get out the vintage bug pins.
Vintage pin, shoes and belt from shopruche.com
This is a great little number and I'm glad the pattern stash contest pushed this to the top of the sewing queue.   Here's the Flickr set for a few additional pics.

The parade of dresses will continue next post with a burda style number from my mag stash.

A tee for you and a tee for me

7.19.2012

Mom and son sporting their freshly sewn Tee's made from some "seasoned" patterns.
On me Grainline Studio's Scout Tee, on my son Jalie 2918.
Pattern Review is running a pattern stash contest all this month and I've been inspired to sew up a few that have been lurking in the back of my closet.


For my son Jalie 2918 in some ribbed cowboy print cotton.  This is size 2 with the sleeves and hem shortened about an 1".  Either neck or the neck binding needs to be enlarged a bit for the next version.
I'm much too busy to stand still for pictures.

Confession time, I traced this pattern in November to make his cousin some Christmas T-shirts and then never sewed them.  Ooops.  At least this pattern has a huge size range so my nephew might get some correctly size T-shirts at some point.

I ignored the directions and used the coverstitch machine to do the neck binding and hems.  The rest is all straight forward overlocking of seams.  Easy Peasy.
There's a new sheriff in town.


For me Grainline Studio's Scout Woven Tee in Stretch Silk Crepe de Chine. (Still available here)
Pants are Hotpattern's boyfriend jeans, which are awesome.

A muslin showed that there was plenty of ease in the bust but I still really needed a bust dart.  To accomplish this I took out the front pattern piece from the Anthropologie knock off blouse and traced the dart.  Then added the amount of the dart intake to the bottom of the side seam and blended it into the hemline.
Other fitting changes were my standard 1/2" forward shoulder adjustment and 1/4 additional ease added to the hip.  My bustline sucks up a lot of length so 3" were added to the body and 1" to the sleeves.   I should have increased the ease across the upper back for freer arm movement but didn't notice that until wearing the finished shirt.  Thank god for stretch silk!


The only thing that can be a bit tricky in construction is the bias neckline.   But wait, Jen made a detailed tutorial on her website that totally rocks.  I've used it a couple of times now for different garments and highly recommend it.  Love this Tee, it's my new favorite.

Some bust dart action.
Flickr sets are here and here for larger pics.   Next up for the pattern stash contest, a whole lot of dresses.

Thurlow Shorts - a review

7.17.2012

When Sewaholic released a pants pattern I jumped on that right away.  Her patterns really are drafted for pear shaped bodies and this means less alterations for me.  The pattern also has everything I like in a pair of dress trousers, slash pockets up front, bound button hole pockets in the back and a little flare to the leg.  The shorts are pretty cute too and since it's summer I made those up first.
Thurlow definitely is men's wear inspired because it has about a million pattern pieces.  I admit sighing heavily a few times while tracing and sewing everything.  But don't be lazy because the end result is a really nice pair of shorts.
My pair of Thurlows are made up in a gray/violet lightweight stretch cotton from Marcy Tilton.   Very nice weight for shorts and the color is an interesting semi-neutral.

Still had to make most of my regular pants fitting alterations, but having just completed Iris it was not too hard to transfer the changes over.  Started with the size 14 and made the following alterations.....
1.  Dropping the crotch 1".
2. Extending the CB seam line 1". 
3. Cutting off all CB extension provided in the pattern.  Actually had to take in an additional 1/2 in this location so it seemed silly to keep all that extra fabric when I don't need it.
4.  Increased the back dart intake to 1 3/8".  This did mean there were some puckering problems when sewing on the bound buttonhole pockets. 
5.  Cut down the waistband at CB probably about 2-2.5".
6.  Added about 1/2" to the front at the top of the side seam.
7.  Added 3" of additional length to the legs since the crotch alterations sucks up a lot of inseam length.  Also wanted the shorts a little longer for my tastes.

Now some close up shots so you can see all the great details on the shorts. 

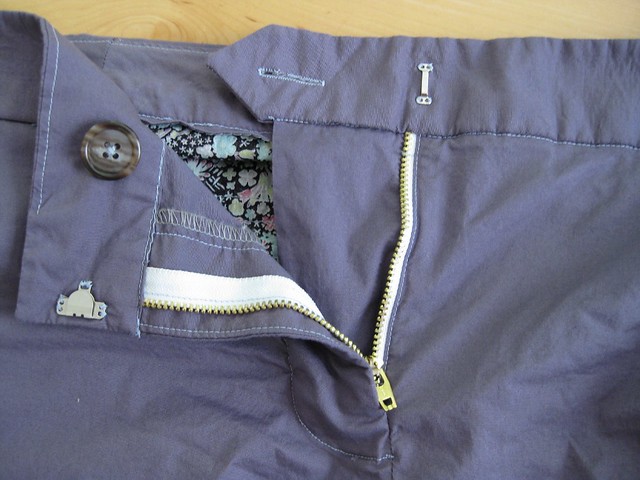
Zipper with button and hook and eye closure.  It's annoying that you can't get jean zipper in very many colors locally.  If anyone knows of a good Internet zipper supplier drop me a line. 
Thurlow Shorts zipper

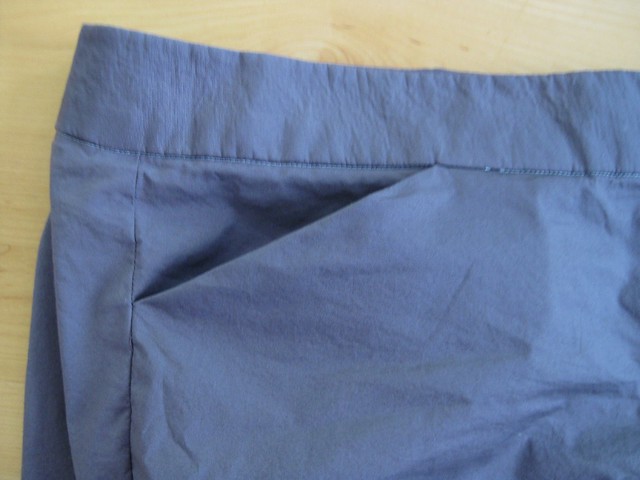
Slash pockets on the front. I did omit the belt loops since I never tuck my shirts into pants.
Thurlow Shorts front pocket

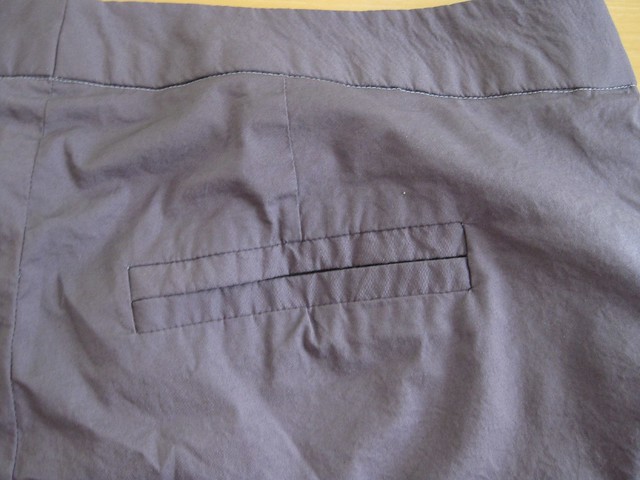
Bound buttonhole pockets on the back.  Personal confession..... I HATE sewing bound buttonhole pockets even though I've done plenty of them. They're always fiddly and you've got to cut the fabric, so there's that no turning back point.  UGH!  That being said these turned out pretty well.  The increased dart intake seemed to create a pucker under the bottom of the pockets that couldn't gotten around.  I just accepted it and moved on.   Also the pocket bags are completely different than I've ever sewn before.  It took a few minutes of rereading the directions to understand what to do.
  Thurlow Shorts back pocket

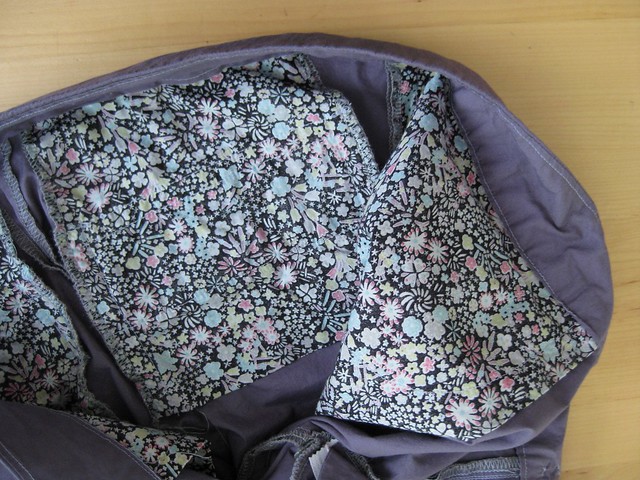
Speaking of pocket bags, I used some Liberty of London scraps for mine. Ooooo pretty!
Thurlow Shorts pockets from inside


Final thoughts on Thurlow, I think it's a great pattern for intermediate to advanced sewers.  I wouldn't suggest a beginner tackling bound buttonhole pockets on their first foray into pants sewing.  But if bound button hole pockets and fly front zipper insertion is an old hat to you then you'll love this pattern.   The directions are well done, and I really like the option of being able to adjust the fit at the last minute with the CB extension.  Come fall I'll be happily sewing up the pants version.

Post Holiday Supplies Hull

7.06.2012

JoAnn's is having a sale on pretty much every pattern company except Simplicity.  Got up early and managed to score everything on my wish list. Victory!   Simplicity goes on sale next week on the 12th so I'llll be baaaaack.
Dresses, shirts, dresses, coats and more dresses.
 Mail man also delivered me some pretties,  roll ends from the hot patterns etsy store.

All knits that will probably turn into Renfrew tops.

Also interfacing and elastic from Pam at Fashion Sewing Supply .  If you aren't buying your interfacing from Pam, then you should be. All her interfacing is excellent but my favorite is her Pro-tricot for knits.

On the actual sewing front it's muslin madness!  Scout tee, Thurlow shorts, Easy Kimono Sleeve dress, vintage Advance 9440, and Burda 109 from issue 5/2010. I blame pattern review and their pattern stash contest for half of this mess.  The rest is just my brain getting distracted by something new and shiny... oooohhhhh what's that!

Make us into real garments already!

Either I'm going to have a lot finished garments in the near future or more muslins to join my muslin grave yard.  Gonna cross my fingers and hope for the best.

Mad Men Inspired Blouse - McCall's M5138

7.05.2012

Joan's fabulous even when blurry.
While watching Mad Men I secretly labor under the delusion that I can wear whatever Christina Hendricks does.  She's the only reason I bought Colette's clover pattern, because if Joanie looks good in cigarette pants than maybe I can pull that off too.

This season I was completely taken with this short sleeve button down shirt Joan wears after telling her husband to take a hike. (See sadly blurry photo to right.) My brain said, "wait there's a pattern almost exactly like that just sitting in the stash. All it needs is a little sleeve redraft."
Most of the hard fitting work on this pattern had been done last year then I was trying to make a banded collar blouse with ruffles.  I got bored with that project and moved on, but not before hammering out a pretty decently fitting blouse.

Alterations made included....
1. Full bust adjustment with an additional lowering of the bust dart.
2.  Forward shoulder adjustment of about 1/2".
3.  Lowering the armhole around 3/4".
4. Adding a little extra width to the back armhole.
5. Moving the location, length and width of all the fish-eye darts.
6. Shorted the 3/4 length sleeve and added a sewn on cuff.
7. Adding almost an 1" to the side seams in the hip area.
8. Reducing the sleeve cap ease about an 1".

The worst part of the fitting process was getting the darts right. The back darts seemed too close to the side seams.  I moved them some what closer to center back.  Because of my sway back the dart intake was increased and the leg of the dart lengthened. On the front the dart intake had to be reduced to almost nothing.  Truth is I don't really need a dart in this location but like the look of one.

As great as Joan looks in rosebud gingham that's something I couldn't pull that off, so out came this long stashed cotton blouse weight. 
Blurry cherry blossoms from Emma one sock years and years ago.
It must have been meant to be because there was just enough yardage in the roll end cut to make this blouse.

Ta Daaaa,  the finished product.....
Front and back view worn with Colette Clover Capri length pants.
A few style changes were made, I lengthened the blouse and retained the shirt tail hem from the pattern.  A cuff was added to the sleeves because they needed a little something to keep them from looking dowdy.

A little detail montage. All photos can be seen larger on flickr http://www.flickr.com/photos/froggiegirl/sets/72157630363323714/

I'm already thinking this pattern needs to be made in a solid color with patch pockets!

Happy 4th of July

7.04.2012

I made deviled eggs.


And feta dip


Stood in a wading pool with my son
Colette Iris shorts,  Hot Patterns Riviera Once, Twice, Three times T-shirt


And got a little sewing done on muslins for Grainline Studio's Scout Tee and Sewaholic's Thurlow shorts.

Hope everyone had a great day with plenty of tasty food. :)

Next Up....

7.02.2012

On the sewing table, a muslin for Pattern Runway's Easy Kimono Sleeve dress.  Did all the work tracing the pattern and bumping up the sizing to XL months ago but didn't get around to making a muslin. I'm planning on using one of my stashed silks for the actual dress, but isn't this cheap Jo-Ann's polyester fun!

Next to review - McCall's M5138 a finished blouse that looks almost exactly like the technical drawing.  You'd never know I made about 5 muslins. Ughhhhhh.

Proudly designed by Mlekoshi pixel perfect web designs