Showing posts with label Megan-Nielsen. Show all posts

Sweatery Briar with a Cowl

12.07.2013

Oh yeah, me and Briar are partners in crime. After we had our fun with the punky french knit Briar was like, "Hey, how about you sew up some of that sweater knit you've had for ages?" Well Briar, you make an excellent point and I'm supposed to be stash busting and all.  How about we start with the first sweater knit I ever bought? Deep Stash Baby! You get extra points for sewing that up, right?
Oh yes, I put a cowl on it. Just an easy to draft rectangle cowl 8.5" high. So easy that I'll tell you how to do it. (Hey who put that jacket in the shot.)
But first a little more about this fabric, it's an acrylic blend with some percentage of mohair or angora in it. I know cause it's got little hairs that stick out and make ripping out stitches a PITA.  It's also a rib knit which makes sizing a bit of a crap shoot.  I used the exact same sizing as my first Brair and put clear elastic in the shoulder seams.  This did not keep the shoulder area from stretching out, giving the sweater a drop shoulder look.  I probably should have cut the shoulders a bit narrower to maintain the correct look.  However this doesn't bother me all that much since the cowl neck keeps everything covered and drop sleeves are kind of "in" at the moment.

The other problem that does irk me is that my hem is a little ripply, especially in the back.
In retrospect I should have used knit stay tape on the hem before running it through the coverstitch machine. Some one wasn't using all her brain cells that sewing day. Frog didn't warn me either, must have been playing with the PJ eaters.
I'll could go back and fix the hem, but more likely I'll ignore it and just dig being warm in my snaky sweater. So cozy, so soft, so cowly.  Mmmmmmm. Maybe you have some sweater knit floating around your stash and want a cowl neck Brair too. Well here's how you do it and it works on any pattern with a scooped neckline.

How to draft a cowl
1. Using a flexible tape measure, measure the back and front necklines on the seam line.  Subtract the shoulder seam allowances and you'll get the length of your cowl. Mine was around 29".

2. Mark this length on a piece of trace paper.  I find self healing cutting mats to be really handy for this type of drafting.
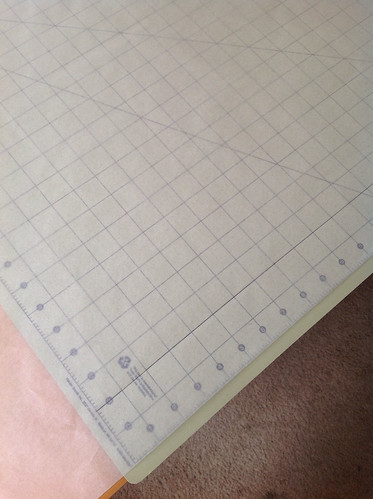
image
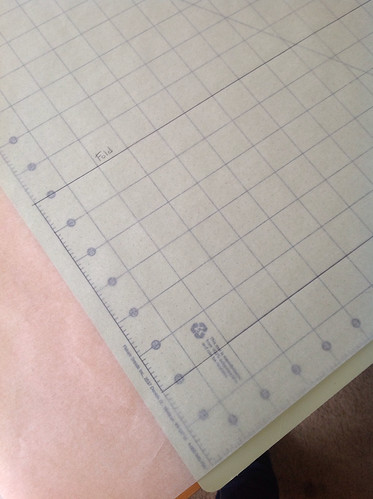
3. Decide how high you want the cowl to be and draw another horizontal line at that height. Mark that line as a fold line. For my finished sweater I made a 8.5" high cowl, here I'm drafting a slightly narrower 6" cowl.
image
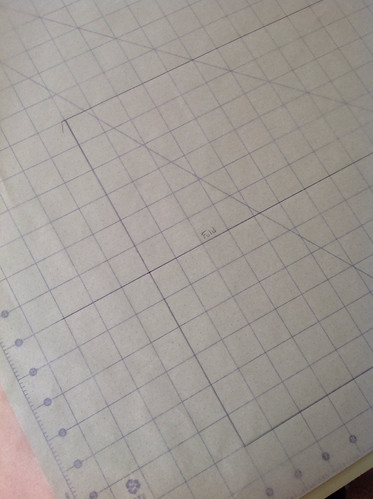
4. You'll be folding the cowl in half and sewing the two edges into the neck seam line so double the height on the page. In my example this makes the pattern 12" high.
image
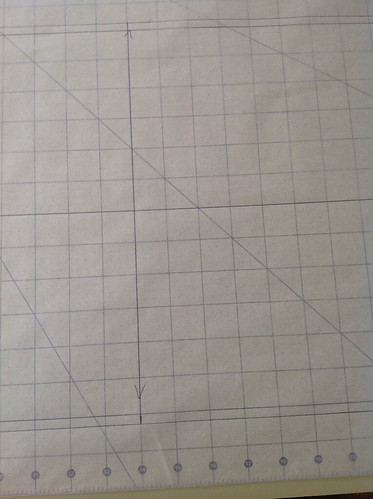
5. Find the halfway point on the long side of the cowl and mark it with a notch. You'll want to match this notch with a CF notch on your neckline. I've put my grainline at this location too.
image
6. For wide cowls you'll want to stick with a rectangle and add a seam allowance to finish the pattern at this stage. My Brair cowl pictured above has this type of cowl.

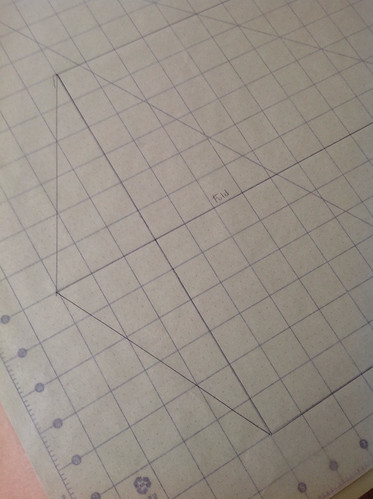
For narrower cowls you have the option of putting triangles on the short ends of the cowl.  This increases the diameter of the folded edge on the cowl which gives it more drape around your neck.  The trade off is that those triangles give the CB cowl seam a pointed edge.  The point is not very noticeable in a narrow cowl so  I've use this technique in this renfrew hack.
image
To draft this, increase the fold line a few inches and then draw a diagonal line to the seam line edges. Then repeat for the other end of the cowl. Add seam allowance and then the pattern is finished.

To sew the cowl.
1. When cutting out your front and back Briar pieces mark a notch at the CF and CB on the necklines.
2. Sew the CB/short seam of the cowl.
3. Fold the cowl in half. If you don't like lining 3 layers up at once then baste the long edges of the cowl together.
4. Set the cowl into the Briar neckline by lining the CB seam of the cowl with the CB notch on the back shirt. Line the center notch of the cowl with the CF notch on the front shirt. Stitch together all three layers, remove any basting and you're done.
5. Celebrate with a cookie. Then bring me a cookie, I'm outside your house leaning against a fence.

Briar and Espresso - A match made in heaven

11.20.2013

Sometimes a fabric tells you what it wants to be. Sometimes it also yells and screams "Just sew me already!!!" Here's the mouthy fabric in question, a 2 layer knit from Waechter's. The color is a tad off here as the top layer is a true black. Everything else is just as awesome in person.
I really shouldn't have been surprise that it wouldn't sit mutely in the corner.  It's all "Let's party with the young folks." It also told me to ignore my misgivings about giant butts in high/low hems and download that Megan Nielsen Briar pattern.  You want be to buy a new pattern? Well you don't have to twist my arm casue I got to keep my rep as "All the patterns Heather" to keep.
Upon completion of the Briar I released that it's the kind of shirt that allows one to commit the "sin" of wearing leggings as pants. But I had no leggings.....so I bought the Sewing Cake Espresso pattern. MOAR PATTERNS! The serger and coverstitch were both threaded to black anyway. One must take advantage of that and sew more black clothing. I can feel Katie nodding her head in agreement.
This time I could have the superior feeling of using stash neoprene fabric bought from Gorgeous Fabrics last year.  Confession time.....I like buying new types of fabric just to see what they're like. When GF started stocking neoprene some HAD to be purchased even though I wasn't sure it would result in a wearable garment. This stuff is about the weight of a ponte but has a lot more recovery both in the horizontal and vertical stretch.  One side is matte rib and the other has a shiny satin look.  The greatest amount of stretch was in the vertical direction and I was lucky the fabric was 58" wide, my drafted leggings pattern just barely fit. The plan was to go with the conservative matte side but I said, "Screw it, let's make shiny leggings."


I sewed the neoprene with my serger and used the coverstitch for the hems/casting just as I would any other knit. The satiny side was a little slippery but since the fabric is so stable I had little trouble sewing it together.

Patterns
Megan Nielson Briar and Sewing Cake Espresso Leggings.  I bought PDF versions of both these patterns and found them easy to assemble.
That was easy!
Fabrics used
For Briar a Polyster/lycra knit, still available.
For Espresso a thin neoprene knit, sold out.

Pattern changes/alterations
I made zero alterations to either of these patterns.  For the Briar I combined the med and large sizes as is my habit. Since it's a loose fitting style it needed no other tweaks.

The espresso is drafted to your measurements so they fit well right out of the gate.  I did add extra to the back rise and then found that it wasn't needed. Better to be safe than sorry!  I might add some extra length to the leg, just for personal preference, on any future versions.

Confessions/Advice
No advice per say, just a note that I used a plain black jersey for the neckband of my briar.  That worked a whole lot better than trying to serge a thin strip of the self fabric to the neckline.
Husband Comment
"Do you make those shiny pants! Cool!"  He made no comment about the shirt which probably means he doesn't care for it.  Or maybe it's awesomeness rendered him speechless.

My Final Thoughts
Briar - I still think the high/low hem looks best on women with regular/small sized backsides where is drapes in a pleasing manner. My backside just fills the available space but I like the complete coverage that the style provides. There are plans to make more, the first in some stashed sweater knit.  Hey I'm still "Stashbusting."

Espresso - Never thought I'd like leggings but my fellow sewcialists seemed to have changed my mind about them. This pattern is excellent for us ladies with more junk in the trunk, since the self drafting means you don't have to worry about short back rises and bending over. *Shudder* We've all had that problem with RTW, am I right? Never again I say!  Now let's rock out in our leggings as pants. WOOO HOOO!

Keeping it cool in Culottes

7.31.2013

Confession - sometimes I have trouble finishing things. There might not even be anything wrong with the garment, I just get the itch for something new and shiny. Always with the shiny.......Squirrel!   

Such was the lot of these lovey Tania culottes that languished around on my ironing board for 2 months only needing a hem. 
I really need to get a gaggle of sewing elves to do my hems for me.  Do you think they'd do zippers too?  I'd rather spend all that hemming time doing more fun things like cutting out fabric. (No that is not a joke and yes I am available for hire. Hee hee)
To show these culottes that I really do love them they got a coordinating Lady Skater Tee.  I threatened to make this hack after my first Lady Skater dress and finally did it.  It couldn't be easier just trace off the bodice and extended the side seams to about 16.5" long.  If your hippy like me give the side seams a slight curve out over the hips.
Use the coverstitch machine/sewing machine to give it a 1" hem and Bazinga done!

And now for our regularly scheduled pattern review.
Pattern
Megan Nielsen Tania Culottes  I caught culotte fever, or maybe I started it.....let's just blame the internet.
Fabrics used
Milly silk twill from Gorgeous Fabrics last year.   I love you Milly, give me all your silk and no one gets hurt.  Otherwise I'm finding your sample room and stealing some bolts.
I bought this fabric knowing it had a cream background and also knowing I look horrible in cream. Butterfly silk will make you do crazy things people.  (I know Katie is thinking, I would have bought it too.) Anywho when I saw Megan's culottes pattern it seemed like the perfect solution to the whole cream near your face problem.  Just don't put it near your face....Duh.

Pattern changes/alterations
The XL size didn't need too many alterations thanks to the inherent looseness of culottes.
1. Took in the waistband 1/2" at side seams.
2. Scooped back crotch 1".
3. Added 4" of additional length.

Confessions/Advice
1. I would have liked to make these a little longer but 4" extra inches was all I could squeeze out of my 2 yards of silk. 

2. When I made these up the center part of the culotte arc stretched more since it was on the bias.  I'm pretty sure the fabric being a twill was part of the problem. Anyway I had a really wavy hem that looked like this.
I let it hang for a few days to set the bias. Then measured the side seams and CF/CB to see how long they were.  Next  that length was painstakingly marked across each culotte crescent and cut it down with the rotary cutter.  I might have needed a stiff drink and a pep talk before doing this, "Sewing goddess be kind and don't let my rotary cutter do astray." She was kind, bless you sewing goddess.....have my silk scrapes. What, you want yardage?! Over my dead body.

Husband Comment
"A garment for women who don't like wearing skirts but want to look like they're wearing one."  Did he just google "Culottes"?  I mean thanks honey!!!

My Final Thoughts
If you don't let them sit around waiting for a hem for months these go together pretty quick. As others have said the CF/CB pleats are a cool design feature.
If you do have a lot of junk in the trunk, like I do, be prepared to be some what horrified at the volume of fabric cascading off your giant ass. It's like a train wreak you can't look away from. But a longish tee will tamp that down just fine. Then you can wear your short skirt/long shorts with abandon.  Swish them around cause it's fun, swish swish.

Me-Made-May Day 8 - Singing in the Rain

5.08.2013

Actually fish faces in the rain, I'm told it's what all the kids do these days.
Two me mades today, one that is a WIN and the other that's kind of a FAIL.  Let's break it down shall we.

WIN - Manequim blazer in stretch denim sewn in 2009
This is a free download on the Manequim site, but it only comes in one size. At one time I was that  size and took the plunge, even though all the directions were in Portuguese. Since I was no stranger to jacket construction, the whole thing together without much of problem.  (Some sewing manuals were checked, I'm not that amazing.)  Here's 2009 me in the jacket.
Burda Jacket front
Burda Jacket back
I do think 2009 me did a rather amazing job on the top-stitching, it really makes all those great seam lines pop. If I could marry a blazer it would be this one.

FAIL - Darling Ranges Dress in silk georgette sewn in 2012
I never wear this dress and it is no one's fault but my own.  First of all I didn't really know how to handle georgette and instead of researching on the internet I just charged ahead like a bull in a china shop.  The georgette was cut on some muslin, a technique that seemed to work for crepe de chine, but failed miserablely for this fabric.  Every pattern piece changed it's shape once I picked it up.  For more on that tail of woe you can check out the FO blog post, but let's just say the damn hem still pisses me off.
Darling Ranges Dress
The other dumb thing I did was not change the skirt. I hate gathers at the waist and think they are not very flattering for my figure, but kept them anyway.  Now I just think Ewwwww every time I put on the dress cause who wants to feel frumpy. What I should do is keep the top, which is super cute, and add a bias skirt or switch the gathers out for pleats.  Oh well, not everything is going to be a sewing success and at least this one is "wearable."

Darling Ranges Dress - The final stash project

7.30.2012

The Darling Ranges dress was one of those patterns I started started seeing all over the net and loved on everybody.  Months ago after buying the pattern I excitedly mocked up a muslin only to decide that the style didn't look all that great on me. I stuffed the muslin in my muslin graveyard and moved on with other projects.  After entering the pattern stash contest this month I was inspired to pull out that muslin and give it another look.  My new conclusion was that the bodice needed more fitting work and that the dress would look better on me sewn up in a lightweight fabric like this stashed silk georgette.

Due to my large bust, sway back, wide upper back and stomach pooch I needed to make a lot of adjustments to the pattern.  Here's a list of everything I did along with pictures of my final bodice pattern pieces.

1. Did a FBA adjustment of 1" and then dropped the bust dart an additional 3/4". Decreased length of dart about 1". The Darling Ranges dress already has a rather large dart so the FBA made a monster one. I took the extra dart intake and rotated it into the shoulder to compensate for the additional width added to the back. This still made the front bodice shoulder too wide so I just cut off the extra, basically cutting a new neckline as it were. This shouldn't have worked but it did.
Final front bodice pattern. I should buy some scotch tape stock.

2 Increased width across the back 1".
3. Increased length of front and back bodice 1 1/4".
4. Added 1" wide darts to back bodice.
5. Forward shoulder adjustment a rather large 1".
6. All this messing about with the front and back bodice seemed to make the back neck too scooped. I filled in back neckline 1" at CB blending into the existing neckline.
Final Back bodice pattern.

7. The side seam was too far to the front on me so I added 1 1/2" to front bodice side seam and reduced back bodice side seam the same amount.
8. Did the same rebalance of the side seams on skirt front and back.
9. Increased length of dress 1 1/2".  Also did a narrow shirt tail hem to keep some length.
10. Did not gather sleeve hems but added sewn on cuffs.  Cuffs just seemed to be something that would look super cute with this style.
11. Left off the back ties since I'm planning on wearing this with a belt.
12. I added fashion sewing supplies tricot interfacing to the facings and to my cuffs.
After 3 muslins sewing this baby up was going to be a breeze right?  Maybe if I'd grabbed some trusty cotton, but no I had to pick the silk georgette. 
I used the cutting trick of putting the fabric on top of some muslin which had worked so well with my crepe de chine blouse.  Sadly the georgette was not so accommodating.  The cut out pattern piece would look great on the table but as soon as I picked it up the fabric would shift all over the place.  In hindsight I probably should have used that trick for chiffon of washing the fabric in some gelatin.

Sewing was also challenging especially since most of my pattern pieces where not the correct shape. (Thanks to my shoddy cutting job)  I had to do some recutting and little bit of crazy easing in places.  After resewing the bias binding on the neckline about 5 times I gave up and decided the neckline was not going to lay flat in this fabric.  Getting the hem line semi-straight look days since I have no dress form or close by friend to sucker into pinning the hem while I was wearing the dress. Basically my husband was wondering why I was ranting about sewing for a couple of days.  Sorry honey, I really need to bone up on my georgette sewing skills.

Despite all the self made aggravation I really like this dress in georgette, the pattern just seems to mesh well with the design.  The dress it's self is very cute with it's V-neck, handy skirt pockets and 3/4 length sleeves (I love my little addition of cuffed sleeves.)  The gathered skirt is probably not as flattering on me as a darted one but with a belt I can pull it off.  I'm planning on wearing it with some gray tights in the fall and maybe a little blazer if one happens to get sewn up by then.  So thumbs up to Megan Nielsen for an awesome pattern. Maybe I'll make another one in some fabric that easier to handle. :)

Flickr set here if you want to see some inside shots of the dress. 
Proudly designed by Mlekoshi pixel perfect web designs