Motorcycle Jacket Project - Part 3

8.31.2012

Stick a fork in it cause the motorcycle jacket is done.  Time for fun finished object pics.
 
Front view zipped and unzipped.
 
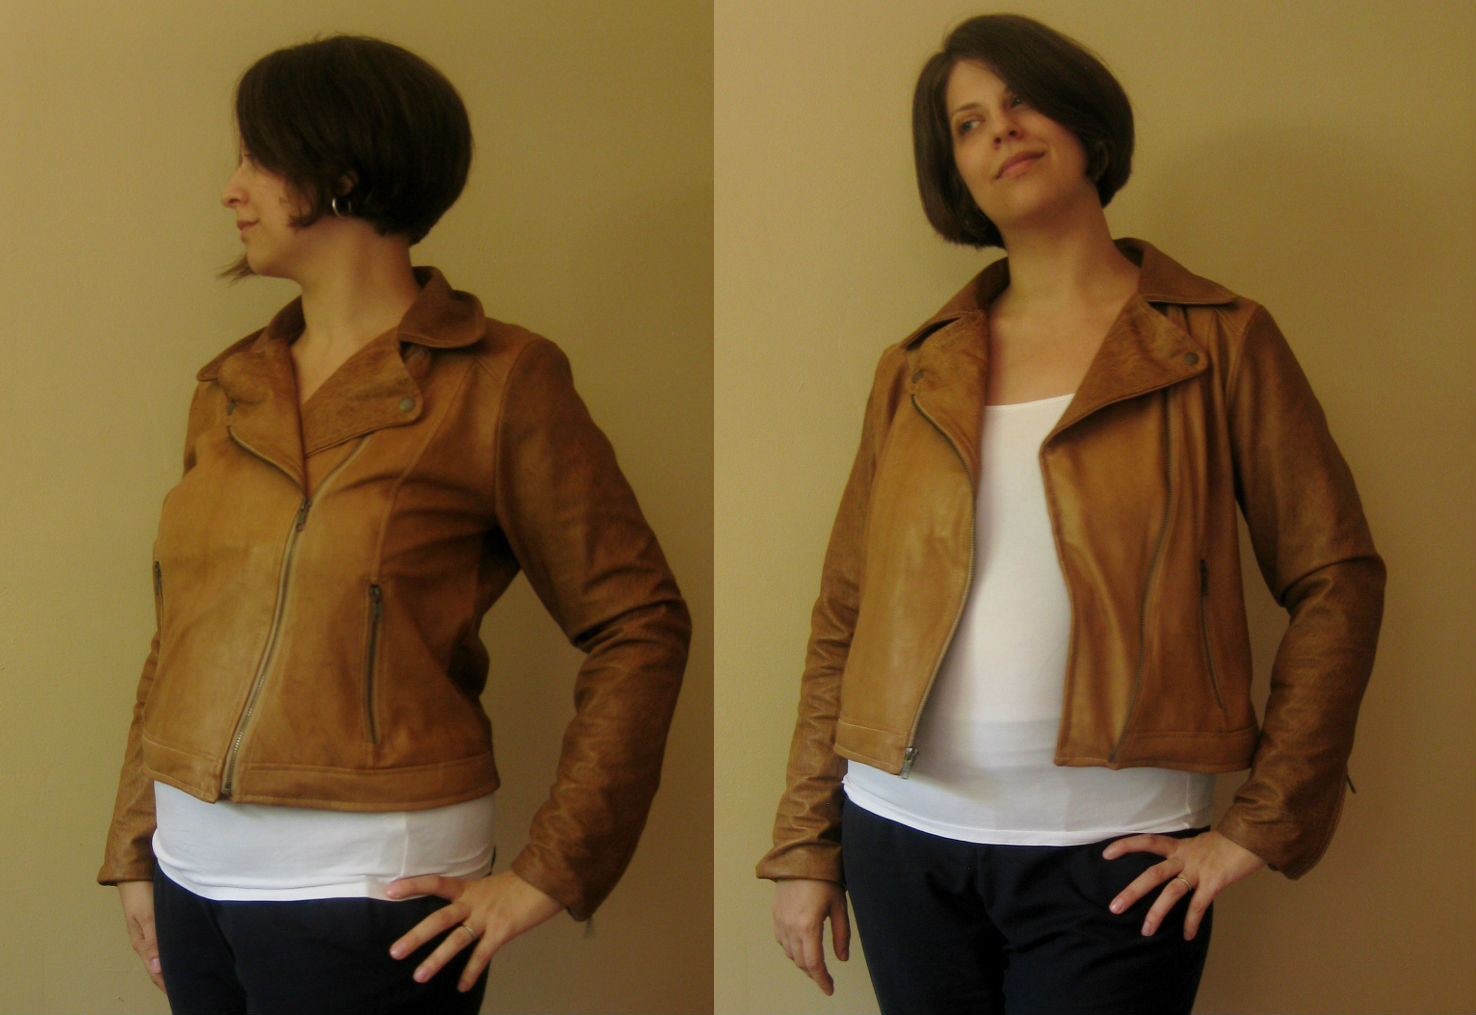
One of the things I really liked about the original fossil jacket is that it looked good zipped and unzipped.  The width of the left front facing and the snapped down lapels balances out the off center zip.
 
A close up of the snapped lapel.

Didn't have any luck finding the kind of metal snaps you see on RTW leather jackets so I bought size 24 Antiqued Brass snap heads from Snapsource.com.  The look of the snap head is nice and they work well for a decorative snap that won't be used much.   I don't think this leather would hold up to a lot of snap usage, its a bit delicate.
 
You've already seen the pocket zipper but here a little look inside the pocket.
 
 
Sleeve vent open
 
 
Back view
I did sacrifice a little upper back width for a slimmer looking silhouette.  The sway back adjustment could have been a little bigger.  That's OK, learning fitting is a work in progress. :)
 
The decorative back tabs, the other use of snaps in the jacket.
 
And finally a little shot of the lining.


More photos on the flickr set here and if you want to read my pattern review on this project go here.  There are many beautiful jackets entered in the lined jacket contest. Take a look if you have some time.  Some of those beautifully tailored jackets make me feel like a beginning sewer.  What great inspiration to do some more learning about making tailored jackets.

Motorcycle Jacket Project - Part 2

8.30.2012

August, where did you go?   I think it got sucked down a black hole of jacket sewing and 2nd birthday party planning.

I've been making great progress on the motorcycle jacket project, partly because I bought the original jacket and have been using it for construction details. After all my sewing is done I'll be returning the store bought jacket and wearing my own. :)

Speaking of construction details..... how about some photos of zippers sewn in leather?

First up, the inseam zipper pocket.  I'd never sewn a pocket like this before but "Threads" August/September article about sewing exposed zippers helped a bunch.

Inseam zippered pocket

My construction steps were as follows.

1. Sew seam together, leaving hole open for pocket area.  (Don't want unnecessary holes in the leather)
2. Cut miters on both ends of pocket area for the squared off top and bottom.
3. Topstitch wider line of stitching so that you have a slot in the leather to insert the zipper.
4.  Sew pocket bags to the zipper tape but do not join the bags.
5.  Place the zipper in the slot and topstitch again to attach it.  Don't get your pocket bags caught in the topstitching.  (This is where you might realize your machine doesn't like all this leather and zipper nonsense)
6. Sew pocket bags together and finish the edges.


Things I've learned the hard way,
1. Cutting down metal zippers is all well and good until you try to sew over the teeth and break your needle. Duh.
2. Double stick tape does not stick to zipper tape fabric.
3. My sewing machine doesn't do all the well with this sort of topstitching.

All this adds up to me having to handstitch that zipper in using the topstitching thread and the needle holes made by the sewing machine.  You can tell the thread tension is different, but it's better than ruining a bunch of leather.


The sleeve vents were a little easier since the zippers are inserted like a lapped zipper.  I only had to hand stitch the end because of the metal teeth.  There is a wedge shaped piece of leather behind the zipper, which increased the width of the sleeve hem.

Sleeve vent zipper
 Construction details on the sleeve vents.
1. Sew sleeve seam up to point where zipper will be inserted.
2. Fold back seam allowance on both sides and topstich close to edge.
3. Attach the piece of leather that goes behind the zipper to the zipper tape.  (I used pins here, GASP! In my defense it was the only time a pin was used.)
4. Place topstitched sleeve edges on top of zipper and topstitch a wider line of stitching to attach zipper.


The only thing left to do is finish attaching the lining to the leather shell.  I'm a big fan of bright linings so I used this silk crepe de chine roll end from emmaonesock.com.  Mmmmm petty!

Motorcycle Jacket Project - Part 1

8.11.2012

It's official, I've joined the lined jacket contest over on PR.  Figured after making 3 muslins I'd already committed to the project and was having too much fun stalking the message board not to join in.
The first muslin was just a straight up sewing of the Burda 111 to check if the style would be flattering on me.  That worked out well, so I started modifying the pattern to make it more like the fossil jacket I'd been longing to buy.

The to do list looked something like this..
1. Move princess line seams towards the armhole.
2. Add new seam for the off center zipper.
3. Cut out slanted yokes on front and back.
4. Cut jacket body so there is a sewn on belt like bottom
5. Redraft collar so it is a 2 piece with collar stand.
6. Do normal fitting alterations - forward shoulder, wide upper back, narrow lower back and decrease sleeve cap ease.

I made the changes for the princess line seams and the zipper and made up a second muslin to see if my pattern drafting instincts were correct.   No pic of that, but the changes seemed to be on track.    So then I carried on making the rest of the pattern changes and decided to mock up muslin #3 in some cheap pleather that was in the stash.  That way I could get a little experience with sewing right the first time and see how the jacket looked in a fabric closer to leather.

It seems like I'm in the general ballpark now but there are still some ease issues to take care of.  It seems that there is too much ease in the upper back now and maybe too much still in the lower back.  I don't want to make the jacket too tight to wear over a few layers but I want it too big either.  So back to pattern drafting for me.  Drat.


Things in progress

8.05.2012

Now that the pattern stash contest is over some new pattern purchases were pushed to the top of the sewing list.

Waiting for buttons is the StyleArc Victoria blouse in cotton voile.
My JoAnn's didn't have any decent navy buttons so it looks like some web shopping is in my future.

Also from StyleArc the Karen Walk Shorts in khaki twill.  Everyone needs some khaki bottoms but boy are they boring to sew.
Ran out of thread for these right after my trip to JoAnn's so they're on hold until the next trip.


I'm also thinking about entering the Lined Jacket contest on pattern review. Like to turn this motorcycle jacket pattern from Burda 12/2009...

into one that looks a lot like this fossil jacket.

Just cut out muslin #3 for this design and it seems to be moving in the right direction. We'll see how it goes.
Proudly designed by Mlekoshi pixel perfect web designs