Odds and Ends

1.28.2015

I'm knee deep in a coat sewing project and all sewing mojo has run off on a tropical vacation.  Not fair sewing mojo, you were supposed to take me with you.  That's what the stash of tropical print fabric is for!
I've been coping with my disappointment by marathoning murder mystery programs while knitting. The coat moodily glowers at me from the other room but I don't care. La la la laaaa, you don't exist coat, it's just me and my yarn and we are sooooo happy together. (Yarn is Madelinetosh DK in Flash dance and the pattern is a vintage Sidar, if you're wondering.)
It looks like it might be awhile until the sewjo returns to help me complete a project, so I'd better clear out some odds and ends in the meantime.

#1 - This year I'm going to participate in Vintage Pattern sewing pledge. My desire to sew more vintage patterns has been stoked by the Christmas dress project.  The vintage pattern stash is pretty small, so I'm setting the modest goal of sewing up 3 patterns this year. Here are two of my newest acquisitions that I'm pretty excited about.

#2 - We decided to do themes for the stashbusting sew-a-long a little differently this year.  Each month is going to be hosted by a different blog. In February Judy is having a big fabric contest complete with prizes. It sounds like she's set up a great bag of goodies, so you might want to stop on by to see if you want to sew along.  I'll be hosting March where the theme is "Using patterns you already have."

#3 - I'm the sewing superstar of the week over at Cut Out + Keep.  If you like reading my weird questions to interviews then check it it. ;)

Alright, I'm gonna stare at my coat lining now and wiggle my fingers around hoping it will attach it's self to the shell. Have a great week folks!

Sewing on and off the List

1.21.2015

Every year I try to start off strong with my stash busting plans. Usually I'm in the mood for it and it's good to get the numbers down before my inevitable fall off the wagon in June. Warm weather makes me buy novelty prints, lots of them.

I admitted in the last post that my sewing plan for January was to sew all the things that were planned in December. When I say "planned" I really mean things that were floating around in my head. Things that I might have bought fabric for during Black Friday sales. Yeah, this girl is a horrible stash buster at the end of the year too.

The December but now January sewing list.
1. Red circle skirt
2. Black circle skirt
3. Another red pencil skirt
4. Plaid shirt dress
5. Plaid top of some kind

While I was hopped up turkey it seemed completely possible to sew all this stuff plus a Christmas dress. Yep, there needs to be an oversight committee for my sewing plans. "Excuse me Mrs. Beckley. Are you planning on never sleeping during the month of December?  Or maybe you are exploiting a small gang of furry frogs as sewing slaves?"  Exploit?! They have all the baked goods they can eat!

Annnyway, back to those sewing plans.  Ugh plans. I hate real plans in writing because they suck all the joy from my sewing.  No one tells me what to do with my hobby, not even me! So after looking at the sewing list, I went off and cut out a fruit print 
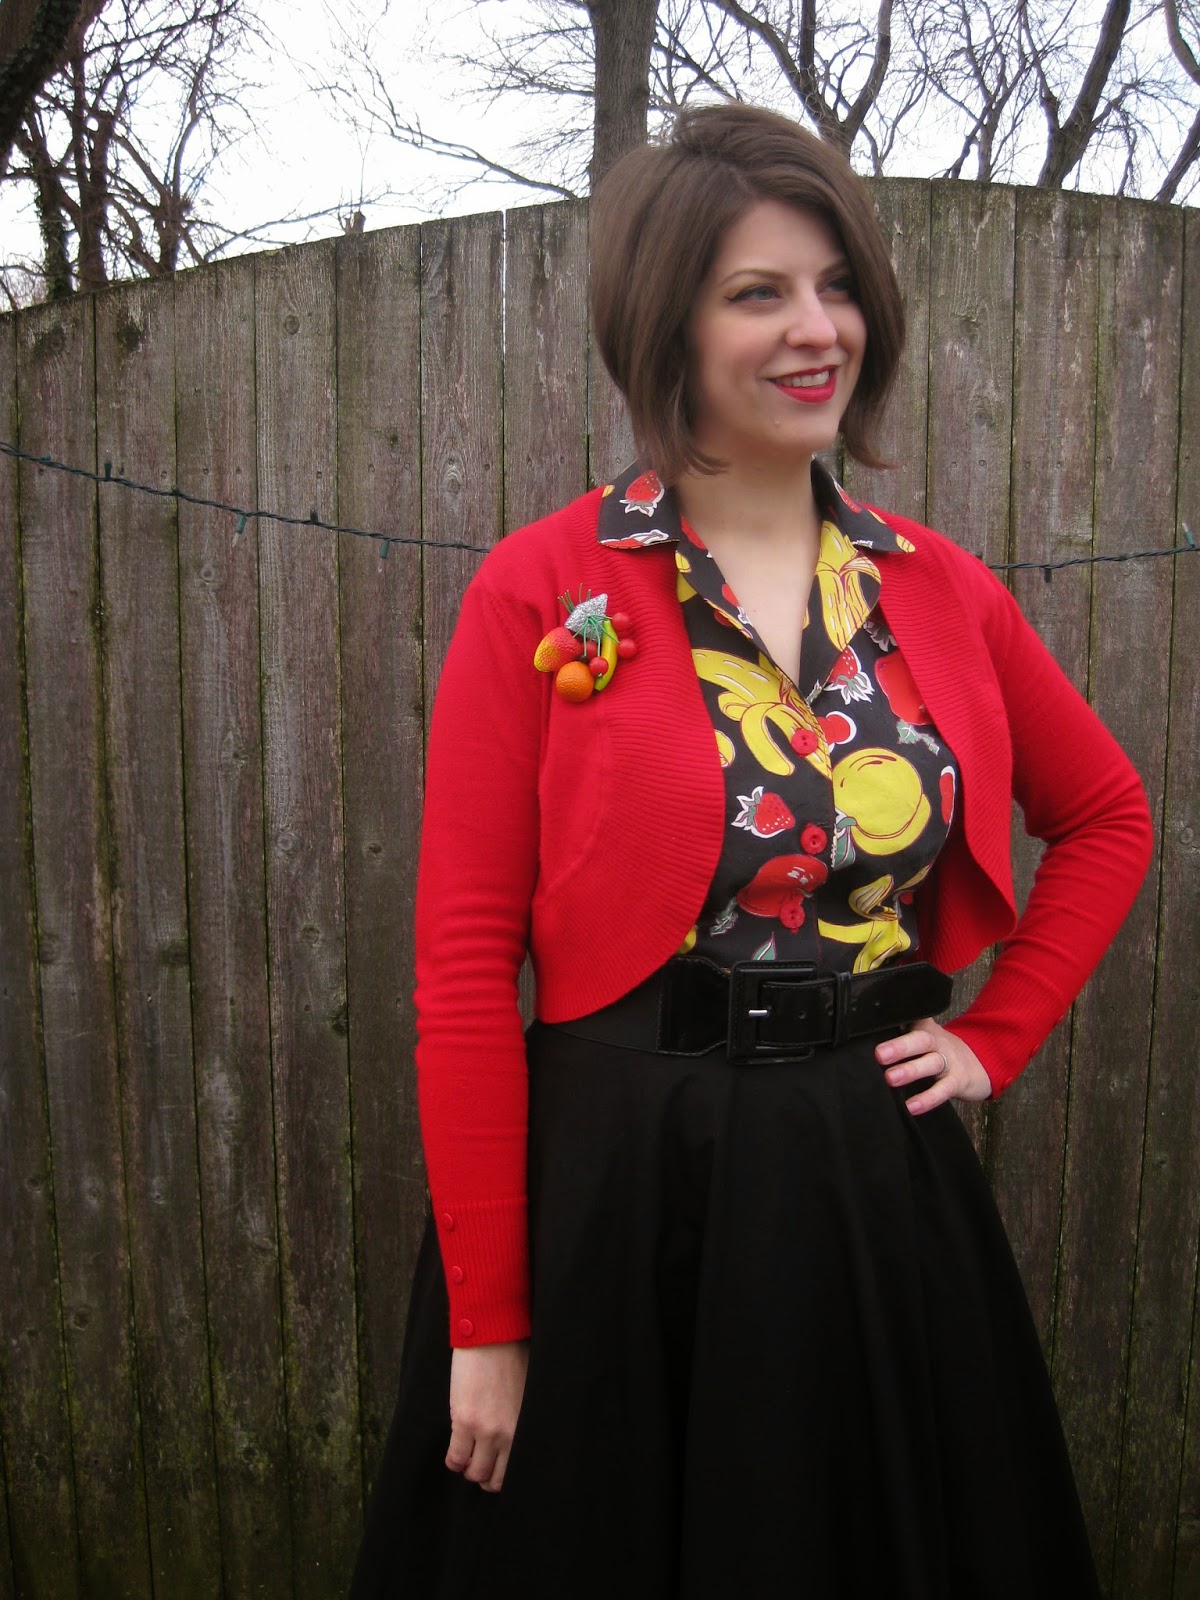
Edith blouse.  Suck it list!
That was all well and good except the fruity cotton was a small vintage cut of fabric. There wasn't enough yardage for me to squeeze out self bias binding for the armholes. What to do, what to do?  Oh wait, I have black cotton poplin for that circle skirt. That would work great.....except I'll need to cut the skirt out first. Crap, guess I have to sew from that stupid list. (Cue sad horn)

I went the easy route and purchased New Look 6056 after seeing Margo sew it up.  Sure I could have messed around with maths and drafted myself one. Honestly I didn't have the head space for that after Christmas + germs. Take my 5 bucks and give me some mindless tracing.
I mindlessly traced the size 18, the one which corresponded to my waist circumference.  Surely I didn't need to worry about extra ease in a simple circle skirt. Who wears a circle skirt on their hips? Guess what, New Look thinks you should because I found 4" of ease needed to be removed. Lord have mercy.
I was a bit put out about having to rip apart what was supposed to be a quick project.  Then Froggie pointed out that I could have taken...oh 5 minutes....to measure the waist area on the pattern before starting.  Fair point.  I shall don the ribbons of Shame along with the ribbons of Laziness.

The one good thing about having to rip apart a garment, is that you might as well make some other changes. I decided to widen the waistband so it would look "nicer" if shirts are tucked in. Instead of cutting one waistband piece, I cut two and used one as a facing. The waistband still closes with skirt hooks on the side. This works fine but it's not my favorite finish.  If I remake this pattern I'd attach the zipper to the waistband as well.
Here's the full deets on the pattern...

Pattern
New Look 6056 (Now OOP, but still pretty easy to find)

Fabrics used
Kaufman Organic Cotton poplin from Fabric.com.  I bought this version because of it's wider width.

Pattern changes/alterations
1. Removed about 4" of ease from the side seams.
2. Cut the waistband out twice and sewed the upper edge at 3/8" seam allowance. This gives me a 1 3/4" wide waistband.
3. Did not use either suggested length from the pattern. Instead I cut the skirt to be a finished length of 28".

Confessions/Advice
- Don't be like me, measure the waist circumference before you begin!

- The skirt was cut cross grain to get the pattern to fit at the longer length. In this light weight fabric that worked fine.

- The waistband facing and the hem were all done on the machine.
- I'm wearing my Christmas petticoat under the skirt in these photos. The pattern looks equally well without it.

Husband Comment
He didn't have anything to say about the skirt, but this comment about the Edith blouse was too good not to share. "I like fruit on a black background. It's like your shirt is a dangerous jungle at night."

My Final Thoughts
Sewing a black circle skirt is a terrifically boring project. I coped by putting an audio book in my ears and machine finishing nearly everything on the garment. At least the cotton poplin was most cooperative with my time saving efforts.  That stuff don't get uppity notions about moving around after you pin it.
OK, I belly ached about a lot of things in this post, but do I like the finished garment?  Yes, it's great to have a black circle skirt in the closet. Too bad it couldn't magically appear in there without my involvement. What am I paying my slave frog work force for anyway?

On that note I'll leave you with the obligatory circle skirt swish photo. Yeahhhh petticoat swishing is awesome.
P.S. If you're new to the blog and want more details on Edith then here's the original review.

Stashes, Pledges and Whatnot

1.15.2015

It's January so it's time for well meaning pledges which we may or may not follow through with. Woo hooo, zero blog accountability!

All jokes aside, I did make a stash busting pledge last year and did really well with it. Yes I still bought plenty of fabric, *cough* 154 yards *cough*.  However I sewed up/give away/trashed a lot more then that.  Thanks to my trusty excel spread sheet, I can confirm that my stash is now 97.5 yards lighter than it was at the beginning of the year.  Cue balloon drop and the donning of party hats. Froggie has cake for everyone on the side board and you can also admire the 2014 purchase of a Bernina 350 sewing machine.  (Big thanks to my immediate family who also contributed a good chunk of the sewing machine money.)


But now it's time to wipe the cake crumbs from my mouth and commit to another year of stash busting. Yes the stash is lighter, but somehow uses up the same amount of storage space.  At least I don't have to sit on the rubber maids bins to get them to lock anymore. They're "only" filled to the brim now. Baby steps, baby steps. Good news for me is that the Stash Busting Sew-a-long is in it's 3rd year and we have a great bunch of ladies in the facebook group. So without further ado here is my stash busting pledge for 2015

I, Heather Beckley, commit to stash busting enough fabric so that one of these containers can be removed from the floor of my bedroom.
This is not the main stash, it is the larger satellite stash. Which should not be confused with the smaller satellite stash down stairs next to the sewing machine.  I know, I know, big time hoarding. How many yards of fabric are in one of those bins?   Ummm lots?  Am I going to go measure the fabric lengths to find out?  God No! Instead I'm going to try and limit my purchases and sew up a bunch of stuff I've already got. Amorphous goals totally work people.

Froggie felt this whole plan needed his expert help, so he jumped in and asked me a few questions.
"What is your plan this month to sew up stash?"  
Right now I'm sewing all the garments that were planned in November/December. News flash Heather, there's no time to sew all those red/plaid/Christmas print garments in December. If you want to theme dress you've got to get beat your sewing elves into productivity right now! In December they run off to bake cookies. Stupid elf union.

"How are you going to limit purchasing pretty new fabric?"
Well thanks to the snazzy excel spread sheet,  I now know that my monthly sewing average is around 12 yards.  I'm going to try to buy less than what I can sew in a month. You should also change my paypal password when my back is turned.

"What types of fabric will you buy with abandon, conveniently forgetting your stash
busting pledge?"
Florals on black back grounds, anything with a fruit on it and probably any sort of red solid.  Snow leopard of course, cause that's a neutral and lobster prints, lots of lobsters. Oh and frog fabric, you are the top animal in the house.

"Sometimes that guy you married tells you that you have enough fabric. Does this help with stash busting?"
No, I then go spite buy fabric. I'm a horrible person.

"Will I be able to sleep in/eat cake on any fabric that arrives in the mail?"
You are more than welcome to make a frog nest in any fabric.  I would ask that you restrict cake eating to on top of the sewing patterns. I can't fault you about that cause I'm doing it too.

"How can I convince you to spend your fabric money on frog shoes instead?"
What do this shoes look like? Are they red with white polka dots? Can I also get a new pair of human sized shoes? If so we might have a deal.

"I think I hear the oven timer. Can we go eat some cake now?"
Yes, yes we can.

P.S. The Stash busting facebook group is a closed group only because we didn't want to clog up our main FB feeds.  We'll happily accept any new members who want to join the stash busting effort.

Operation Xmas Dress Part 4 - The Real Deal

1.12.2015

Yessss, it's finally time for the "sexy dress reveal" post.  Learning about fitting is all well and good, but it can't compare to finished garment eye candy. Warning, this post is overly photo heavy, cause reasons. Now let's get to it, shall we?

My first fabric choice for McCall's 9572 was green velvet, not crushed or panne, but regular velvet. However my internet searches did not turn up much in the way of regular velvet.  The only site that had something similar to what I was looking for was Michael Levine. Their emerald green velvet was lovely, but at 30 bucks a yard for 45" wide fabric, it was too rich for my budget. I consoled myself that sewing bias seams in velvet isn't something you want to do on a deadline.  Probably one of the smarter decisions of my life.

So right about the time I was admitting to myself that velvet wasn't going to happen, Sunni posted about wool crepe over on her blog. Ahhh wool crepe. Now that's a fabric that would drape well on the bias and wouldn't be a bear to sew.  I checked out what colors Sunni had in stock and low and behold she had the perfect color of hunter green.  The color pretty much sold me and 4 yards were soon on their way to me. People this color is GORGEOUS!  My camera can not fully capture the lovely depth it has. Wish I could mail you all swatches or something so that you could behold it with your own eyes. Mmmmm fabric crush.  
As you would expect, the wool crepe sewed up like a dream.  I did line the bodice portion of the dress since wool feels a little itchy when it is next to my skin. My "chiffon" petticoat took care of shielding my legs from the bottom half of the dress.

This pattern has cut on facings that are folded over and catch stitched to the seams. The directions suggested finishing the edges with bias binding and calling the insides done.  Personally this made me nervous since the entire neckline is on the bias. For my own peace of mind I fused the facing part of the bodice and then sewed twill tape right next to the area where the facings fold over.  Then I drafted a lining pattern by tracing the bodice pieces and removing most of the facings, leaving only a 5/8" seam allowance to attach it.
Some polyester leopard lining was chosen from the stash and I then found out why this pattern didn't tell you to line the bodice.  Ummm yeah, sewing 4 right angles is a complete pain in the ass. There was much ripping, clipping and cursing at past Heather. What the hell had she been thinking?  Only by some miracle did I get that lining in without major puckering at every point. Maybe the sewing goddess likes Christmas cookies.

The dress has a side zip for getting in and out of it.  I was going to do a regular invisible zip because me and invisible zips are best buds. My local JoAnn's had other plans for me since the only green invisible zip color they had in stock was olive green.  You had one job JoAnn's! Instead I had to buy a regular zip and hand pick it. BLARG. 
It did not go well...at all. Just getting the one side of the zipper in took me half a day.  Then I thought the zipper was done, unpicked it, and found that I hadn't hand stitched close enough to the tape and the entire seam allowance was free. GAHHHH!  So let's just all admit that we have different talents and hand picked zippers isn't mine.  However if you need an invisible zip sewn in with a perfect join in about 20 minutes then I'm the girl to call.
The rest of the insides are sergred and I finished the skirt with a small rolled hem as called for in the instructions.  Thank god for audio books to distract you from endless hems.

The final step for my Christmas dress was to make a self covered belt.  I lucked out and found a lady on Etsy who was destashing all of her of vintage belt kits. They were all added to my stash. Muhaaaa Mine!
This was my first time making a belt and it turned out OK for a beginner.  Wool crepe isn't the best fabric to start with since it does like to ravel. At least the worst looking ravely bits are all on the back side and can't be seen when the belt is worn. Putting, "more self covered belts" on the to do list for this year, so that I can get better at the skill.

Ahhh, so those are all the details on the Christmas Dress.  I was super pleased with how the whole thing turned out.  The dress was very comfortable to wear and I loved how the hunter green color looked with the red accessories.  It all went together just perfectly and I had that mental glow of a big project that turned out well.  

Thanks for sticking with me through this series that took longer than planned.  Now we can look forward to 2015 sewing. Hooray!

(Throwing in this less than great picture in because you should have at least one picture with a Christmas tree in the back. Look red petticoat!)

Operation Xmas Dress Part 3 - Fitting Adjustments

1.06.2015

At long last another post in the Christmas dress series. In the last segment I'd futzed around with grading until the pattern fit my general dimensions. Today I'm going to talk about the fitting adjustments that were made to fit the pattern to my figure.

After trying on muslin #2 I had the following concerns - the dart had been dropped too low, the front neckline still felt a bit big, and there seemed to be too much extra length in the shoulder area. I also had figure out what skirt length to use.

In the end I made a ton of bodice muslins and quit at the point were my patience ran out.  You'll only see the final muslin since people under deadlines can't wait to favorable photo days. (There wasn't much difference between them anyway.)

Break down of all the final fitting adjustments. 
1. Raised the bust dart 1/2".
I'd previously dropped it 1.5 inches from the original position, so final dart location is 1" lower than the original.

2. Put a 3/4" hollow chest adjustment in front neckline.
In muslin #2 I felt neckline was still exposing a lot of my shoulder.  I'd picked a dress with sleeves so that I didn't have to mess around with special undergarments, but the neckline was exposing the whole bra strap.  Adding a hollow chest adjustment helped bring the neckline closer into the neck, giving me more bra coverage.  I didn't need to adjust the back neckline in anyway, probably because my forward shoulders need extra length in that area.

3. Removed 3/8" of grading in the shoulder area only. This change was made to both the front and back bodice.
McCall's 9572 has an elbow dart and it wasn't in the correct position. With the added grading the shoulder area felt a bit too big, even though the waist was perfect.  This makes sense because my shoulder/bust area is a size smaller than my waist/hip area.  Lucky for me a solution wasn't hard to figure out.
I'd put one of the grading lines right next to the side seam and decided it to use the underarm notch as a separation point.  I cut the notch deeper so that it connected with the grading line, breaking it into two parts. Then I removed 3/8" by moving upper part of the graded area back together. This operation left a small bump out under the notch area. To "true" the area I redrew the underarm curve.  Here's a picture of that adjustment before add the sloping shoulder adjustment mentioned in step 5.

4. Raised the kimono sleeve curve 1/2".
The ease in the upper part of the kimono sleeve was a bit too much for my modern tastes.  I decided to reduce that area by raising the curve of the kimono sleeve and narrowing the upper part of the arm. To do this I redrew the curve 1/2" higher than the original position and blended the underarm seam into the elbow area. (Didn't take a picture of this before cutting off the excess. Oops.)

5. Made a 1/2" sloping shoulder adjustment to sleeves.
After mocking up some of these changes I was still getting a horizontal fold across the back at the sleeve area.  (Super crappy photo below so you can get a general idea what I'm talking about.)
 Instagram was polled about this problem since I had no idea what was up. The general consensus was that it was excess fabric from my sloping shoulders.  I made a 1/2" adjustment for this using the "Fit for Real People" technique pictured below.
I'm only half convinced it made a real difference to the fit. Seems I need to work on more kimono sleeve fitting.

6. Shortened bodice by 1/4".
Took a scant quarter inch off that the bottom of the bodice. This length probably could have been left on because I ended up lining the bodice.

7. Shortened skirt by ????
OK I do know how much I shortened the skirt, it's just different in this muslin than it is in the final dress.  The muslin was shortened by 6" which turned out to be too short with the bias sucking back up.  On the final dress I shortened the skirt by 2".

Here's what all those adjustments look made up in the final muslin.

Front

Side

Back
There's still some wrinkling going on under the arm on the back. I may need a larger sloping shoulder adjustment then a 1/2".  On the other hand kimono sleeves without gussets are going to have more ease which equal wrinkles.  It's something I could have worked on some more, but decided that it wasn't worth the effort. Girl can't wear a muslin to her in-laws house on Christmas day.

Part 4 "The final dress" post will arrive when ever I get a photo opportunity. So far non rainy days have been few and far between and usually happen when I'm the sole parent around. Let's hope the next one collides with some toddler free time and maybe semi-warm temps.


Proudly designed by Mlekoshi pixel perfect web designs