ModCloth Knock Off - Part 2

10.31.2013

*In the last episode of "Handmade by Heather B," Heather and her trusty sidekick Frogore were engaging in the dark side of pattern mashing, hoping to clone a Modcloth jacket.  Were they successful or did their creation run amok? Stay tuned to find out*

After my second muslin, I was feeling pretty confident that the shape was pretty close to the inspiration garment.  Let's just take a look at that again.
I decided to redraw the back peplum seam a third time and mock up the body of the jacket in fashion fabric.  That way the question of a one or two piece sleeve could be put off as long as possible. I was also hoping that given enough time Frogore might convert that sleeve for me. I should have known better, he only makes candy disappear.

In the end I did convert the sleeve to a two piece in a way that was truly heinous and will not be spoken of again. (No tutorials on that people. I don't want to teach you bad habits that shouldn't work.) The only other tweak made was to take in the front edge by 3/4", for a more pleasing look.

Since the search for jacket weight skull fabric came up dry, I did a bit of stash diving and decided on a lace print synthetic of some sort. At least that's what I think it is since it doesn't hold a crease that well. This mad scientist really should keep better notes on the stash since the "abby normal" brain can't remember jack.  But without further ado I give you.... My Creation! Frogore throw the switch! MUHAAAAHAAAHAA!

First up a front and back collage so you can do a little compare and contrast with the original garment.
Jacket collage
Close up on the buttons and collar.  I must be standing a bit funny because the collar doesn't look even on both sides.  I assure you that despite an "abby normal" brain I can balance a collar evenly.  Just take this fun sized candy bar and nod your head yes.
Jacket 4
Like the inspiration garment, the jacket is closed with self covered buttons.  On the other side is one silver button to keep the overlap from flopping around.
Details Collage
Trying to give you a decent photo of the sleeve head but failing. How about a process sleeve head shot instead?  The only thing I'm not entirely happy with is the support for the sleeve head.  I bought very nice shoulder pads from Gorgeous Fabrics, but the heads could really use more support than that.  What kind of support I'm not sure. Frogore should have done a little more research for me.
Sleeve Head Collage
Here I must be really excited to show you my lining, or maybe Frogore was making funny faces at me while we took pictures. He is quite the cut up.
Jacket 5
Finally cause I like you and Halloween's supposed to be about treats....a nice collage of my decorative seams. I'd offer you more chocolate but it seems to have gone missing.
Seams detail
So what did the towns people think?  We'll some of them weren't too sure of my 80's linebacker shoulder line. I managed to convinced them that it's what all the fashionable mad scientists are wearing this season.  The rest were immediately won over by the snazzy lace print and constructed a catwalk lit with their torches.  I'm currently demonstrating my "Blue Steel" while Frogore pockets their change for the next project.  Happy Halloween!
Happy Halloween

ModCloth Knock Off - Part 1

10.30.2013

Hello everyone, long time no post.  I've been sidelined by a series of minor head colds, social commitments and some secret pattern testing.  I'm not done with all those things yet, but I didn't want October to end without talking about my lined jacket project.

The Pattern Review Lined Jacket contest fell in the month of October this year and it's one that I always sign up for.  Probably because jackets/blazers have always been my favorite garment to complete. I might not wear them much, at least the blazers, but oh do I like sewing them.  Besides some day my child will take CEO mommy seriously because I'm wearing a kick ass blazer.  Shhhhh a girl can dream.

This year I decided use the PR contest as a kick in the pants to finally knock off this ModCloth jacket.
The sleeves, the peplumish back, the asymmetrical closure! I love it all.  I'd also give my eye teeth for that skull fabric but you can't have it all. Sniff, sniff.....psst modcloth suppliers, call me.

Now if I'd been a good "clean" pattern drafter, I would have finally made myself that blazer block and drafted this from scratch.  Inside I decided to change my name to Frankenstein, stitch a bunch of patterns together and then further hack them to shreds. I'm a monster I tell you, A Monster!!! I had my assistant "Frogore" collect these bodies....I mean patterns...for my crimes again science/fashion.
1. For the main body - Sewaholic Cordova.  Princess line seams, check!
2. For the sleeve - Style Arc Gabby jacket. These are the funky sleeve heads you're looking for.
3. For the collar/lapel area - Random Burda Jacket in one of my old mags. Sorry, Frogore was a little hazy on this one. He just threw a collar at me and said, "Make it work."

So I half haphazardly traced these three patterns together and then made a few changes.
1. Made the lapels bigger and similar to shape to the inspiration jacket. Also make the upper collar band thicker.
2. Turned the front shoulder princess line into a armhole princess line
3. Added a back peplum seam line and a front diagonal seam line.
4. Changed the CF to an asymmetrical overlap.
Then I threw it on a table and waited for some lighting while yelling "It's Alive!!"  Ummmm no really, I sewed it together while Frogore ate Reese's Peanut Butter Cups.

Here are pics of muslin number one.  I didn't put the sleeves or facings on it cause I knew it would need changes....and cause Frogore didn't get me more muslin.
The first version wasn't too bad considering I was just winging this whole drafting thing.  The front was close to the original other than looking a little long.  In the back the peplum seam line was too high.  I wanted it to lay on the small of my back, but it was a few inches above that.  I also felt it wasn't as curvy as the inspiration garment.

I went back to the drafting board and changed the location and shape of the back peplum seam. Then made muslin number two, this time with sleeves!  Frogore finally came through with the muslin once I hid his candy.
This time the peplum seam was in the right location as far as height, but the shape just made it look like a weird butt cut out.  I was also debating about turning the one piece sleeve into a two piece sleeve.

What did I do next?  Did I end up with a fashionable blazer or one that caused the towns people to chase me with lighted torches?  Tune in next blog post to find out!

Red Roses Dress - Elisalex/Simplicity 2444 Mash-Up

10.17.2013

I have a wedding to attend this month and instead of wearing one of the dozen dresses made this summer I made a new one.  One might point the finger at Red October, the little #sewcialist idea to make something red in October and post it to the flickr group.  But I don't have to explain myself to you guys. I'm pretty sure you're all shaking your heads saying, "Of course you made a new dress, there was fabric and free time. You had to sew it!"
Pic 3
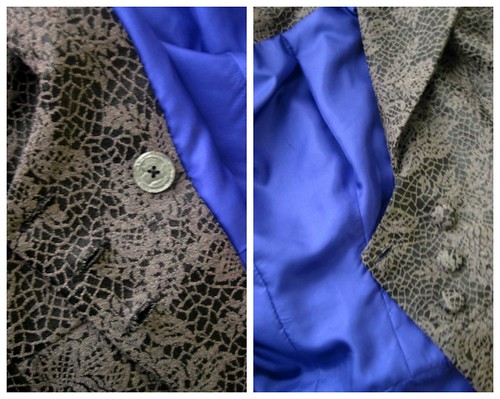
Taaa Daaaa! A pattern mash up of the Elisalex bodice and Simplicity 2444 skirt.  It's pretty and has pockets! I want to keep you pocket lovers coming back, I'm afraid you're still shaking your heads about the pocket-less Burda jacket.

Soooo anyway, it took me a long time to buy the internet sensation that is the Elisalex dress pattern for a couple of reasons. Let's just dive into them, shall we.

- The company's design aesthetic does not really match mine.
The same can be said of several other companies, so no demerits there. Everyone's taste is different and there are plenty of people out there designing with different aesthetics.  My personal style is kind of amorphous anyway, so I don't expect anyone to design specifically for it.
It's just that sometimes there's an element on a pattern that you dislike to the point that it distracts you from other features you might like. Such is the case with the Elisalex "lantern" skirt...... it's not my bag baby. Probably cause its similar to my natural shape and I have no desire emphasize my larger bottom half when I'm trying to balance it with the top.
So when I first saw this pattern I just though, "this one's for the skinny girls," and closed the tab. It took Dolly Clackett's various mash-ups of the pattern to make me give it a second look. Then I realized that the bodice portion of this design was beautiful and might be interested in purchasing it myself.

- Photos of the garments tend to be "arty" with washed out details or very busy prints.
Pattern companies have to the right to present themselves the way they want and By Hand London's photos aren't even as crazy as some of the shit Vogue puts out. Crouching in windows anyone?  In fact my opinion has always been be as crazy as you want in photos, as long as you give me a technical sketch.  Which leads us to my main problem.....

- No technical sketch for the garments before you buy.
Let be me clear that the pattern comes with a technical sketch on the inside of the sleeve. If you happen to be one of those lucky people with a brick and mortar store stocking these, then you could see it before buying.  However those of us in internet land are up shit creek, because a photo shown of this sketch is never shown.
See perfectly nice technical sketch. I could do with a back view, but this is enough information to make my brain happy.  By Hand London did tweet me a couple of months ago saying that they were going to add it to their website. This hasn't happened yet, but small companies have limited resources so I'm sure it's on a "to do" list that's a mile long. I do appreciate them taking my feedback and responding to it.

However this gives me the perfect opportunity to get up on a soap box and talk about a topic near and dear to my heart... the lowly technical sketch. I've noticed a trend across the internet concerning it lately that troubles me.  More and more it's not included as picture in the on-line buying process or omitted entirely from the pattern. Yes, a technical sketch is not sexy like photos or fancy packaging, but it is essential information that should be included in EVERY design.

I will admit that this is BIG pet peeve of mine because the technical sketch how my brain processes a design.  It allows me to see all the construction details in a format were I am not distracted by fabrication, accessories or even the model. I would also argue that no photograph can clearly show you all of the seams lines on a garment unless it is very simple one. (In this case some stylist has probably accessorized the garment to within an inch of it's life and you need the sketch anyway.)

I will take a technical sketch over fancy packaging or interesting card stock any day.  Because to me the technical sketch is not "window dressing" but an essential source of information that allows me to decide if a pattern is worth my time and effort. The only thing more important to me* then the sketch, is decent drafting of the pattern.
*List of importance should be pattern drafting, instructions, then technical sketch but my priorities are skewed cause I never read directions. How else am I gonna sing "I did it my way?" 

Soapbox rant over, now on to the good stuff

Pattern
Elisalex and Simplicity 2444, original review on the Simplicty part here.
Now for the pros, I do think that there is quality pattern drafting on the Elisalex dress.  Those of us on the upper end of the size range might find the arms too tight, but that's a common problem in grading up to the larger end. Both the front and back neckline are gorgeous and I was very pleased to find that I didn't need to move the princess line seams around to hit my bust apex.
Pic 2
Fabrics used
Mid weight stretch cotton purchased from Gertie's Etsy store this summer.  I had just enough bits of her siri lining laying around to line the bodice.

Pattern changes/alterations
1. I generally like patterns with minimal ease but it can bite you in the ass if you have ...ahem "full" upper arms. (I wanted to say meaty here, but that just makes me think of dinner options) Both the armhole portion of the dress and the sleeve were very snug on my muslin. My fix was to drop the armhole 1/2" and add 1/4" to each side of the sleeve underarm seam for a total of 1/2" additional width.  Since I was working with a stretch woven this seemed to be enough additional ease.
Pic 4

2. Normal 1/2" forward shoulder adjustment.  I also did the forward sleeve adjustment on the cap as discussed in the last blog post.

3.  My bust fullness is low set so I took in the top of the front princess line seams 3/8".
Princess seam
4. Also took in the middle portion of the back princess line seams 3/8" cause it's sway back city in that location.

5. I added 5/8" length to the entire bodice and then an additional 3/8" to just the CF part of the bodice.  I don't have a waist there (thanks post baby gut) so visually it looked better to have that area a tad longer.

6. I took in the bottom of the front princess line seams 1/4" to fit on the Simplicity 2444 skirt.  The two patterns were very similar in size in the waist so only a little minor tweaking was needed. Hooray!
Waist pleats

Confessions/Advice
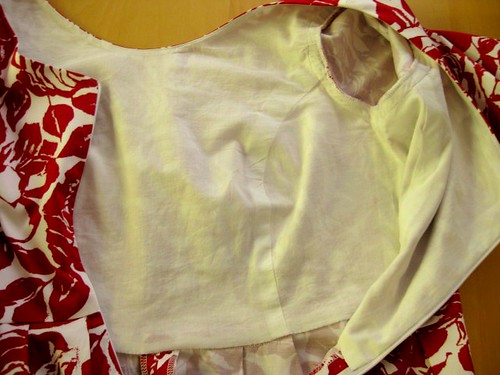
1. I edge-stitched the neckline and then graded and notched the seam allowance to get the curves to sit nicely.

2. I did not line the skirt portion since I didn't think it needed it and there wasn't enough siri left over anyway.  The lining is slip stitched at the waist and overlocked at the armholes.
Lining

Husband Comment
"Hey that's pretty and it has pockets. Nice."

My Final Thoughts
I really like this dress!  There was a bit of concern about this fabric being a little too thick for something that was not pants or a jacket. Thankfully the simple lines of the two patterns worked just fine with the weight. Now all I have to do is decide what pair of red heels to wear with it!
Pic 5

Forward Shoulder Adjustments for Sleeves

10.14.2013

Forward shoulders, that annoying problem that makes your shoulder seams start inching their way toward your back.   With all the hunching over computers we do these days, a lot of us find we need this fitting adjustment.  Or maybe it's the hunching over your sewing machine, you know who you are!!! (Pretends I don't lay my forehead on the machine when I'm concentrating really hard. No my posture is perfect, perfect I say!)

Anyway...you probably already know how to do a forward shoulder adjustment to the bodice. Easy peasy you just add to the back and cut down the front. (Diagram from "Fit for Real People.")
While all the fitting books I own show this fix, they don't say a word about adjusting the sleeve itself.  I know that "Fit for Real People" tells you to either ease in more on the front of the sleeve or not to bother matching the underarm seams.   I found that not matching the underarm seams worked better for me when setting the sleeves.  There was just too much ease in the front of the sleeve to get it sewn in without any puckers.  However knowing that the underarm seams weren't matching was driving me slowly insane.

Enter Leila who tweeted me, "Hey have you heard of this?" and linked me to a Pattern Review board.  There I learned that you could just move the sleeve caps forward, there by fixing all your sleeve setting problems.  So easy!!!  Just in case some of you have never heard of this fix either I've photo'ed up a little how to. You get both one piece and two piece sleeves cause sometimes I'm a comprehensive blogger.

For One Piece Sleeves

1. Draw a line perpendicular to the grainline across the sleeve cap. It should be above the front/back of sleeve notches but the exact position doesn't matter.  This will be our cutting line for the alteration.
2. Square a line down from your sleeve head notch through the horizontal line you just drew.  This will be your guideline for measuring the forward adjustment.
3. Cut the sleeve cap apart on the horizontal line across the cap.
4. You're going to need to move the sleeve cap forward the same amount that the shoulder seam has been moved. Using your vertical guideline as a starting point, measure this amount and mark.  My forward shoulder adjustment is 1/2", so I've marked a small dash at that location. Take the upper part of the sleeve and place the vertical guideline on the new position you just marked.
5. Tape the two pieces together and then add a little paper to the gap that was created in the back.
6. Using a French Curve draw a new curve for the front of the sleeve.  I line up one part of the curve with the sleeve head notch and the other with the lower part of the sleeve like so.
7. Repeat least step for the back of the sleeve.
8. Now you're sleeve will look like this. The sleeve head now has more ease in the back to match the change you've made to the armhole.
9. Cut off the excess paper and you sleeve is ready for fabric.


Two Piece Sleeve Alteration
1. On a two piece sleeve it matters where you draw the perpendicular line across the sleeve cap. Make sure it lines up with the corner where the back of sleeve seam is.  You want the upper sleeve edge to still fit the lower sleeve edge when you're done.
2. Square down the line from the sleeve head notch through the perpendicular line as before.
3. Cut the sleeve cap on the horizontal line, mark the forward shoulder adjustment and position the upper vertical guide line on it as in the one piece sleeve.  Tape sleeve together and add paper to the back.
4. Again using a French Curve draw a new curve for the front of the sleeve using the sleeve head notch and lower portion of the sleeve.
5. For the back of the sleeve put the French Curve on the sleeve head notch and the corner of the back sleeve seam.
6. Sleeve looks like this before trimming. Ease added to back while maintaining seam edge that joins to the lower sleeve.
7. Trim the excess paper off and you're done!

I hope that was clear and semi-formative. Now go forth and hack up your sleeves!

Motorcycle Momma* - Burda 135

10.10.2013

*No motorcycles were harmed or even photographed in this blog post. This blogger is only a Faux-Badass and the mere though of climbing onto such a vehicle makes her back away slowly until she reaches her knitting and cooking eating chair. Mmmm chocolate chip.

I don't want to jinx anything, but this might be the first FO of a jacket/coat extravaganza that might rival the "legendary" summer of dresses. Or maybe I just have tons of stashed coating taking enormous amounts of space in the fabric cave.  MOAAAR COATS IN EVERY COLOR OF THE RAINBOW!!!!!  Ok, Ok, let me calm down a bit and talk about Burda 135 first. Then we can get into Jacketrama/Coatpaloza....name pending.

In the spring I was being a good little stash buster and looking for patterns to pair with stashed fabrics.  Burda 135 caught my eye because I'm a sucker for a pattern with interesting design elements. This one has a three piece front, quilted elbows/hip area and fun eppulates   It seemed like the perfect thing for the lightweight wool/cashmere coating I'd bought on a whim/epic sale.  I was going knock this out right away but got stuck in the "the pants fitting cycle of hate" until the weather warmed up.  (spoiler, I ended up not making pants but making a gazillion dresses instead.) Well the weather's back to being cool and this baby finally got sewn up.

Now are you all excited to see photos of a jacket where all the interesting details are obscured by the color?   Yes? To compensate I lurked around one of my neighbor's fences to give you a new background to stare at.  PS. I've always said I don't like 80's fashion yet here I am wearing leggings and tunicy sweater. You win fashion cycle, you win.
I'm sassy cause I got my skull stud booties on. It's just a matter of time until I start putting studs on everything.
Obligatory back shot showing that I once again shirked my sway back adjustment. Seems wishing that I don't have one never works.

Pattern
Burda 3/2013 #135 Here's the technical drawling again since my photos don't do the design justice. Not shown in this drawing is that all the princess line seams are top-stitched which makes them even sharper looking.

Fabrics used
The shell is wool/cashmere herringbone coating from Fabricmart.com.  I bought this last December during one of their giant sales and was displeased to find it was rather thin.  A little stash marination and actually sewing with the fabric improved my opinion of it.  The quality of the blend is great and it worked up perfectly for a transitional weather jacket.

The lining is a roll end I picked up from Hot Patterns while they were doing a bit of fabric selling.  I loved that pattern so much that I conveniently "forgot" that ivory looks hideous next to my skin.  The fabric was labeled as a cotton but thankfully is very slippery and works great as a lining. Ivory problem solved!
Lining in coat cause I like flashing my linings *wink, wink*

Pattern changes/alterations
1. I started with the size 42 and graded up the waist and hip area using the method described here.
2. Normal 1/2" forward shoulder adjustment.
3. Sleeve cap forward shoulder adjustment also of 1/2".  Miss Leila clued me in on this trick for one piece sleeves and it works like a charm on two pieces sleeves as well.  Basically you cut the sleeve cap and move it forward the same amount as you did the shoulder seam.  Then cut down the over hang on the front and add to the gap in the back.  I promise to write a post on this with decent step by step pics, but for now just look at my sleeve post change.
5. After making up the shell in the real fabric I found there to be waaaaaay too much ease for the design aesthetic.  In my opinion, which you may take with a grain of salt, a motorcycle jacket should be rather trim and sit close to the body.  Instead the jacket was baggy like a duffle coat, which is fine if you were making a duffel coat, but so great for this jacket.  I took in both side seams removing 4" of ease. I know 4", that's cray cray!
6. This meant each armhole was 2" smaller so I had to get a little creative with sleeves to get them to fit into the new armhole.  I took in the underarm seam about an 1" and then eased in the rest in my sleeve cap gathers. Go wool, enabling my bad sewing!!!
7. The pattern calls for snaps to hold down the eppulates.  I only had gold and colored snaps on hand so I ransacked the button stash for some black buttons.

Confessions/Advice
1. I didn't do a sway back adjustment because of sheer laziness and I "thought" the muslin looked fine without one.  In retrospect I would put a small 1/2" adjustment in at my lower back area.

2. If I had took in the side seams at the muslin stage then I would have reduced the height of the sleeve cap to compensate for the smaller armhole.  Thankfully the black wool disguises that the sleeve heads are puffier than they should be.

3. I feel that the princess line seam on the front is too far away from the bust apex to give you any good bust shaping.  This makes the front boxier than I though it would be looking at the technical drawing. Not a deal beaker but it's a good thing to be aware of.

4. I was thinking about not quilting the hip area but the fusible batting is very thin and did not add much additional bulk to my already bulky hip areas.

4. I've made a decent number of Burda patterns and am generally fine with their basic directions and minimal notches. But on this pattern you had to trace together two shell pieces for the lining.  If I wanted to draft my own lining I would.  When I'm paying for a pattern that says it has a lining I expect to have the pieces drafted for me. Grrrr

Husband Comment
"It would be perfect if it had pockets."  What can I say, the man loves pockets and I did find myself trying to put my hands in the non-existent pockets during pictures. Hey sewing mice, magic me some pockets on here!

My Final Thoughts
I was a little heart broken when I put this on in the middle of the process and realized it was huge.  Thank god my on fly fitting mods were able to size it down without ruining the whole thing.  Now that it's all finished I think it's super cute and can't wait to wear it out.  Another bonus, other than the fusible batting needed for the quilty parts all other supplies were from the stash!  Ahhh such a good feeling to actually use things you half haphazardly spent money on.  Um I mean I successfully executed a project that I planned and bought supplies for.....yeah that's it.
Hey construction guys, what you looking at?  Haven't you ever seen a women set up a tri-pod and take about 50 pictures of herself before? No?

Odds and Ends

10.05.2013

Hello everyone! I've got a little housekeeping to get out of the way today.

First of all I want to say thank you to all of you who voted in the Mae contest.  I won 3rd place and got a swanky pattern voucher from Indie Stitches.  Decided to finally get the Sewaholic Robson coat I've been eyeing since it came out.  Now all I need is about a thousand yards of not brown animal print raincoat fabric. ;) Everyone keep your eyes peeled!

Secondly I'm always the worst at timely posting about blog awards.  Sorry, I do appreciate them.
Thank you to Wendy of Coser Cosas for a Super Sweet Blogging Award.  You can click over here for my original answers to those award questions.

Also Thank you to Emily of Tumbleweeds in the Wind annnnnd the Stashbusting Sew-a-long for a Liebster award.  Since I already nominated peeps for this award, I though it would be fun to just answer Emily's questions. So without any further ado........ here are my semi-serious answers.

1. Who are the three most influential people in your life?
My grandma Ruth.  She always said I was her clone which was pretty much the truth. Rooms full of craft supplies? Check.  Rather be sitting at home making something than talking to people? Check. Think you're always right? Check. LOL  Though I like to say my Grandma thought she was right 95% of the time and I'm only like that 75% of the time.  My husband might disagree with that percentage.

My parents as unit cause between them I learned to bake and sew and watch PBS programming with real enjoyment.  I impressed our Realtor with my knowledge of home construction purely on my childhood viewing of "This Old House." Oh Bob Vila, I miss you.  And let's not even get into "Victory Garden" cause that show used to be good.

Lastly Froggie who reminds me to relax, take it easy and always eat desert.  

2. What is the most influential book you have read?
Here's where I admit that in the past my reading was mostly trash. Not really trashy trash where bodices get ripped, but light fiction that doesn't stick with you. I don't read much anymore, but least you think me an inbreed hick, I do enjoy listening to the classics on the Craft Lit podcast.  Dracula and Jane Eyre were some of my recent favorites.

3. What's your favorite thing to do to relax?
Knit while watching period dramas or period murder mysteries on the TV.  Preferably with a cup of tea and some cake/cookies.  Maybe I'll get frisky and yell at the kids to stay off my lawn if they keep distracting me from Christoper Foyle.  Old Lady cred achieved.

4. What's your favorite thing to make?
Blazers, which is ironic cause I'm either too hot or too cold to wear them most of the year. Though I wonder if my son would listen to me better if I look "professional." "Pick up those blocks, CEO mommy demands it! You don't want an unfavorable quarterly review!

5. What's your favorite pattern you've sewn?
Oh Lord, are you trying to start a pattern revolt in my house?  They can hear me you know.  If I'm gonna by sheer volume of finished garments plus level of difficulty I'd say Grainline Studio's Archer. Now I fully expect to wake up to pattern envelopes holding shears in a threatening manner.

6.When it comes to sewing: Quick and easy or special details?
Hmmmm, I like sewing interesting details on the machine, like darts or garments with decorative seams. However if those specials details require hand sewing then I'd rather pluck my eyes out. Curse you hand sewing, you make me crazy....crazyer!

7. Classic or Trendy?
Classic, mostly cause I can't get too trendy without looking like a complete idiot.

8. What is one thing you would not want to live without?
My iPod!  Else I couldn't drown out my toddler shouting "Worm Ant!" for the 100th time that day.  Ahh yes you're as cold as ice, you're willing to sacrifice ....GET OFF THE TOP OF THE SOFA! ( This is exactly how I look when I jam....maybe)

9. If you could travel anywhere in the world where would it be?
I would travel to New Zealand to hang out with the hobbits in their awesome hobbit holes.  Hook me up with some second breakfast and I'll hook you up with some cake.  Cause hobbits are real, right?

10. If you could meet anyone from the past or present who would it be and why?
Hugh Jackman so we can engage in a scientific experiment of who's genes would be more dominate when making a new human life.  Is that creepy?  Sorry Hugh, you'd better stay on your side of the pond. But if you do come visit bring me some of those crazy toys.

11. If you could have any superpower what would it be?
Hmmm, Well I always thought it would be cool to be a super genius at technical stuff and be able to design machines in your brain.  Kind of like X-men's Forge.  I'm pretty sure half of you don't know what the hell I'm talking about, so I'll give you some early 80's Forge.  Remember we all wore shorty shorts, but it takes special panache to wear them with a popped collar and a pimp cane.
Proudly designed by Mlekoshi pixel perfect web designs