Pages

10.31.2014

Oooooo Witchy Woman, she got the flounce in her skirt.

Happy Halloween everyone! Do you have any fun plans cooked up for tonight? We're planning on taking Desmond for his first real door to door trick or treat experience. Previous years he's been ecstatic about sitting on the door step handing candy to other kids. His brain might implode with pure joy when someone hands him candy instead. What ever happens I'm looking forward to raiding his candy stash later. We all know he's not gonna eat those Almond Joy's.
This year I was in the mood to sew a costume, but didn't feel like spending the money to buy materials for something that would hardly get any use. The extent of my Halloween celebrations are hiding in another room while my husband is on the candy distribution duty. Can't let those adorable kiddies have the chance to pass their germs on to me. I see you hiding that bubonic plague under your Iron man mask! Never trust a cad like Tony Stark.

So instead of a costumy costume I took a page from some Halloween lovers on instagram and hatched a plan to "Dress like a witch." Well not a Wizard of Oz witch, or a Hocus Pocus witch, or even a Stevie Nicks witch. No disrespect Stevie, I can't carry off a shawl like you. Instead I decided to focus on the basics, the color black and some stripes thrown in.  Everyone know witches love stripes, right? Probably cause they make your eyesight vibrate until your pupils go all crossed. Once you can see again it's too late, you're in the witch's sack. Muhhaaa! Cannibalistic Treats!
For my quasi witch outfit I chose the Kitschy Coo trifecta top and Burda 6834 for the skirt.  I've made the trifecta top a couple of times in more sweatery knits and liked the fit.  In this bamboo knit the upper sleeves and bust area seemed to be too baggy.  I went back and removed 2" total at the underarm and tapered that out to the waist and elbow area. The neckband was also reduced in width to 1/2".
Burda 6834 is basically a princess line pencil skirt with a flounce sewn to the hem. Mine is sewn in some light weight wool suiting that was laying in the stash. I'd been toying around with the idea of drafting some sort of flouncy skirt when JoAnn's had sale on Burda patterns. Natch, drafting averted! Now I can use my free time to carve intricate jack'o lanterns.
I do owe a big thank you to a lot of my lovely sewing friends on Instagram.  My first muslin of this pattern was less than stellar looking on me.  I wasn't sure what the problem was, but figured a picture on instagram couldn't hurt. Immediately you guys told me to shorten the flounce length and just like that the skirt was 100% times better. Thank you all!!!!

My final flounce length is between the two specified in the pattern.  I used view B's cut line as the hem turn line. A 5/8" hem was added on so that I could finish the skirt with a machine rolled hem. Might as well take advantage of black hiding everything and give Froggie the night off from hemming.  His paws were covered in chocolate anyway.

Pattern
Burda 6834 - Used a combo of size 16 for the waist and size 18 for the hips. People with normal sized rear ends most likely wouldn't to bump the size up in the hips.

Fabrics used
Shell - Lightweight stretch wool suiting.
Lining - Polyester lining.

Pattern changes/alterations
- Took in the back princess line seam 1.5".
- Cut down the front waist 3/8".
- Used the flounce cut line for view B as my skirt length. Added 5/8" hem allowance for a small rolled hem.

Confessions/Advice
- Instructions tell you to interface the top of every pattern piece.  I used a roll of fusible stay tape pressed into the seam allowance for this.

- I skipped hemming the lining because it is so far up into the skirt no one is ever going to see it.

- Skirts without waistbands are not my preferred construction. Would add one if I make this pattern again.

Husband Comment
"It's sexy and professional!" Now I feel like naming this look "Profession witch."

My Final Thoughts
OK, so I thought, "This is gonna be a special occasion type of skirt." NOPE! Gonna wear it allllll the time. Basic black, you always do right by me. However.....if I was to make another one in a bright color which one should I go with? Just don't say orange or brown because then Froggie will have to slap you. Sorry it's a house rule. The other house rule we have is "EAT ALL THE CHOCOLATE!" Hand over the bag of assorted snicker varieties and no one gets an evil hex placed upon them.  Happy Halloween!

10.27.2014

Retroish Nettie Dress

Ponte dresses, they've been around for awhile right?  I have to say they've never struck my fancy until this year. Maybe the Ponte Fairy visited me in the middle of the night and smacked me up the side of the head with her double knit wand. Heee heee hee that tickles!

What also helped my ponte conversion was stumbling across a few lovely retro inspired styles on the net.  The Joan dress by Outerlimitz and the Joanie dress by pinupgirl clothing to point out a few. Oh if only we could all be Joan for a couple of days. I'd give my eye teeth to always have a witty bon mot ready to put people back in their places. Alas this is not my lot, instead I'll be over in the corner giggling about some weird crap I just made up in my head. Frog tutus, Bam!

Anyway, let's just talk about the dress, shall we?  I really liked the pleat detail on the Outerlimitz dress and decided to drop that into a Nettie dress with a few style mods.  To make the dress a little more retro looking I gave it a boat neck and lengthen the skirt 5".
Full disclosure here, the dress came out little shorter and tighter than I'd envisioned. I'm also wearing a Rago girdle in these pics to suck everything in a bit.  This ponte is 100% polyester and had a much firmer recovery than the rayon based pontes I've worked with in the past.  Does anyone find judging knit ease needed more tricky in pontes than say regular jerseys? Is it just me?
View of the side pleats.  Looking at the pictures of the Outerlimitz dress makes me think that they might have sewn down the pleats a few inches. Something similar to a shoulder tuck cluster.
Skirt vent on the back annnnd me being reminded how big my back end is. Better pop on over to youtube to watch "Baby got back" a couple of times.   P.S. - Crazy windy on picture day so enjoy some weird hair.

I need to size this dress up a bit to be comfortable wearing it, but that doesn't mean I can't give you some hacking instructions in the meantime. Oh yeah, hacky, hack, hack.

Hacking Instructions
1 - For the front trace the skirt portion of Nettie and mirror it so that you have the whole front. Add seam allowance to the waist since it will now have a seam. If you want to lengthen the skirt do it at this time.  I've added 5" of length here. When all your changes are done, cut out the pattern piece.

2. Chose which side of the skirt will have the pleats. Measure down 2.5 inches from the waist and mark the location of the first pleat.

3. Mark 3 more pleat locations 2" apart from each other.

4. Using the pleat location marks, draw 4 lines across the whole pattern.  Keep the lines parallel to each other, but they do not need to be completely horizontal across the pattern.

5. Cut the lines from one side seam almost all the way to the other. Leave a small paper hinge.

6. Place paper behind the cuts and open up the slashes to the width you want your pleat. On this dress I've spread them apart 1".  Tape down the pleats at your chosen depth.

7. Cut off all the excess paper to complete the front skirt pattern.

8. For the back trace the pattern on the half. Add seam allowance to the CB and draw in a vent intake.  I made mine 5" high and 1.5" wide.

9. I used the same technique for converting the neckline to a boat neck as outline in this renfrew tutorial.  The shoulder seam doesn't need to be narrowed on Nettie. Place the french curve on the edge of the existing shoulder seam and redraw the neckline higher.  Here's a quick look at my back bodice.

10. On the front add two pleats in the same manner as you did on the skirt.  The lower pleat is 2.5" from the waist and the second is 2" away from the first pleat.

Sewing Notes
1. When sewing the dress, fold the pleats up towards the waist. Secure them with some basting before sewing the side seam. Once the side seam has been sewn the basting can be removed.

2. The neckline is finished in the same manner as the previously mentioned boatneck tutorial.

3. The back vent is top-stitched just like you would on a woven garment.

10.21.2014

My Sweet Chickadee

Facts you probably already know about me - I like red, garments with birds on them and anything that raises my core temperature above the freezing mark.

Fact you may not know - My favorite thing to knit is cardigans with colorworked yokes. A close second is cardigans that have decorative stitch patterns in their yokes instead of colorwork. Yokes, yokes, yokes! God I could go for some eggs right now.
Anyway, I'm all for trying new things, learning new techniques and knitting some crazy pattern just because you have a girl crush on the model.  But after you do all those things it's also OK to say, "You know, all I really want is a million yoked sweaters." Then proceed to knit the same sort of project over and over again. There's my knitting evolution in a nutshell.

When planning a little knitting for the Fall Essentials Sew-a-long it seemed smart to knit what I'd actually wear and use materials from the stash. My yarn stash isn't as big as the fabric stash, but that's not the same thing as saying "I have a small yarn stash". Oh no, pack ratting crafting supplies runs deep in my family. My grandmother build an extra garage/shed/purchased school buses to store all of hers. (That sounds like a joke but is 100% true.)

Back in my working days I amassed a healthy yarn stash, a bit heavy on the sock yarn side but still pretty good.  It hasn't depleted much since I started stepping out on it with the sewing machine. Sexy, sexy sewing machine......Oh sorry, drifted off for a minute. Annnnnyway, I popped the top off of the sweater part of the yarn stash and dug around to see what caught my fancy.  Why hello there bright red Filatura Di Crosa Zara, wanna be my main sweater squeeze this Fall?
Pattern is "Chickadee" from Ysolda Teague.  It's part of the "Little Red in the City" book which I purchased when it first came out and the proceed to knit NOTHING from it. Honestly I have a horrible reputation when it come to knitting pattern from books.  Is it the whole,"hard to transport compared a PDF" thing or that I just secretly like hoarding books?  Probably a little of both.
Back to the sweater.....there are plenty of DK weight odd balls laying around in a drawer, so I utilized those to do the yoke. Quick yarn break down for those that might be interested.  I think certain retailers were having a biggest yarn name contest.
White - "Biggian Design First Cross Merino DK."
Blue -  "Sublime Yarns Extra Fine Merino DK"  Color name "Plume"
Black - "Filatura Di Crosa Zara" (I think) could be a sublime yarn too. Who the heck knows at this point since I'm the worst at storing odd balls.
Unlike most of my yoke sweaters, this one was constructed top down. My brain was a bit cranky about knitting a chart "upside down" so to speak.  But I bribed it with some cookies and got the old girl working again. The chart is nice and easy to knit, very few areas where you need to trap the float on the back. The majority of the rows have only 2 colors, so you can put one in each hand and get a nice rhythm going.  After the chart is done the rest of the sweater is "TV knitting."  My shows of choice for this project were "Justified" and "Mr. Selfridge."  I bet Piven would love to play a gunslinger. "Nailing it!" - (Up Yours Downstairs Podcast reference. If you're not listening to their Mr. Selfridge recaps then do it this instant!)

I knit a size 38 because my bust measurement was between sizes and my gauge was coming out a bit small. The cardigan is knit as instructed other than reducing the amount of St St between the waist increases/decreases and adding an extra waist increase. The booty, aka extra cookie storage, always needs more increases. The only thing I would go back and change would be to make the buttonholes smaller than 5 stitches.  In my stretchy yarn they came out large and I had to go buy enormous buttons to match them.
Enormous buttons or not I've been wearing this sweater everyday. Anyone else do that once they finish a big project? It's like my brain thinks,"Now I can finally be warm. You'll never rip this cardigan from my back. NEVER!!!" *Clutches cardigan to throat and laughs manically*

In closing I'll leave you with this ridiculous outtake. Mother nature felt I needed a wind machine to spice up my blog pics. Woooooo KNITTING!

10.15.2014

Once more with feeling

This is the part where I would make some further "Buffy" reference if I'd watched more than one season of that show. I tried guys but it was too much teen angst for this 35+ lady. Truth is that "Firefly" is always gonna be my go to Joss Whedon series. This girl was raised on sci-fi and cowboy movies and the marriage of those two genres fills me with glee.
Also on my personal scale of hotness Nathan Fillion is an 11, whereas David Boreanaz is too vaguely neanderthal like to be anything higher than a 2. Sorry David, at least you have that "Bones" money to keep you warm.

Anyway I thought the title of the "Famous/infamous" musical Buffy episode was perfect for today's post because I've got sewing repeats to share. Yes you've seen these garments on me before but not with leather jackets and switch blades. OK, maybe not with switch blades either. Mal told me to misbehave but that seemed to be taking it a bit too far.

First up the denim Beignet I mentioned making back in August. Look dudes, actual follow through on blog plans. I owe it all to my Frog task master who dug around the stash and found an oddly narrow piece of stretch denim. It turned out to be the perfect amount for a Beignet skirt.
Worn with Nettie, a Target Scarf and that Leather jacket I sewed back in 2012
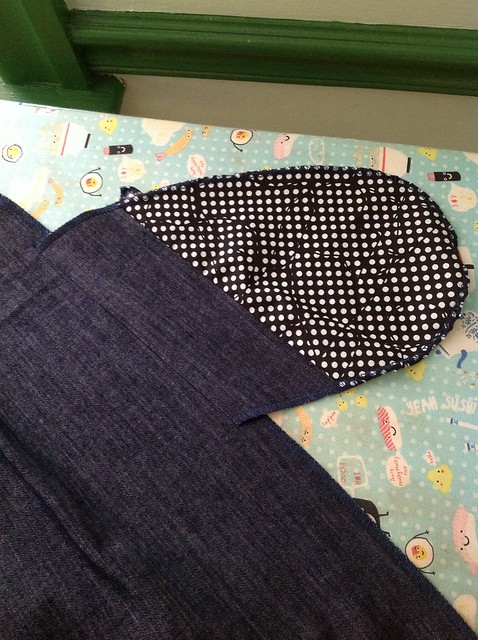
The sewing process went a lot faster the second time around. Partly because all the pattern pieces were traced and partly cause I knew how all the parts fit together.  The only construction change was to piece the pockets together with a lighter weight fabric to cut down on bulk. The pocket was cut about 2" away from where it connects with the side seam. Seam allowance was added to both sides of the cut and, Ta Da, a two piece pocket. I used a scrap of cotton/rayon for the majority of the bag and the self fabric at the edge.
image
The lining used on this Beignet is also a repeat from the stash. Is it an animal print? Is it a mod leaf print? You decide. Just know that you'll be seeing it again because it seems to be regenerating back in a dark corner of the stash cave. Wonder if it will teach this trick to certain other pieces of fabric.
One other thing to discuss, turns out that when covering buttons with stretch denim the color gets lighter. Maybe I should have tried interfacing the denim to see if that limited the amount of stretch. Oh well, that smart idea just occurred to me now instead of presenting itself to Past Heather. Curse you brain with your tardy brain storms! 
Enough about my anal retentive issues with button shades which no one else will care about. How cute is this with tights and boots? It's exactly how I'd pictured it. Guess Froggie knew what he was doing by making sure I followed through on my sewing plans.

But wait there's more, on to skirt number two. Remember how I put a black denim pencil skirt on the Fall Essentials Sew-a-long?  No, yes, no? Well I went with remaking Burda 127 pencil skirt with my hacked "lips" waistband.
Worn with a Target sweater, luxulite brooch, and a RTW suede jacket.
This denim is also medium weight so the facing was switched out with, gasp, more of the polka dot remnant. What can I say, that polka dot fabric is a shameless hussy when it come to jumping to the top of the scraps box. Only thing I'd change on the waistband is to use a heavier weight interfacing to help keep the "lips" standing up. One side always seems to be flopping over when ever I peek in the mirror.
I used stretch denim again so this is nice and comfy even with the heavier weight fabric. I fear for the state of my invisible zipper every time I pull it over the waistband seam hump, but otherwise this is an easy wear item. You'll have to take my word for it that the skirt has nice top stitching on the princess seams and the waistband. I wouldn't skimp on top stitching like I would on photos.
I'm starting to make decent inroads on the Fall Essentials Sew-a-long list now that everyone's immune systems have stabilized. But we can talk about that on a later date when the males of the household aren't looking at me longingly hoping I'll magically make some food appear. The small one warns me that I'm arresting his development and that it's a serious issue. Better start dinner before he calls child services on me.

10.09.2014

Sorta Fall Sewing with Nettie

Back in June I mentioned that Nettie was going to become a wardrobe staple. Boy did it ever! If I was the sort of person that took stats of daily wear and created a pie chart, then it might look something like this.*
* All data has been made up. Also goal for next summer - more lobsters.

I probably wear a Nettie about 4 times a week, which is why they got added to the Fall Essentials Sewing plan. Yeah baby, I'm gonna milk this cow until she runs dry. Or until I'm freezing and nothing but wrapping myself in yards of wool will do. Wool mummy, grrrr!

Despite the rampant germ sharing in the house, and I was able to bang out a Fall-ish version out of some stashed soy/cotton jersey. Here it is paired with an Odette skirt and a snazzy peach brooch from Luxulite.
If you want more info about the skirt, click on through to the Bluegingerdoll blog where I talk about waistband options.  Over here it's all about the Nettie.  Now I call this version Fall-ish because I went for the medium scoop back. Not exactly cold weather wear, but my husband was thrilled.
I like this view a lot too, it's sexy without being overly so.  No one is going to point and gasp, "My Stars!" at your exposed scapula.  At least they won't until I made it "a thing."

Just like in my Nettie/Flora dress combo I didn't make any changes to the body of the Nettie pattern. Thanks to the lower back scoop a width adjustment isn't necessary.  I did add a 1/2" extra width through the entire sleeve by splitting it down the center and adding there.  The width change is small enough that the sleeve sets in the armhole without any trouble.
I do have some trouble with the shoulder area of the top wanting to slip off  my shoulders. This isn't present in my dress version, so it surprised me a bit.  Guessing that the weight of the skirt pulling down keeps the shoulder area in place on the dress.  This soy/cotton jersey is also a bit softer, making it sag more than the polyester jersey of the "Nora dress." That's OK. I make sure to wear a nude bra and adjust the shoulders from time to time. Maybe I'll go back in and add some bra keepers if the mood strikes me.  Odds are that I'll be covering up the shoulder area with a cardigan soon enough anyway. Till then hijinks at the local law offices....hmmm that sounds like a fun Nancy Drew story.

10.07.2014

A Pair of Bonnies

If you've been sewing long enough I'm sure you've had the experience of thinking, "I'd really like a pattern for x garment" and then magically someone releases that very thing.  It's an Indiana Jones moment where it feels like a shaft of light might has fallen upon the pattern while heavenly voices sing. The holy grail!  Anyway I had one of those moments when Abby sent me the Bonnie pattern to test. Cropped sweater YEEEESSS!
Wait did you say sweater Heather?  Yes you heard right, Bonnie is the first knit pattern from Bluegingerdoll. I had no idea what Abby had up her "puffed" sleeves when she told me that the next pattern was going to be for knits. When the technical sketches arrived and I saw it was a mix and match sweater pattern, my little heart sang with joy.  Nothing like a quick knit project to make one feel productive. Because of that I might have whipped up more than one.

*Both of my Bonnies are the cropped length body, crew neckline and the full length sleeves.  I used a size 10/12 combo with a 1/2" forward shoulder adjustment. The crew neckline was lowered an 1" in the front, because anything higher makes feel feel a bit choked. Due to the neckline adjustment I added 1/2" more length to each end of the neckband for a total of 1"
.
Version 1 - Sewn in rayon ponte with stashed medium weight rayon ribbing. 
After doing my test muslin in T-shirt weight fabric, I wanted to try a more "sweatery" fabric.  Trying the pattern out in ponte seemed fun, especially after finding this wild rose pattern on Etsy.  Bonus - if using a contrast fabric/ribbing for the bands, then you can get a 10/12 combo out of one 60" wide yard. I'm happy with the ponte version other than a touch more fabric could be taken out of the back. 

Bonnie is paired with some Colette Clovers here. They aren't the best choice for the cropped length since the waistline on the pants is too low when actually moving around.  Some "at waist" cigarette pants would work, such as the Butterick 5895.  I also think the cropped length top would look sharp with some forties area full leg pants, such as Decades of Style Empire Waist Trousers.

Version 2 - Sewn in T-shirt weight organic cotton/spandex jersey with self bands.
Here the pattern is sewn in a plain jersey which let's you see the puffed sleeve detail.  I've used the self fabric for the bands on this version. Bonnie comes with different band lengths for ribbing and self fabrics so that you get a good fit with either. Nice not having to do that ribbing calculation in my head.

I've paired Bonnie with my latest version of the Betsy pencil skirt. (The yellow/white polka dot fabric is still available at Gorgeous Fabrics if you're interested) My growing collection of pencil skirts is one of the reasons I've had cropped sweaters on the brain. The length is perfect to show off a brightly patterned skirt.
Right now Bonnie is only available as a PDF, but a print version will be arriving later in the month and can be pre-ordered now. You can pick up the pattern at 10% off the pattern with the code BONNIE through 10-13-2014. Meanwhile I'll be whipping up a bunch of these since it's finally cold in Pa. Hot pink is up next!