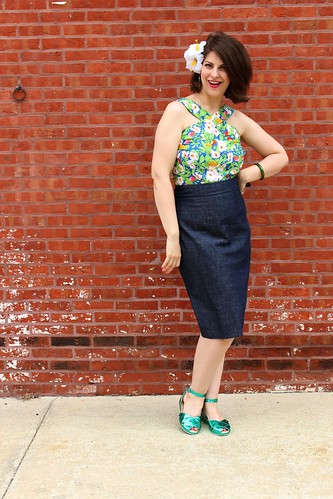
The patterns spanned from the 40's through to the 70's and I had a good time looking at style changes and picking out my favorites. Not surprisingly most of my picks were 50's area designs and I decided to bump one of them to the top of the sewing queue. Let me present Simplicity 2086, View 3. (You can see the original pattern illustration below in the review area.)
The pattern was a one size smaller than my bust so some slash and spread grading was needed Two grading lines were drawn on each pattern piece and I spread each area 1/4". That gave an extra 1/2" width on the quarter, for an extra 2" in increased width on my entire pattern. (See Christmas dress post for more details on this type of grading if you're interested.)
After making muslin number one I found that this pattern must run small because the entire bodice was very tight. There was also a problem with the strap shoulder seam being too far forward. The straps themselves hadn't been graded so I had to go back and add 3/8" to both the front and back straps at the shoulder seam. On the body I decided to go the easy route and add extra ease to the side seams instead of regrading. Muslin number two was much better, but I needed to tinker with the ease at the side seam a bit. Since my bust line is low I had to take some ease out at the top of the blouse and add a bit more at the bottom. (Final amounts are in the alterations area.) Even with the added task of the grading this pattern was very easy to fit. I was especially impressed with how nicely the straps lay against the body straight out of the envelope.
My blouse was sewn up in a vintage tropical print cotton that was bought earlier this year. The real fabric behaved a bit differently than the muslin, stretching out under the arms. This wasn't too surprising since the upper bodice is cut on the bias and only had stay stitching to tame the stretch. In hindsight I probably should have fused some extra interfacing on that edge. Instead some "on the fly" alterations were needed to take in the top of the side seam. Thankfully this wasn't hard to do since the directions instruct you sew the facings on before completing the side seams. I only had to go back in, sew a new side seam and the top fit great. Hooray!
Pattern
Vintage Simplicity 2086. Here it is in all of it's original fashion illustration glory. "Judy" is busy calling people on her shell phone.
Fabrics used
Vintage cotton print from Etsy.
Pattern changes/alterations
(Made after grading)
1. Dropped bust dart 1.5".
2. The side seams needed to be rebalanced to fit me. The top part of the blouse was taken in 1/2" and the bottom area was graded out 3/4" at the hem.
Confessions/Advice
- The pattern suggested using a separating zipper for the closure. I decided to go with an invisible zip instead.
- The other sewing change made was to attach the back straps by sewing them into the facing/body seam. The vintage directions said to hand stitch them into the facing.
- I catch stitched all the facings down so they wouldn't flip out. The busy print helps to hide the thread "picks" on the right hand side.
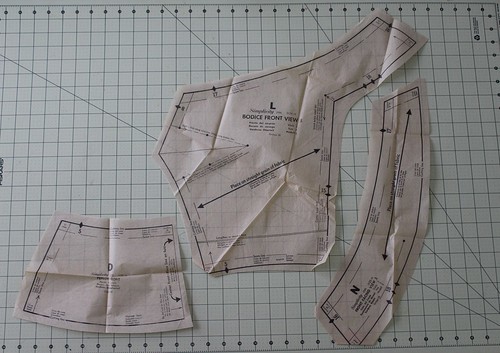
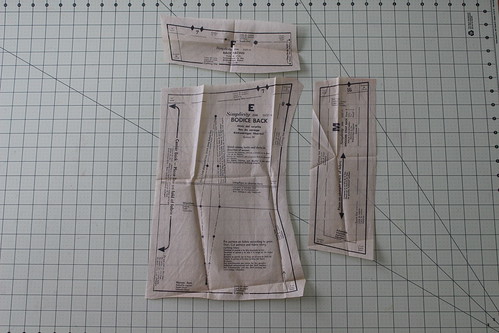
- There was a lot of interest in this pattern and since making a ton of copies isn't something that's easy for me to do, I'm going to show you the pattern pieces. I hope this will hope those of you with drafting skills come up with something similar.
Front pieces
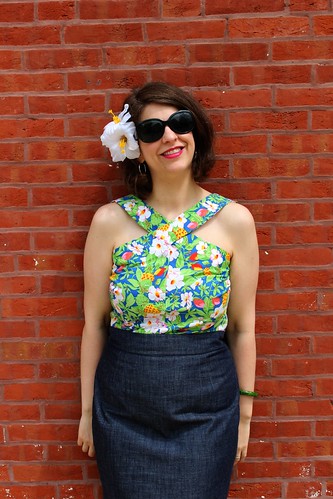
The front bodice has a waist seam, a CF seam, and the front half of the strap. During construction you would sew the CF seam up to the dot and then leave the strap area to be sewn to the facing. The facing is also the back part of the strap. It finished both the upper edge of the front and the two strap edges.
Back Pieces
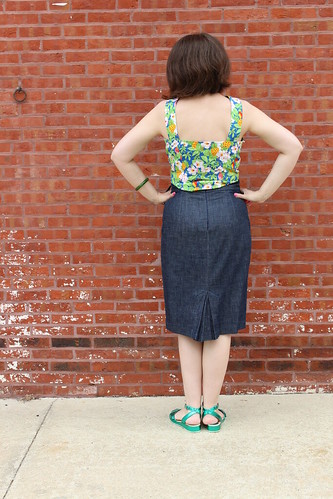
The back does not have a waist seam, it's a standard sleeveless block with a fish eye dart. It also has a facing to finish the upper edge. There is a strap back piece that sews to the front strap at the shoulder. This piece is cut 4 times to completely finish the edges of the strap.
Husband Comment
"I like it. Great shoulder exposure and looks good from all angles."
My Final Thoughts
Dear Simplicity, please re-release this pattern so that all my friends can have one. I'm pretty sure you'd sell a lot of copies. The design is classy, comfortable to wear and bonus, quick to sew up. I'd high recommend it if you can get your hands on a copy. Thank you so much Lori for sending me one!




This is so you- adorable!
ReplyDeleteLooks gorgeous on you. Great job.
ReplyDeleteI love this piece! So cool that it combines the look of a halter with nice back straps.
ReplyDeletehusband comment is bang on, and so is your message to Simplicity ;o)
ReplyDeleteSo unusual, and so summery. Great little top. All the views are so much fun
ReplyDeleteCute! And I agree - Simplicity needs to re-release this. I want to make them all!
ReplyDeleteGreat shoulder exposure! I love this on you - it's awesome!
ReplyDeleteWow that looks gorgeous on you! the pattern is beautiful I love the cross over in the front.
ReplyDeleteThanks man. Perhaps I need an animal print one to really show my stripes. :)
ReplyDeleteThanks Becky. I really liked the regular straps too. As much as I like the look of halters they tend to hurt my neck when wearing them.
ReplyDeleteThanks Heather. Shoulder exposure needs to be a new catch phrase. :)
ReplyDeleteThank you Nathalie. That cross over front is such a nice design feature and I would have never thought of it on my own. :)
ReplyDeleteThank you Morgan. The regular back straps are so nice. I can do with the neck pain of a true halter.
ReplyDeleteThank you! I agree that all the views are great. So nice and classic.
ReplyDeleteThanks Kaitlyn, this certainly is a gem of a pattern. :)
ReplyDeleteHaa haa, thanks Colesworth. Let's hope Simplicity hears our demands. ;)
ReplyDeleteThanks so much. It was a fun little project.
ReplyDeleteLike I said before: gorgeous! Thank you for the review!
ReplyDeleteSo cute! Also...where are those shoes from bc I am quite sure I NEED them!
ReplyDeleteI ADORE this on you... it's SO cute!!!
ReplyDeleteThanks so much. Hope you're able to draft your own version. :)
ReplyDeleteThanks Elisabeth. The shoes are from Miss L Fire and I'll give you link since I'm a major enabler. ;)
ReplyDeletehttp://shop.misslfire.com/products/product/Harlow
This is lovely. What a great friend you have to gift you old patterns. But you have done this one proud it's lovely.
ReplyDelete