Showing posts with label How-to. Show all posts

Sewing with the Pattern Stash - The TNT

3.16.2015

Confession - This outfit was sewn last month before I'd even given any thought to the this month's stash busting theme. It just happens to fit into one of my suggestions of sewing TNT patterns. Errr I mean that I'm soooo good at planning that I keep it secret from myself. But Frog knows...he knows everything.
Before you get ideas of bribing Frog for my dark secrets, let's talk about the two TNT patterns that I used. The first is the Nettie bodysuit, a pattern that gets worn on a weekly basis.  My wardrobe has needed a longer sleeve red version for months and I finally got around to filling that hole. There's nothing new to discuss fit or design wise here. It's the high back/scoop front version with the back and shoulder mods that were detailed in my review of the pattern.  It was also sewn in the same Lillestoff red jersey. It turned out to be exceedingly hard to find bright red cotton jersey in the middle winter.
TNT two is a little bit more fun to talk about. See I bought this Micheal Miller print, "Out to sea," last year after loving it on both Roisin and Jo. There were no exact pattern plans for it at the time, I just snagged 3 yards from Hart's fabric and stashed it. Then last month I stumbled across a lady on Instagram that was wearing a circle skirt in this exact fabric. Yes, Yes!!! That is precisely what my fabric wanted to be.

However a straight circle skirt pattern wouldn't do because of the 45" width of the fabric and the horizontal pattern motif.  I did a bit of brain storming and decided the best way to solve the problem was to use a gored skirt pattern and increase the amount of sweep to the pieces.  So I grabbed the skirt portion of the Odette dress and New Look 6056 to use for my experiment. Thanks to photographer Frog it's also been documented for you. He wears many hats and all of them at a jaunty angle.
I really like the hem sweep on New Look 6056 and wanted to add the same amount to the Odette skirt.  Before beginning the drafting, both pattern's hem lines were measured to find out the difference between them.  I found that NL 6056 hem sweep was 14.5" bigger on the half.  That meant 7.25" needed to be added to each of the Odette panels to get the same sweep. Here's how you go about doing it.

Step 1. Trace the CF panel of the the Odette skirt.

Step 2. From the hem area of the skirt measure out 7.25" and mark. I usually line the ruler up with the angle of the existing hem for now. We'll edit that later.

Step 3.  Draw in a new edge to the pattern. (Since I already have a waistband drafted for Odette the new seam was started 5/8" down from the waist edge. That way the waist circumference is not increased.)

Step 4. Next draw in the seam allowance.

Step 5. Place the Side Front pattern on top of the stitch line and mark were the bottom of the pattern falls.

Step 6. Adjust the hem sweep curve so that two pattern pieces will have the same seam length. If you have a hip curve ruler use that. You can also fudge it with a french curve.


Step 7. Trace the side front pattern piece.

Step 8. Add the 7.25" to the non side seam side edge. (The side seam has two notches for pocket placement if you get confused.)

Step 9. Draw in the new pattern edge and seam allowance.

Step 10. Place the already modified center front on top and use it to adjust the hem sweep curve like before. (Also double check that you have a seam notch that matches between the two pieces for assembly.)


Step 11. Repeat these steps to the Center Back and Side Back pieces. After you are done altering all the pieces the skirt can be sew together in the same manner as outlined in the Odette directions. Bonus you'll have pockets if using the pattern.

With the added sweep the seam lines disappear into the folds and you get the look of a circle skirt.  I was just able to squeeze out the size 12 skirt on 3 yards of fabric. The boats aren't exactly matched across the CB, but there was literally no more fabric to tweak that. Slightly irksome, but at least I can't see my backside when wearing it. ;)
So there we go, two TNT's and a little hack to start out the week.  Spring is in the air and it's going to be pretty dress sewing season soon. Can't wait!

Retroish Nettie Dress

10.27.2014

Ponte dresses, they've been around for awhile right?  I have to say they've never struck my fancy until this year. Maybe the Ponte Fairy visited me in the middle of the night and smacked me up the side of the head with her double knit wand. Heee heee hee that tickles!

What also helped my ponte conversion was stumbling across a few lovely retro inspired styles on the net.  The Joan dress by Outerlimitz and the Joanie dress by pinupgirl clothing to point out a few. Oh if only we could all be Joan for a couple of days. I'd give my eye teeth to always have a witty bon mot ready to put people back in their places. Alas this is not my lot, instead I'll be over in the corner giggling about some weird crap I just made up in my head. Frog tutus, Bam!

Anyway, let's just talk about the dress, shall we?  I really liked the pleat detail on the Outerlimitz dress and decided to drop that into a Nettie dress with a few style mods.  To make the dress a little more retro looking I gave it a boat neck and lengthen the skirt 5".
Full disclosure here, the dress came out little shorter and tighter than I'd envisioned. I'm also wearing a Rago girdle in these pics to suck everything in a bit.  This ponte is 100% polyester and had a much firmer recovery than the rayon based pontes I've worked with in the past.  Does anyone find judging knit ease needed more tricky in pontes than say regular jerseys? Is it just me?
View of the side pleats.  Looking at the pictures of the Outerlimitz dress makes me think that they might have sewn down the pleats a few inches. Something similar to a shoulder tuck cluster.
Skirt vent on the back annnnd me being reminded how big my back end is. Better pop on over to youtube to watch "Baby got back" a couple of times.   P.S. - Crazy windy on picture day so enjoy some weird hair.

I need to size this dress up a bit to be comfortable wearing it, but that doesn't mean I can't give you some hacking instructions in the meantime. Oh yeah, hacky, hack, hack.

Hacking Instructions
1 - For the front trace the skirt portion of Nettie and mirror it so that you have the whole front. Add seam allowance to the waist since it will now have a seam. If you want to lengthen the skirt do it at this time.  I've added 5" of length here. When all your changes are done, cut out the pattern piece.

2. Chose which side of the skirt will have the pleats. Measure down 2.5 inches from the waist and mark the location of the first pleat.

3. Mark 3 more pleat locations 2" apart from each other.

4. Using the pleat location marks, draw 4 lines across the whole pattern.  Keep the lines parallel to each other, but they do not need to be completely horizontal across the pattern.

5. Cut the lines from one side seam almost all the way to the other. Leave a small paper hinge.

6. Place paper behind the cuts and open up the slashes to the width you want your pleat. On this dress I've spread them apart 1".  Tape down the pleats at your chosen depth.

7. Cut off all the excess paper to complete the front skirt pattern.

8. For the back trace the pattern on the half. Add seam allowance to the CB and draw in a vent intake.  I made mine 5" high and 1.5" wide.

9. I used the same technique for converting the neckline to a boat neck as outline in this renfrew tutorial.  The shoulder seam doesn't need to be narrowed on Nettie. Place the french curve on the edge of the existing shoulder seam and redraw the neckline higher.  Here's a quick look at my back bodice.

10. On the front add two pleats in the same manner as you did on the skirt.  The lower pleat is 2.5" from the waist and the second is 2" away from the first pleat.

Sewing Notes
1. When sewing the dress, fold the pleats up towards the waist. Secure them with some basting before sewing the side seam. Once the side seam has been sewn the basting can be removed.

2. The neckline is finished in the same manner as the previously mentioned boatneck tutorial.

3. The back vent is top-stitched just like you would on a woven garment.

1940's Dress Part Three - Sleeve Changes

9.11.2014

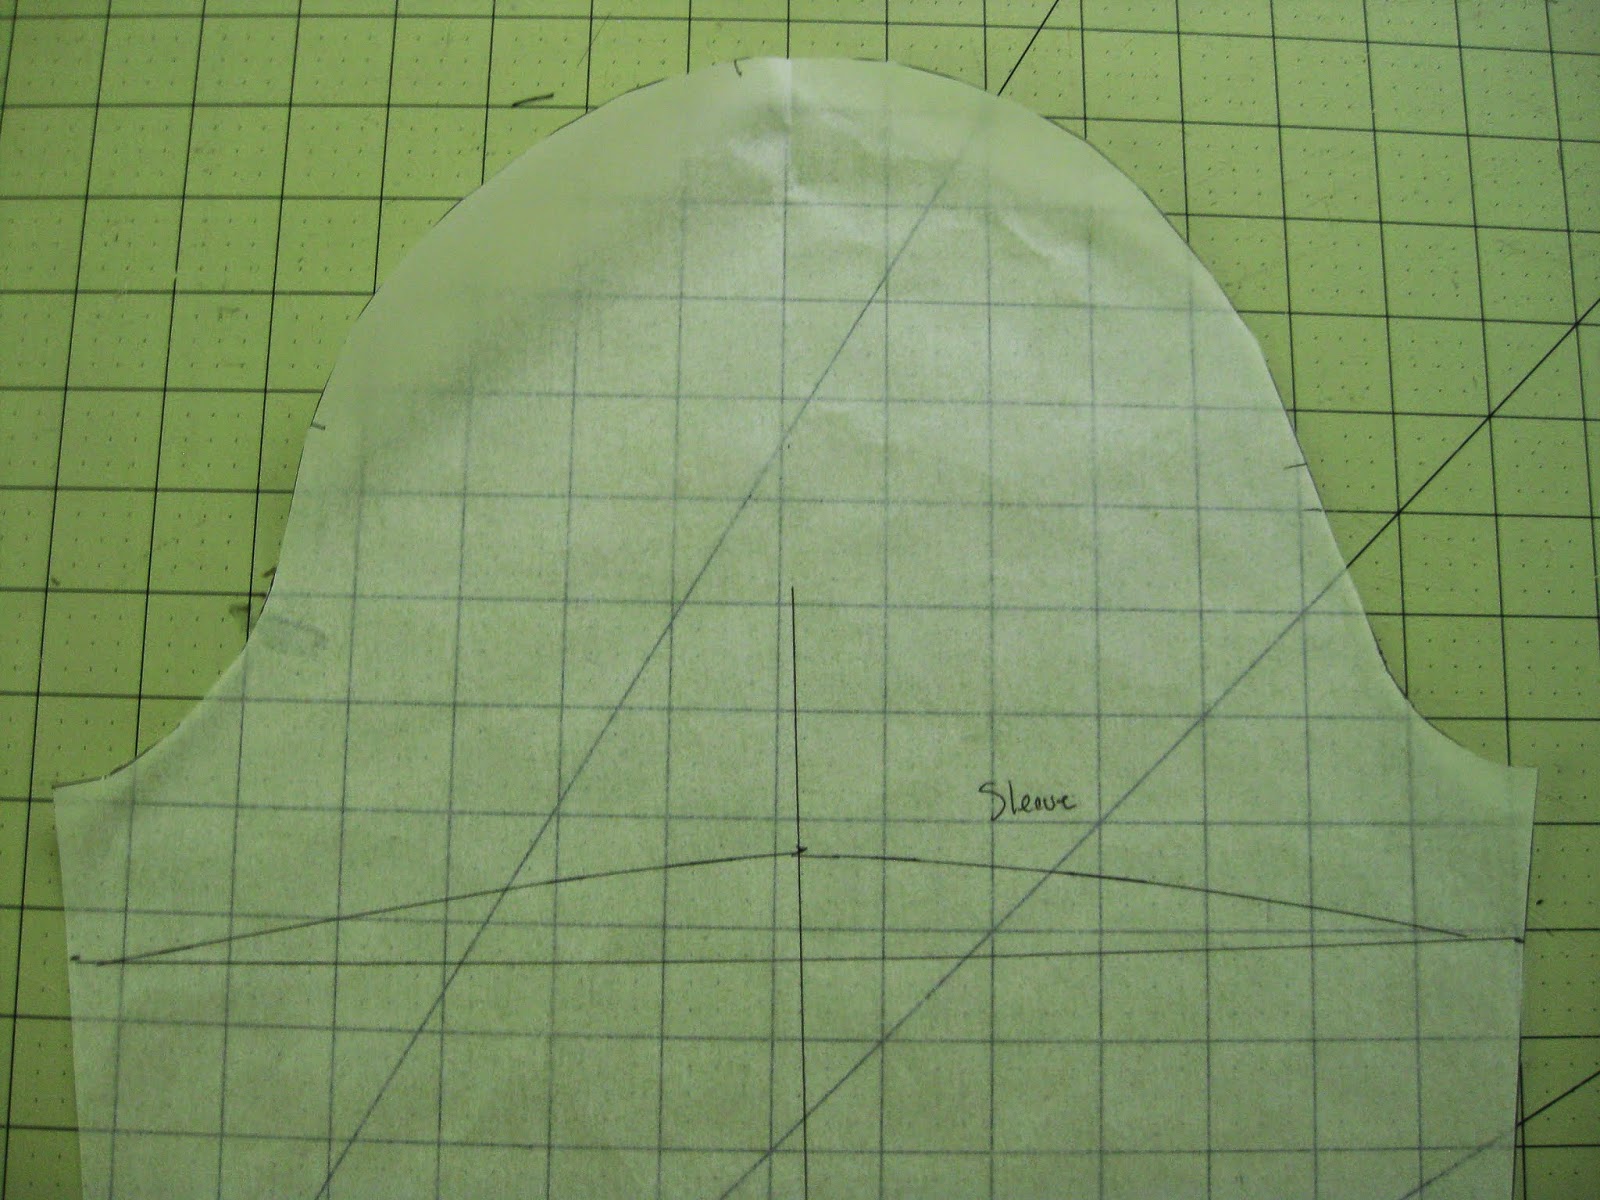
Almost there 1940's dress hackers. You've created/modified some insets, converted your bodice to a wrap and added some shoulder tucks. Today we'll cover the final steps to modify the sleeve. First up, shortening the sleeve to a cap. Then the final touch of adding ease to the sleeve so that it can be gathered up into a pretty poof. To do these steps you'll need the following pattern piece:

*Sleeve

Shortening the Sleeve
How to covert 3/4" into a cap.
1. Take a traced copy of the sleeve and measure 1" down from the top edge of the side seam. Repeat on the other side.

2. Using the new marks square a line across the sleeve.

3. Find the center of this newly drawn line and mark. From the mark draw a vertical line through the sleeve cap. Mark 1" up on the vertical line. Note: The measurement of an 1" here is arbitrary. If you like the sleeve to be smaller you can increase this measurement and continue with the same steps.

4. Use a french curve to redraw the hemline of the sleeve. Cut off the excess length.

5. Now we will reduce the sleeve cap height.  Using the same sleeve center line measure an 1" down.

6. Redraw the sleeve cap curve with a french curve.

7. Redraw any notches if needed and then cut off the excess.  This change will make the sleeve sit out farther from the dress which will complement the gathers we are about to add.

"Puffing"/Adding ease to the sleeve
We are going to slash and spread again to created gathers.
1. Evenly space about 3 marks across one half the cap of the sleeve.  I used the measurement of 1.25" to space my marks.  If you want less ease added to the sleeve then make fewer marks. More ease then add more marks.

2. Repeat step one on the other side of the sleeve cap.

3. Draw lines through the entire sleeve at each mark.

4. Cut each line from the sleeve cap almost all the way through. Leave a "hinge" at the cuff edge.  You can see I did not cut the center line. You can chose to cut this to add additional ease or leave it uncut. When you are done cutting then fan out the cut areas a bit.

5. Place a large piece of paper behind the sleeve.  Tape down the center and then spread each cut area .5" wide. Tape down at this measurement.

6. With a french curve go redraw the sleeve cap to a smoother curve.

7. Cut out the adjusted sleeve and you are finally done all the 1940's dress modifications. Hooray!
When sewing the sleeve, take the sleeve cap gathers and cluster them around the shoulder seam area. The rest of the sleeve should be set in smoothly.  To finish the sleeve hem edge use Gertie's tutorial on using piping as a facing. You can use store bought piping or use some self fabric to make your own.

OK folks, that was an intense 3 day course and I hope you found it informative.  If you have any questions or need clarification feel free to comment/contact me.  I will do my best to answer between surfing the internet for T-strap shoes. ;)
Proudly designed by Mlekoshi pixel perfect web designs