The Du Barry blouse was another one of those 32" bust patterns that I just "had to have" even though I'm a 36" bust. Grading never seems easier than when you're pushing the purchase button on Etsy. But when it comes time to do the grading work I feel like a complete fraud. "Don't know what I'm doing, tra la la la la. Look over there instead." So after pulling out the pattern I waited for the usual sense of panic and dread to overtake me. Instead my brain said, "Hey we just graded that whole Hollywood pattern and it turned out fine. Just do the same thing knucklehead." It was then that I realized that maybe, just maybe, I wasn't a fraud but had learned to do a pretty good 4" grade. Huzzah!
Incase you're wondering what my personal grading steps are I'll break out for you.
1. Trace the pattern...of course.
2. Since I'm pear shaped 1/2" is added to the waist and hip area along the side seam. In the case of 40's skirts I usually add that extra 1/2" of width down the whole length.
3. For pattern pieces on the quarter, I draw 3 grading lines and slash the spread the pattern. Two of the lines are spread 3/8" and the third is spread a 1/4". (Was pretty pleased with myself for remembering the front blouse on this pattern is not on the quarter and needed to be slashed and spread 2".)
4. Finally I add 1/2" of extra height to the pattern along the shoulder and neckline. If there's some sort of attached neck facing, like on the Hollywood blouse, I usually walk the pattern on the seamline to see how much extra length is needed.
At this point I'll make any standard fitting adjustments for my figure and then sew a muslin. Usually the muslin fits pretty decently and I can tinker with seam placement, lengths, etc. The Du Barry wrap blouse was an easy fitting job since the shoulder pleats give you plenty of bust room and the tie makes the waist width easily adjustable. After the first muslin all that needed to be done was remove some of the height from the sleeve caps. Those babies were impossible to ease in without puckers.
Pattern
Du Barry 5510, blouse portion only.
Fabrics used
Silk Crepe de Chine from the stash.
Pattern changes/alterations
1. Graded the pattern up from a 32 bust to a 36 bust.
2. Did standard 1/2" forward shoulder adjustment to the shoulder and sleeve cap
3. Reduced the sleeve cap height by 1/2" because they seemed to have too much ease to set properly.
Confessions/Advice
- I said on my instagram feed that this isn't a blouse made for raising your arms. Even with an at waist skirt any upward arm movement results in some bare midriff.
- The downside of a silk wrap blouse is that the ties starts to loosen as you wear it. I haven't had a wardrobe malfunction, but do need to retie the blouse during the day.
- Put 1/4" shoulder pads in this because I've been brainwashed by the 40's into worrying about droopy shoulders.
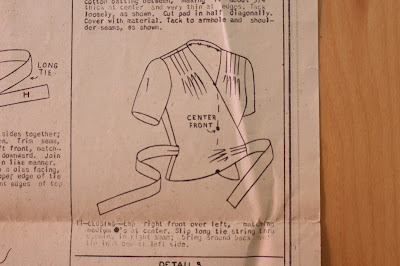
- In case you were wondering how does this particular wrap blouse wrap, then here's a handy illustration from the instructions.
The pattern has a short tie and a long tie, the short tie goes on the blouse half that crosses in front. On the other blouse half the long tie comes out of a hole you leave in the side seam, wraps around the back and ties to the short tie.
Husband Comment
"Never seen a green leopard before but it's silky and nice."
My Final Thoughts
Despite my confession about the length occasionally causing accidental bare midriff, I've worn this blouse every week since finishing it. It just feels so elegant in both style and fabrication. Figure I need to add a pair of high waisted trousers and high waisted skirt into the sewing list. Then I can pair them with this blouse and wave my hands in the air like I just don't care. Cause I won't because my hats are too fabulous. ;) Have a great friends. Next time we "talk" I'll have a dress that's refreshing as a tall glass of lemonade. Mmm delicious.


No comments:
Post a Comment