A Tiny Hack - Boat Neck Renfrew

1.18.2014

Confession - I'm a instagramming junky when it come to my sewing. Unless it's a secret project, I'm taking a picture of my process every 10 minutes. Early this week I put up a pic of a black boat neck T-shirt that was altered from the Sewaholic Renfrew pattern. Silvia aka Jusipra said, "Hey can you do a tutorial on that?"  Heck yeah, tutorial request excepted.  I'll even make another T-shirt out of a fabric that doesn't photograph like crap.
Ta daaaa, one foxy boat neck out of some cheap ass fabric.  Oh little foxes I couldn't say no to you.

Fabric is from Girl Charlee "Fox family on Blue Cotton Blend Jersey." I feel the need to do some full disclosure on this particular yardage.
Pros
-The fox print is very cute and the colors are bright.
-The price is very reasonable at $6.50 per yard.

Cons
-The base fabric is cheap feeling and if I hold it up to the light it's semi transparent.
-On my piece the grain is skewed. The pattern does seem to be printed on the straight grain so maybe one could block this straight if they wished.
-It has very little stretch in any direction. Too be fair the fiber content is clearly stated and the fabric has no fibers like spandex woven in to increase it's stretch. That means the fabric only has "mechanical stretch," it  stretches cause knit construction is inherently stretchy.

I've ordered from Girl Charlee before and knew what to expect in terms of quality. I decided that the price point was low enough to make up for any inadequacies with the fabric. Those foxes where just too cute to pass up. Now on with the tutorial bit.

How to turn your Renfrew into a boat neck
Notes - All my Renfrew seam allowances have been trimmed down to 1/4 in this example. Use the seam allowances you are comfortable with. The coverstitch machine can be substituted for a twin needle or a zig-zag stitch on your regular machine.

Drafting Instructions
1. Trace the front of the Renfrew and extend the CF line up to the shoulder.
2. The width and depth of your boat neck is mostly personal preference, but it's always nice to have a guide line. For my shirt I marked the shoulder seam 2.5" from the outside and the neck 3" down from the shoulder point.
3. Then use a french curve to draw the new neckline in.
4. The front is pattern has now been adjusted. I considered the new neckline the cut edge and did not add any seam allowance to it.

5. Moving on to the back pattern. Here only the shoulder width needs to be adjusted to match the front.  Measure 2.5" from the outside of the shoulder and mark.  You can double check by putting your new front piece next to it.
6. Grab the french curve again and draw the new neckline.
7. Your back piece is now done.
8. One last step is to draft a facing for the front and back neckline.  I traced the new necklines and made the facings 1" wide. We'll be cutting them down later.  I cut notches at the CF/CB of both the shirt and facings to make them easier to line up later.

Sewing Instructions
1. Sew together the shoulder seams of the shirt.  Then sew together the shoulder seams of the facings.
2. Pin the facings and shirt right sides together lining up the seams and the notches on the CF/CB.
3. Sew these pieces together along the neckline.
4. Flip the facing to the inside of the shirt. Give it a nice press on a ham to keep the facing inside.
5. To secure the facing, run a line of coverstitching along the neck edge. I used the throat plate as my guide making the stitching 1/4" away from the edge. When you're done secure the coverstitch threads.
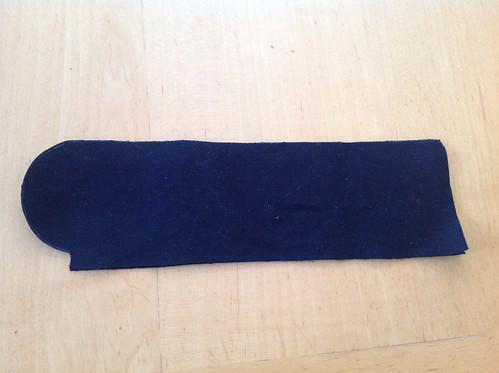
6. Finally we're gonna trim the facing down to the coverstitch.  Use a small pair of scissors and go as slow as you need to. When you're done the neckline will have a nice tidy binding.
Additional changes to this pattern were:
- Narrowed the lower half of the sleeve by 1/2" at the cuff, tapering the new seam up to the elbow area.
- Added 2" additional length to both the sleeves and body of the shirt. The shirt was then finished with 1" coverstitched hems.
Hopefully that was clear enough, but if you have any questions feel free to leave them in the comments. Happy Hacking!

A Quick Trip to the Jungle

1.12.2014

Off the top I want to say "Thank You" to all of you for the congratulations on my new gig. The sewcialist community is so awesome and I'm forever grateful for it. Big electronic hugs to everyone!

It's been really cold around these parts, so it seemed like the perfect time to take a little trip to the jungle. That's "code" for a trip to my fabric box of animal prints cause it's Jungle January peeps!
Yes, I do have a box devoted to animal prints and it growls ever so softly at night. I like to sing, "soft kitty, warm kitty, little ball of fur," to it on a weekly basis so that it doesn't maul me in my sleep.  Anyway I dove deep in to that box looking for some long stashed knit to turn into a Renfrew.  This is what I found, a burnt out knit of some what hazy origins.
I'm 80% sure that this came from Fabricjunkeez a number of years ago.  She sells both on etsy and ebay and mainly stocks punk/goth themed fabric. She also has a healthy appreciation of animal prints/bird designs, so I've snagged a few pieces from her shop.  This knit was thin but stable and it seemed like the perfect thing to pair with the renfew pattern. You might say I was happy with the result.
I'm not gonna go into too much detail here cause about 95% of us have made a Renfrew.  If you haven't I'm gonna assume that the pattern doesn't come in your size or you've been in a coma for about 2 years.  To the first point I say, "Sorry," and to the second, "I hope you feel well rested."

There is one detail to show on this renfrew. Check out the insides.
I didn't want to worry about the burnt out portions showing undergarments, so I underlined the front and back pieces with a gray knit.  The gray knit was also stash and was too warm of a tone to flatter my coloring.  The knit is such nice quality that I kept hanging on to it, thinking I'd dye it or something.  This solution worked out even better. I get a really comfortable knit next to my skin and it makes this renfrew a lot more wearable.  Oh yeah, props to Past Heather for buying so much stuff. I raise a cookie in your honor. Then I'll put the cookie down and let Froggie eat it....stupid health goals.

Cookies or not Jungle January is my favorite print related holiday!  Now everyone say "GRRRRRRR"

Stella Blouse and a Little Announcement

1.10.2014

STEEEEEEEELA!!!!! Now that I've gotten that out of my system, let's talk about my new Stella blouse.
I know it's cruel of me to parade completely awesome deep stash fabric in front of you. Especially if you'd just put it on your "to burgle list." Gotta act fast people, we be stash busting around these parts. If you're thinking, "Haven't I seen this fabric before?" then yes you are correct. I used the majority of the yardage in 2009 to make Burda 117 which I wore during Me Made May last year.
I started Stella in early December before everyone came down with germs. I "hilariously" set the sleeves in while the germs were over taking my body. Let me tell you, sick Heather can't set in a sleeve for shit. It looked like a drunk money had a go at the sewing machine.  In fact I'm pretty sure it was a drunk monkey that set those sleeves. Curse you drunk monkey, I had to rip those things out and do it again.

Happily the sewing goddess felt I'd paid my dues dealing with drunk monkeys and the rest of the construction went well. I even managed not to cut half my buttonhole threads when cutting out the button hole tab.  Take that drunk monkey!
Pattern
Stella from Bluegingerdoll

Fabrics used
Feather print was an Italian cotton remnant. The yardage originally from Emmaonesock.com
Black tabs are a stretch cotton twill, also a remnant.
In fact the only thing I bought for this project was the 7" invisible zipper. Go stash buster go!

Pattern changes/alterations
1. Normal 1/2" forward shoulder adjustment to shoulder seam and sleeve cap.
2. Normal 1/2" board upper back adjustment with added shoulder dart.
3. Sway back adjustment of 3/4".
4. Increased dart intake of back dart to 1 7/8".
5. Dropped the point of the front waist dart by 1 1/2".
6. Dropped the bust dart by about 1 1/4".  I just crossed out the existing dart, drew in a new one at my position and then trued up the side seam.
7. Dropped the armholes 1/2".
8. Added 3/8" to each side of the sleeve to increase the sleeve diameter by 3/4".
9. Lengthened the sleeve by 1 1/2" cause I was in the mood for 3/4 sleeves.

Confessions/Advice
1. After measuring the pattern I decided to size up from a 10/12 combo to a 12/14 combo. I like a little more ease in a garment where the fabric has no stretch.  This worked out well except in the shoulder area, which I should have kept at a size 10.  I completely forgot about fixing this until putting the blouse on to take these picture. Oops!

2. I've lost around 4 lb since fitting this blouse and it probably needs to be taken in a bit.

3. I recommend cutting down the seam allowances on the tabs to at least 3/8". It's much easier to sew a nice curve with smaller seam allowances. In this pic I've just cut them down on the the top side around to the notch. That way I didn't have to cut down my pocket edge that was already serged.
image
4. I ran into a problem with the front dart when pinning up the hem. I think the dart intake is a bit too big for the hem to sit flatly with you sew it.  Before you cut your real fabric I suggest you make a change to the pattern like this.
- Take the front bodice and draw in the hem line. 
- Fold the pattern up on the hem line and measure the difference between the dart lines.
- Adjust the dart legs so that they are closer to the width of the dart at the location where you fold it up. 
Husband Comment
"That's a nice utilitarian tunic with functional pockets. Feathery Heather.....those are supposed to be feathers, right?" I think my husband needs an education on what tunic is and only he would call this garment utilitarian.  However my new mini frog agrees about the pockets.
My Final Thoughts
This is a great design to showcase a bold print and it's super simple to sew. I'm also pretty exciting about it's hacking potential.  Muhaaa haaaa Plans!  But first I must raid that hidden cold war bunker to get the top secret pattern drafting book.  Operation Stella is a go.
Announcement
I'm pleased to reveal that Abby asked me to be a part of Bluegingerdoll.  She's still the designing brains of the operation, I'll just be taking a few housekeeping tasks off her hands. My main job will be generating content for the Bluegingerdoll blog. Tutorials, pattern hacks, stuff like that.  And of course I'll be sewing up all the Bluegingerdoll patterns, but I was gonna do that anyway.

Have Stash, Will Bust.

1.08.2014

No one was more enthused than me to find out that Emily and Cindy are continuing the Stash Busting Sewalong into 2014. Even after my stash busting efforts of last year the stash remains unruly. Heck I'm only sitting with about 1/3 of it here and seems intent on burying me under it's fabricy goodness.
I need to show it who's boss by stash busting further.  OK then stash, I'm laying down the law...

 In 2014 I promise to make at least 25 stash busting projects. 

"25 projects Heather? Didn't you sew around 40 this year?  That hardly seems like a challenge."  I completely agree with you crazy voice in my head, but in 2014 I'm trying not to punk out on some fitness goals.  Between that and wanting to do more blog content, my sewing time is going to be reduced.  Might as well low ball my original stash pledge to a number that seems achievable. If need be I'll up my pledge as the year goes along.

Now as a new twist to the stash busting sewalong there is a Curating Challenge which includes questions to make us think about our stash. I have done my best to answer them with half truths and crazy talk. As an added bonus you also get some photo outtakes, since a certain little rascal can not resist body surfing stacks of fabric.  

Why do you sew?
I sew because buying fabric is so dang fun and it looks kind of weird if you don't finally sew some. ;)  "I'm buying it for insulation honey. Why are you looking at me like that? The house IS drafty."  *Wraps self in wool*  I also sew to gratify my life long obsession with clothing. Buying RTW is still fun sometimes, but I can't be bratty and yell "I Made This" to everyone in earshot.
What's on your list?
List? I don't hold with bossy pieces of paper telling me what to do. I'm like the wind baby, changeable and full of hot air......mmmm maybe that's not the best analogy. So let's just say I have "all the patterns" from last year and I will buy all the patterns from this year.*  Some of them will get sewn up and some will continue making out in the pattern drawer.  
*Slight exaggeration, slight.
Why are you stash busting?
Mainly to met my number 1 goal of the year of saving up for a shiny new sewing machine. There's also that pesky problem of storage. There's only so many times you can disguise a 18 gallon rough neck container as a new end table. I should probably cut down on the fabric before someone calls that hoarders show. "What doesn't everyone have a path between stacks for fabric? Watch out for the toy frog, he has a nest over there. No you can't go into the fridge, that's where I store all my yarn!" Just wait until the box of PJ eaters rains down on their head. 
Here's to another fun year of stash busting so that your offspring don't send all your unused loveys off to the dump.  THE HORROR!

I'm Your Personal Tailor* - Ottobre Design Peacoat

1.05.2014

*Some exclusions apply. Are you related to me and plying me with fabric gift certificates? If not then you're probably excluded. Unless you are a photogenic toy frog, he is excluded from exclusions.

My sister does meet all the above criteria which entitles her to coats.
Here's the back story on this coat - My sister is always spoiling me with lovely gifts, so I asked her if there was something she's like me to make her.  She sent me a picture of a RTW peacoat with a faux fur collar and said, "How about this?"  I went through the pattern stash and darn if I didn't have a pattern almost the same in an issue of Ottobre Design women. I picked some pretty wool and lining from my stash, bought some faux fur and made her a coat for Christmas.
Sounds great right?  Well I forgot to mention that this conversation took place in 2012.  Worst personal tailor ever, I'll never make it in this business. At least my sister is doing better than my husband, who asked for a jacket in 2009 and still doesn't have one.  And no he has not forgotten. Perhaps he should ply me with fabric gift certificates for favored sewing queue status.
Pattern
Nanette Peacoat from Ottobre Design Woman 5/2010.

Fabrics used
Wool flannel coating from Gorgeous fabrics - this color "Heathered Smoke" was purchased in Dec 2012, so it is now sold out.  The good news is that there are other colors of this coating still available. It's wonderful quality wool at a reasonable price, especially at 60" widths.  In my opinion it's also the perfect winter coat weight. Thick enough for colder climates, but not a nightmare to sew on your home machine. I might have purchased 3 yards of it in red this December.

Faux fur "Siberian husky" collar from Fabric Empire on Etsy.  This was my first time purchasing from this source and I was very pleased.  The faux fur is excellent quality, similar to $50+ a yard furs, but at $34 a yard. Their shipping was also lighting fast. I had a fluffy package on my doorstep in 3 days even though they are based in California.

Rayon leopard print lining - This was also from Gorgeous Fabrics in the year 2012.  It's long gone except for the stockpile in my closet. So put that on your "to burgle" list.

Pattern changes/alterations
OMG people, my sister is so easy to fit. I think she made a deal with the devil to be almost a perfect fit model.  I hear her yelling in the background, "But I have short legs!" Shhhhh Shhhhh, you got two good knees to wear 4" heels to get around that.  The devil deal still stands.

1. Blended sizes 38/40 because being a bit pear shaped is in our genes.

2. I assumed she would also need a 1/2" forward shoulder adjustment and put it into the muslin. She did so I went back and adjusted the sleeve the same amount for the real coat.

3. The muslin showed that my sister is also narrow in the small of her back.  She needed 1/2" taken out of the princess seams right at the waist seam. I blended this out to nothing before reaching the upper back.

4. Shortened the sleeves around 4" because my sister is petite and likes to show off her bracelets.

5.  Added 1 3/8" of length to the coat. My fitting muslin did not have the hem turned up and I liked the proportion of the coat with the extra length.

That was all the fitting changes, no moving waists, doing sway back adjustments and FBAing. It was blissful.

One other note - The pattern is not drafted to have contrast fur collar, but it is very easy to modify for one.  The roll line is well marked on the facing. I cut the pattern apart on this line and added seam allowance to each side.  The lower part was cut in wool, the upper in faux fur. Cut the upper collar in faux fur and sew as instructed.

Confessions/Advice
On the whole I found this pattern to be beautifully drafted and the majority of it was a delight to sew.  I only have two issues.

1. The collar stand/collar seam has a really tight curve.  I'm used to a flatter curve, much like what is on a button down shirt collar.  Don't even try to sew this at a 5/8" seam allowance cause that mother clucker will not fit.  Trim down the SA to 3/8", or if your daring like me 1/4", and the two pieces fit just fine.
2. The pattern does not come with a back facing pattern.  I drafted one and adjusted the back lining to fit the new piece. 

Tips for cutting faux fur
When cutting your faux fur you want minimize the amount of fur cut off a the edge of the piece.  Here are my steps with some semi dark photos. Such is the hazards of middle of the night sewing.
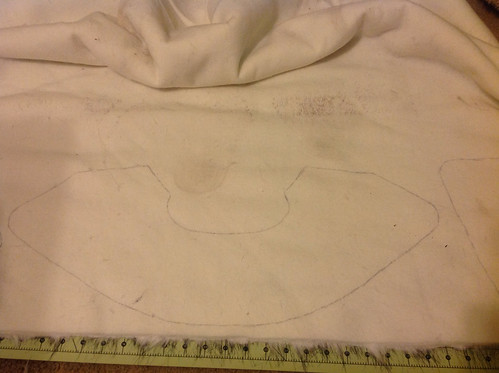
1. Trace the pattern on the back of the fur.
image
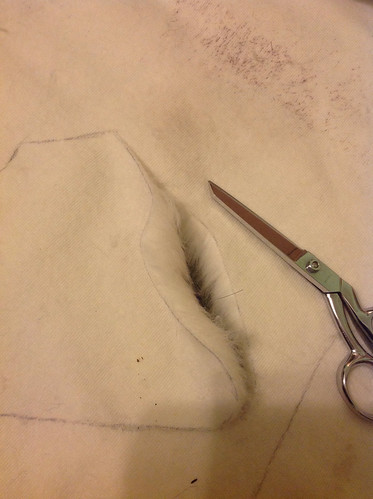
2. Cut a small hole on the pattern edge with a razor blade, just big enough to get your shears through.
image
3. Then take the shears and very slowly cut trying to just catch the backing with the blade.
image
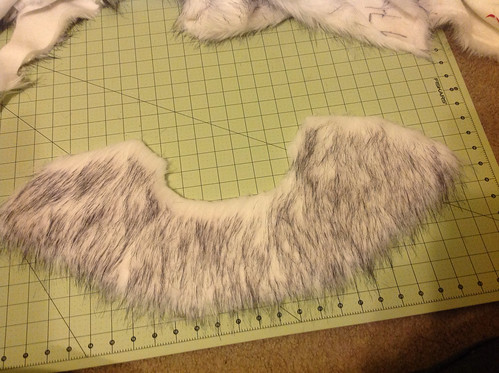
Here you can see the cut out piece. 
image

Of course always remember to pick the fur out of the seams when you're finished sewing. My choice instrument for this is the large blunt needles used for seaming knitting.

Husband Comment
"Do you make that? Why does it have extra buttons."  Then I explained that a pea coat is double breasted and double breasted styles always have extra buttons for visual balance. "But those buttons aren't functional, you should just take them off."  At which point I might have mimed choking him.  Otherwise he thought the coat was great.

My Final Thoughts
Guys, I love this pattern.  I whole heartedly agree with Ottobre that it's a feminine take on the the classic peacoat.  But not too frou frou flouncy feminine, just right. It's staying in my sewing queue to make for ME!  Confession - I'll probably procrastinate another year before making another one.  See you in 2015 new coat.

Top 5 Goals for New Year

1.01.2014

Time for that final list just in time for the new year, it's my top 5 goals.
1. Save for a new sewing machine.
My dear Janome has been with me since the mid 90's and has been beaten to hell.  Getting it serviced in the summer helped a bit, but some damage just can't be undone. It's time for a new machine, preferably one that makes pretty buttonholes.  Sadly this means less fabric purchasing as I try to save up my pennies.

2. Continue to sew from the fabric stash.
Out of 65-ish garments completed this year, 40 were from stashed fabric.  I'm surprised and pleased with that total. One could almost call 2013 a stash busting success....if I hadn't bought at least as much fabric as was sewed. I don't keep any hard records of stash in/out. All I know is that my closet storage area is still packed to the gills  In 2014 I'm gonna try to sew up more fabric than I purchase, god help me.

3. Learn some new skills.
It's relatively easy to stay in my current sewing skill plateau.  I'll also admit to being annoyed about learning new sewing skills.  I don't like finding out that I'm not good at something immediately. "You mean I have to practice at this? SOB!"  Even so I'd like to became better at my craft. My goal is to read at least one of those cool new sewing books I got for Christmas.

4. Draft a few of my own ideas.
I've got the skills and the know how, I'm just lazy and easily distractible. However I harbor a certain about of guilt about my languishing education as I purchase other people's patterns. MOAR PATTERNS?  Let's make that more patterns from me. For concrete tracking purposes we'll say 2 self drafted patterns for the year is the goal.

5. Give back to the sewing community.
This is an area where I feel some improvement is needed.  Maybe because the sewcialist community is so giving in general, it's hard to keep up. :)  I've directly benefited from the generously of many people in 2013 and I'd like to "play it forward." In 2014 I'm planning on doing some more pattern drafting tutorials/fitting tutorials and hosting a few giveaways.

Hope everyone had a great Holiday Season and is ready to start a New Year.  I'm hoping my sewing mojo returns from it's holiday vacation soon cause I've got plenty of plans.  Also I have some exciting, well exciting to me, sewing related news to share with you soon. Squee!

Proudly designed by Mlekoshi pixel perfect web designs