A How To - Plantain Tee with Yoke

1.31.2014

Hey bloggy readers, I made a plantain....just like everybody else.
But wait, there's something a little different here...is that some sort of contrast yoke?
Why yes it is a yoke and I even got fancy and put some stretch mesh lacy fabric on it.
The old gray cells and I were trying to think up a way to jazz up this pattern a bit. It took a few weeks, but finally we and hit upon a way to use that stashed stretch mesh. Add yoke with overlay, sooooo easy. It really is easy and I've put a little tutorial in the pattern changes/alterations section.

Pattern
Deer & Doe Plantain (free pattern)

Fabrics used
Soy/cotton jersey and stretch mesh. I got the stretch mesh from Marcy Tilton some time ago.
It's a fabric that I'm not sure how to use most of the time. But come on, a cool feather design, I couldn't pass that up.  Marcy stocks a lot of stretch mesh if you're looking for that type of fabric for any reason.

Pattern changes/alterations
I traced a straight size 42 and only added about a 1/4" of extra ease at the hemline.  The real change made to the pattern was to add at yoke design.  It's a fairly easy to do and I'll show you how.

1. You'll need to grab the front and back pattern pieces of Plantain.  Make sure the seam allowance is drawn in on the shoulder seams.  I also added the seam allowance to the other edges to make measuring the finished yoke more accurate.
 2. Starting with the back, measure 4" down the seam allowance at CB and mark.  Use this mark and the CB to draw a perpendicular line across the back. This will be your back yoke seam line.
3. Cut the pattern apart on the line, then tape extra paper to the cut edges so you can draw in the seam allowance.  Once you have the new SA trimmed up your back piece is done.

4. Next take your front and draw in the seam allowance on the the neck and arm edge.  We're going to measure down on the SA for the front yoke line.  On the neckband edge measure down 2 3/4"and mark.
On the armhole edge measure down 3 1/2" and mark.
Then draw a diagonal line connecting the two marks for your front yoke line.
5. Once again cut the yoke line and then add seam allowance to the cut edges.
6. The last step is to connect the two yoke pieces.  Take the front and lay the shoulder stitch line on top of the back shoulder stitch line. Tape in place and trim up any overhanging edges.

You'll want to mark both the armhole and neckline shoulder points as notches.  Then when you're sewing the shirt up later you'll still have matching points for the sleeve head and neckband even though the seam is no longer there.
Now your pattern is ready to sew!

Confessions/Advice
I was a bit worried about sewing on the elbow patches on the old sewing machine.  Turns out if you use a stable knit, stretch needle, and a longer stitch length then elbow patches are easy peasy.

Husband Comment
"It's kind of like a Star Trek uniform with the stuff on the shoulders. What is that fabric? Isn't that bra fabric? You have bras on your elbows."

My Final Thoughts
This is a nicely drafted pattern with clear directions. If the style pleases you than go make a bunch of them. :)
It's time for the leopard scarf drawing results!  Thanks to everyone who put their name in, wish I had a scarf for each of you. Mr. Bee did the picking honors and the winner was Maris Olsen. Maris just send me your mailing address to knit(dot)n(dot)frog23@gmail.com and I will dispatch the scarf.

Leopard Party Bellatrix Blazer

1.27.2014

It seems fitting to round out Jungle January with a party....a leopard print party to be exact.
Leopard 1
My outer leopard shell is muted and business like, but my inner leopard skin is all "Hello and MEOW!"
Leopard 5
But let's back up and talk about the Bellatrix pattern for a moment.  When Papercut Patterns released their Constellation collection I practically foamed at the mouth upon seeing this blazer.  I've got a fever for blazers and the only prescription is more blazers!!! At least that's what Dr. Frog tells me.

I swear on Dr. Frog's fake medical degree that I was going to sew this pattern up immediately. But that pesky Christmas/germ tsunami totally took the wind out of my sales.  My forlorn Bellatrix muslin stared at me sadly from the corner for weeks. "Why won't you sew me? I thought we were in luv."  Poor blazer, I couldn't let it go on pining for another month. Instead I got my shit together and decided to pull out ALL the leopard print.  Bellatrix Blazer, you will be a magnificent beast! *Cue "Bungle in the Jungle*
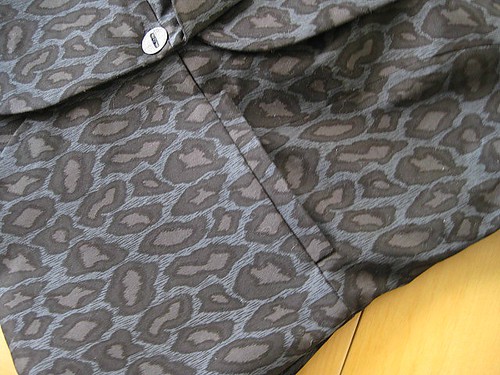
Outside pocket detail
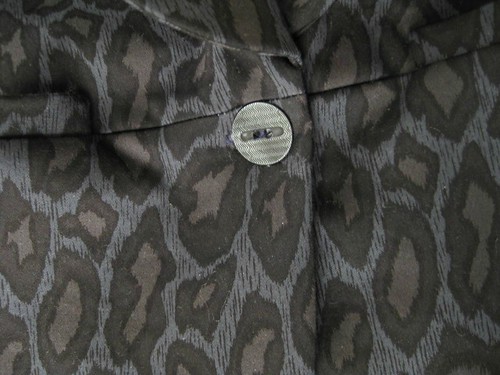
The main fabric is a stretch cotton twill picked up from Marcy Tilton last year. Most of the pattern pieces need to be fused, so the stretch factor is moot in the finished garment. Speaking of fuse, I used my favorite "Pro Weft" for the majority of the jacket.   For the extra collar fuse, sleeve facings and welts, I swapped in a different product from Pam, "Pro woven crisp".  I found that pro woven crisp takes a lot more work to fuse completely. You really have to wet it down, put a press cloth on top and just lay the iron on it for a minute. Worth the effort cause I like the way it looks in the blazer.

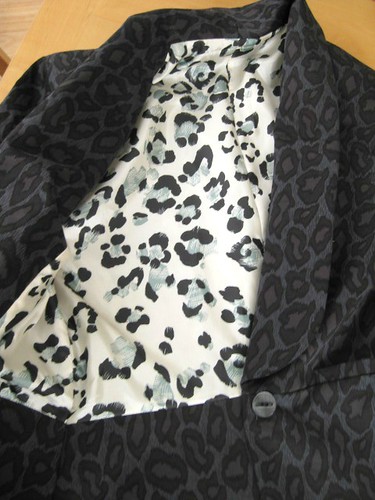
For the finishing touch I did pull out more of my leopard lining stash. Pretty sure it goes with everything.
Lining shot
Pattern
Papercut Pattern's Bellatrix Blazer

Fabrics used
Self - Stashed Stretch leopard cotton twill
Lining - Stashed Leopard lining
Interfacing - Stashed Fashion Sewing Supply Pro weft, with some Pro woven crisp in the collar/sleeve facings and welts.
Button - a freebie from some past Waecter's order
All Stash Project - collect your bonus internet points! Cha-ching.button

Pattern changes/alterations
1. I had to do a giant forward shoulder adjustment on this pattern 1 1/4". The corresponding change to the sleeve cap makes for one funky looking pattern.
2. Normal 1/2" upper back width increase with added shoulder dart.
3. Sway back adjustment of 3/4".
Leopard 4
4. Added 3/8" to the side seams to increase the hem sweep.

Confessions/Advice
- I think this pattern is drafted very slim through the hips or maybe just with flat butts in mind.  My muslin was made back in December using a blend of sizes M and L, which should have fit my hips.  I found the waist and hip area both way too small and put the muslin away for awhile.  This month I'm 10 lbs down and have lost several inches from both of these areas.  I still found the hip area too small and added more ease the hem area. I would advise anyone that carries their weight in the hips/butt area to size up on the lower half, especially if you want to wear this blazer over pants.

- I decided to bag the lining instead of following the directions.  Then discovered that it's impossible to under-stitch the bottom of the blazer from a gap in the armhole lining.  Solution - open up the lining side seam as instructed, under-stitch, then turn the jacket inside out again and stitch up the side seam.  Then you can turn the blazer right side out through the armhole gap and machine sew that closed.  No hand sewing makes Heather a happy girl.

Husband Comment
"That looks nice and it has real pockets that work." *Shoves his hands in the pockets to check that his eyes aren't deceiving him.*
Leopard 3
My Final Thoughts 
The construction of this blazer was different from most that I've previously sewed.  I did find that enjoyable and think it would be a good pattern for those not experienced with sewing blazers. The fusing does take a fair bit of work at the beginning. However this step gives the finished blazer a crisp professional look, so don't skip it.  The inseam welt pockets are super easy to sew. Can all my welt pockets be inseam from now on?
More pockets
Beep Beep Beep!  Oh no, it's the stash-o-meter! It seems my leopard print stash levels are now dangerously low. Frog take a note - Schedule trip to Katie's house to steal more leopard print before next Jungle January. We have to be prepared for more Jungle parties.

- I'm going to do the scarf drawing next post, so you'll have to bite your fingernails for now.

Not so Itty Bits

1.24.2014

This month I joined the Stash busting Sewalong theme team and sewed up some Itty Bits. Inquiring minds want to know if the Sewalong theme team as jerseys........ummm we probably have a box full of jeresys.  *Guilty as charged*

Since that box and basket of jerseys exists I made my son another pair of Peek-a-Boo Pattern's Winter PJs.   Yeah that's right, I made this exact same thing for last January's Itty Bits challenge.  Big whoop, want to fight about it!  Hmmm maybe I should stop taking those "performance enhancing" sewing drugs. They seem to making me a little bit combative.
Both the pirate themed ribbed cotton and the black ribbing is from old stash.  The pants fabric and the red ribbing is a December 2013 acquisition, but we're calling that stash OK.  Don't make me hurt my brain calculating months since purchase. New year, new stash.
Completed PJ's for Des. Good work Froggie....wait what's that lurking in the background?
Froggie was very helpful during assembly, he knows how to earn extra cookies.

The second project is a bit of a theme cheat, it's not under the "legal yardage limit." Don't tell my coach cause I don't want to be benched during the big sewing meet.
I finally made an infinity scarf out of some silk chiffon bought for that exact purpose. The fabric has silver metallic threads woven in the leopard print.  How cool is that!  Now I can accessorize that team jersey and blind the referees with my fabulousness.  "Did you see the play?"  "No, I couldn't take my eyes off that girl's grrrific scarf."
The scarf is a 2 yard fabric tube that was folded in half, seamed and then joined into a loop. In my brain it counts as an Itty Bits project because you can get two scarfs out of 2 yards of fabric.  That makes the second scarf a scrap project right, right?  Just nod your head yes and I won't give you a swirly.

Instead you could receive a swirly scarf. Oh yes, I made the second scarf as the Jungle January trophy for one of my sewing friends. We all need a little more jungle in our January.
Just leave a comment that you'd like to have your name in the scarf lottery and I'll do a random drawing for the winner next week.  I'd have Froggie pick the name but he's easily bought with treats. Don't want any of you getting any ideas about rigging the vote. ;)

So I went on a little Stash Dive

1.21.2014

In case you don't know Andrea and Morgan started Stash Diet 2014 with an accompanying fabric swap for unwanted stash.  When they say swap it really means, "If you want this fabric then by all means take it. No actual swapping required."  I freely admit I went there first to see if there were any fabric goodies to enrich my stash.  MOAR Fabric!  Problem was that it's still January and I can't conveniently forget all my goals yet. Wasn't there some goal about stash busting......damn it, it's in print on the blog and everything.

Instead I decided to comb my own stash for the duel purposes of refreshing my brain on what's stockpiled in there and to weed out any unwanted items. Also to give me some ideas of holes in the stash since I'm not banning all fabric purchases. Here are my take aways from communing with my stash.

1. Hey dumb dumb, stop buying fabrics that are cream or oatmeal in color. Same goes for any prints that have these colors as the background.  You know these colors don't look good on you and no garment will make them magically flattering. Stick with the colors you know suit you, true white, black, gray and jewel tones.

2. Is an alternate personality starting some sort of jeans business, cause there is a ton of blue/black denim in the stash cave.  Until I see some jeans magically appear in my dresser no more denim purchases.  Unless it's colored denim then Future Heather has permission to go nuts.

3. How much silk crepe de chine does a stay at home mom of a toddler need?  Probably about 1/4 of what's in that rough neck container. Sew what ya got.  Or just lay it on the floor and roll around in it. Wheeeeeee!
4.  No more 2 yard cuts of rayon knit prints unless they are so awesome that your eyes melt. In that case get 3 yards for a dress. I'd say no more flora prints on black backgrounds but I know Future Heather will buy it anyway.

5. Look at all this great cotton I bought from Gertie and vintage Etsy sellers last summer. I Regret Nothing. MOAR cotton prints!
6. Children's fabric - unless it's Lillesoft buy a swatch first.  There's too much variety in knits in this area and you never know what you're gonna get. Future Heather has permission to buy any awesome boy prints cause they are like the holy grail of knits.

7. You have wool coating in every color you wear, that's probably enough. Forget about an adult sized hot pink Barbie coat....Forget about it! Oh look I have faux leopard fur in the stash already...crap.

8. Solid cotton blend knits and striped knits, buy those things Future Heather but maybe not more gray. You're buying gray right now aren't you?

9. Damn I have a lot of gray wool.  Is gray my signature color or something? *Looks down to find I'm wearing dark gray pants and a light gray sweater.* Crap
10. Buy More Color Gray Girl! Future Heather says, "Like navy right, that's a color.....ooooooo look at this black fabric."  Damn you future Heather buy some red or hot pink! She never listens.

Anyway....I did find some fabric candidates to put up in the stash diet swap page.  Nothing too exciting, mostly things that were the wrong color for my complexion. I also have a few items inherited from my grandma that I just don't feel like using.  I need to measure yardage and do a little color correction but hope to have must of the fabric posted by the end of the week. Drop in on the flickr group of you're interested.

A Tiny Hack - Boat Neck Renfrew

1.18.2014

Confession - I'm a instagramming junky when it come to my sewing. Unless it's a secret project, I'm taking a picture of my process every 10 minutes. Early this week I put up a pic of a black boat neck T-shirt that was altered from the Sewaholic Renfrew pattern. Silvia aka Jusipra said, "Hey can you do a tutorial on that?"  Heck yeah, tutorial request excepted.  I'll even make another T-shirt out of a fabric that doesn't photograph like crap.
Ta daaaa, one foxy boat neck out of some cheap ass fabric.  Oh little foxes I couldn't say no to you.

Fabric is from Girl Charlee "Fox family on Blue Cotton Blend Jersey." I feel the need to do some full disclosure on this particular yardage.
Pros
-The fox print is very cute and the colors are bright.
-The price is very reasonable at $6.50 per yard.

Cons
-The base fabric is cheap feeling and if I hold it up to the light it's semi transparent.
-On my piece the grain is skewed. The pattern does seem to be printed on the straight grain so maybe one could block this straight if they wished.
-It has very little stretch in any direction. Too be fair the fiber content is clearly stated and the fabric has no fibers like spandex woven in to increase it's stretch. That means the fabric only has "mechanical stretch," it  stretches cause knit construction is inherently stretchy.

I've ordered from Girl Charlee before and knew what to expect in terms of quality. I decided that the price point was low enough to make up for any inadequacies with the fabric. Those foxes where just too cute to pass up. Now on with the tutorial bit.

How to turn your Renfrew into a boat neck
Notes - All my Renfrew seam allowances have been trimmed down to 1/4 in this example. Use the seam allowances you are comfortable with. The coverstitch machine can be substituted for a twin needle or a zig-zag stitch on your regular machine.

Drafting Instructions
1. Trace the front of the Renfrew and extend the CF line up to the shoulder.
2. The width and depth of your boat neck is mostly personal preference, but it's always nice to have a guide line. For my shirt I marked the shoulder seam 2.5" from the outside and the neck 3" down from the shoulder point.
3. Then use a french curve to draw the new neckline in.
4. The front is pattern has now been adjusted. I considered the new neckline the cut edge and did not add any seam allowance to it.

5. Moving on to the back pattern. Here only the shoulder width needs to be adjusted to match the front.  Measure 2.5" from the outside of the shoulder and mark.  You can double check by putting your new front piece next to it.
6. Grab the french curve again and draw the new neckline.
7. Your back piece is now done.
8. One last step is to draft a facing for the front and back neckline.  I traced the new necklines and made the facings 1" wide. We'll be cutting them down later.  I cut notches at the CF/CB of both the shirt and facings to make them easier to line up later.

Sewing Instructions
1. Sew together the shoulder seams of the shirt.  Then sew together the shoulder seams of the facings.
2. Pin the facings and shirt right sides together lining up the seams and the notches on the CF/CB.
3. Sew these pieces together along the neckline.
4. Flip the facing to the inside of the shirt. Give it a nice press on a ham to keep the facing inside.
5. To secure the facing, run a line of coverstitching along the neck edge. I used the throat plate as my guide making the stitching 1/4" away from the edge. When you're done secure the coverstitch threads.
6. Finally we're gonna trim the facing down to the coverstitch.  Use a small pair of scissors and go as slow as you need to. When you're done the neckline will have a nice tidy binding.
Additional changes to this pattern were:
- Narrowed the lower half of the sleeve by 1/2" at the cuff, tapering the new seam up to the elbow area.
- Added 2" additional length to both the sleeves and body of the shirt. The shirt was then finished with 1" coverstitched hems.
Hopefully that was clear enough, but if you have any questions feel free to leave them in the comments. Happy Hacking!

Proudly designed by Mlekoshi pixel perfect web designs