Extra, Extra.

6.29.2015

Popping in on this Monday morning with a quickie info dump.

1. This week I'm the featured maker over on Kollabora. Pop on over there if you feel like reading about "creative process".  I put that in air quotes because my process is usually just a chocolate fueled exercise in winging it.


2. Sundress Sew-a-long officially starts on Wednesday. Here's the link to the flickr group if you haven't already joined. I'll be doing a few sew-a-long related posts throughout the month to get everyone's creative juices flowing.

More Stash Busting Contest Makes

6.26.2015

I promised/threatened to do another post of all my PR contest makes, so let me show you what else the frog powered sweatshop cranked out.  We had to close the sweatshop up a little early thanks to a freak storm that blew out our power for a few days.  Now that power is back on, we find ourselves only interested in laying in front of the air conditioning and surfing the internet. Oh internet, never leave again.

We still cranked out a lot of clothing during the middle of the month, including another Advance 9441 that will get it's own post. Mainly because I took so many pictures and can't whittle them down to one. So you have that pic heavy post to look forward to.  For now feast your eyes on a plethora of tops and a few bottoms that are no longer stashed fabrics.

1. Comino Cap
Finally decided I was keeping this yard of mermaid jersey for me. Sorry/Not sorry kids in my life. No changes to this baby, just hot pink mermaid goodness.

2. Maison Fleur 1301 Top View 2
This was supposed to be another version of View one, but the cotton sateen seemed a bit too thick for shoulder ties.  No worries, it's easy to convert the top to view 2 mid project.  All you need to do is cut off the ties on the back an put some buttonholes in the front ties.  A few self covered buttons were added to the front for a decorative element.


3. Nettie with cap sleeves and gathers.
Somehow I didn't make a short sleeve black Nettie last year. What! Well that oversight must be fixed immediately.  To spice the pattern up I added a few minor tweaks. First the normal Nettie short sleeve was swapped out with a cap sleeve that I'd drafted way, way back for the Fauxneta.  Second I gathered up the CF with a 1/4" x 1.5" piece of black elastic.  Easy, Peasy.


4. Edith and Self Drafted circle skirt
Yep, I really like the Edith pattern and keep adding them to my closet. More prints! More Colors!  And what could be better for summer than a sea themed vintage cotton version? Nothing! After that was finished, I decided to sew another self drafted circle skirt for a snazzy new outfit.
 

5. Several pairs of Barrie Briefs.
At long last a use for those Lillestoff remnants that are too big to throw away! I've been sewing the mid rise version because I'm turning onto an old lady who likes her underwear bigger and bigger.  They have excellent "check coverage" for those of us with plenty of junk in the trunk. I'll be sewing up a least a week's worth and while chackling with delight.

The stash busting contest was a fun challenge and did make me sew up more yardage than I normally do.  Nothing like a good dose of competition to get one cranking out all those things on the sewing list.  Still I'm looking forward to July, using new fabrics and not feeling guilty about picking up my knitting.

Plaid Madness Insues

6.23.2015

Say you haven't sewn with plaid in years. You are well aware that your plaid matching skills are rather rusty and things could get a little dicey. Because of this you're entirely sensible and choose a simple pattern. Maybe a pull over top with a side seam zipper so you only have to plaid match across the shoulders and at the side seams. You get a little plaid matching refresher without tearing your hair out. Pleased with yourself you celebrate with cake.

Or you could think, "My plaid matching skills are a little rusty. Maybe I should sew a shirt dress with a big collar and a bias cut skirt. Don't have to plaid match across the waist seam. WINNING!" Fixated with this fact you fail to think about all those seams that do need to be plaid matched, some of them on the bias. Oh no, this project is going to be a "Piece Of Cake", you think while eating cake.
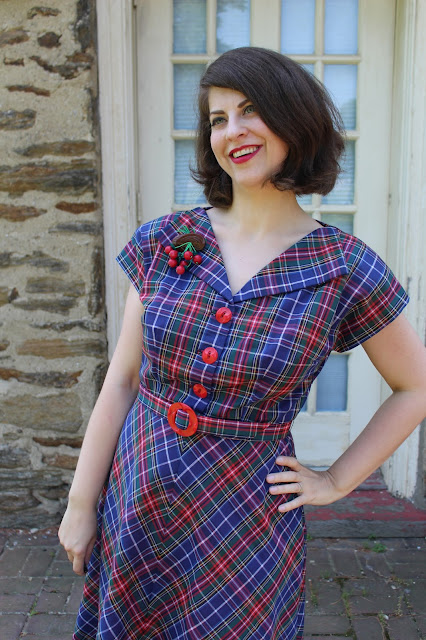
Now that you've seen a picture, it's pretty clear the direction I went in. Sensibility is not my strong point and I did think a bias cut skirt would be a piece of cake. I told myself that this worry over plaid matching was silly and everything would be fine. FINE. Thusly prepared with fake confidence I went forward to cut plaid fabric.

The plaid cutting technique I used was drawing a line on the pattern and lining it up with one of the white plaid lines. When pattern pieces were labeled cut two, the first piece was placed on top of the fabric to assist matching the second. This was most likely a fine cutting technique if I'd been a bit more careful.  But I got a little sloppy and though, "That's close enough and I'll be about to make it work."
I also flat out made a cutting mistake. When cutting the second front, I plaid matched the white plaid lines but not the red ones.  But that was an error that wasn't caught until much, much later. Well get to that in detail in a bit.

My order of assembly was to sew up the bodice first. All the darts, facings, shoulders and one side seam were stitched.  I even went so far as to hand sewed the sleeve facings in place.  All that went smoothly other than realizing that I hadn't plaid matched across the shoulders. Oh well, no use losing sleep over that detail now that the fabric was all cut.
After completing all those details the only thing left was sewing the bound buttonholes. I wasn't in the mood to tackle those yet. Sewing bound button holes is one of those things that always provokes a mild panic attack.  Matching plaid on the bias skirt seams would be much easier...right?  The first seam, CF, took one whole hour to sew. "Oh Crap! What have I gotten myself into and why are some of the plaid lines matching and some aren't?" After much trial and error it was discovered that the plaid intersections were just as important to getting good chevrons as just getting the colors to line up.  Did I mention that my plaid matching skills were pretty rusty?

On the CF seam my cutting was almost correct.  With just a little fudging of the 5/8" seam allowance I was able to get good alignment of the plaid.  The rest of the seams wouldn't be so fortunate.  The other 3 skirt seams had to be sewn at crazy seam allowances to get the correct match. One side would be 1/4" and the other would be at 3/4".  I went back and trimmed down the larger side down to 1/4" so that the finished seam looked a little better.  If any future seamstress looks at this dress they will probably wonder what the hell was going on. Maybe I shouldn't get so uppity about some of my vintage hand sewn dresses.

But back to our plaid matching saga, it is far from over.  At this point I'd done a pretty good job during cutting keeping the repeats matched horizontally. Three skirt panels were sewn together with only a 1/4 or so of mismatch at the hem. It wasn't until panel number 4 that there was a big problem. I found that it needed to be shifted upwards an inch to get the side seams to match correctly. Eeeeep!  A small thank you was said to vintage pattern drafters for using super deep hem allowances as I shortened the other 3 panels to match.

With the skirt finished it was time to finally tackle those bound buttonholes.  I did refresh my brain on sewing those by rewatching the Sew Retro Starlet Jacket class on Craftsy. At least part of me learned something about doing proper prep work on this project.  The bound buttonholes were a slow go, with plenty of ripping out.  At least there weren't any horrible cutting mistakes and the finished holes looked pretty good. I moved on to the facing windows and then hand stitched the two layers together. Feeling pretty pleased with all my hard work, I went to baste the bodice pieces together and saw this.
NOOOOOOOOOOO!!! A thousand scream emojis have just been born. I thought, "OK, let's not freak out. The non buttonhole side can be replaced. Wait, which side matches the back?"  You guessed it, the non buttonhole side.  At this point I started manically laughing in the way crazy people do before they flip out and start stabbing everyone.  I...Have....To...Redo....All....The...Buttonholes. Perhaps I should just fall on my sewing shears instead.

At that point my husband arrived home and said, "Time to go to the church picnic." This turned out to be a good thing because I couldn't lounge dramatically on picnic benches crying about mismatched plaid in front of near strangers. "No, no, you don't understand! They were bound buttonholes, bound! I have to dissemble half my work!" *Cue manic sobbing.* By the time we returned home I'd calmed down a bit and was able to deal all the work that had to be redone. There was some fabric left and I was able to cut a new front and facing that did match the other side.  Praise the sewing goddess! She also made sure that second set of bound buttonholes sewed up a lot faster. Or it could have been all that practice bound buttonhole practice I'd just had. Bodice fixed, it was attached to the skirt which magically still fit. Thanks bias cut! The final bit of magic was that the skirt stretched before hemming and was no longer an inch shorter than I'd intended.


Pattern
McCall's 7977. Haven't seen this one floating around before purchasing my copy. This project counts as #vintagepledge number 5.

Fabrics used
Cotton shirting (May have a bit of poly in it. It was from my grandmother's stash and I didn't feel like doing a burn test.)

Pattern changes/alterations
- Added 1/2" through the waist and hips. For the hips I actually added the 1/2" throughout the length of the skirt.

- Shortened the bodice 3/8"

- Shortened the skirt 5.5" (Think as drafted this would have been a maxi skirt on me.)

One alteration I would go back and do is to take in the shoulders about 1/2 -3/4"  Even with shoulder pads sewn in that area is a little big. You can see that the CF is collapsing a bit and it's from the excess in the shoulders. The actual bodice length is correct. (It took me completing the whole dress to finally figure out this issue.)

Confessions/Advice
- Make sure your plaid matches across center front before putting in bound buttonholes. Duh.

- This shirting was a bit more sheer than I'd anticipated before sewing it up. I've worn a red slip underneath the dress for the photos.

- I slapped some ready made shoulder pads in this dress at the last minute. I should go back and either use the shoulder pad pattern pieces provided or cover the ready made ones in self fabric.

- The belt and buttons were a vintage deadstock set I stumbled across on Etsy.

- Covered belt enthuses rejoice, I ran across an internet source for belt backing!  Sew-Biz Fabrics has a lots of widths available. Their website might be a little dated looking, but they shipped promptly and I was pleased with the backing in real life.

Husband Comment
"Hey look, you got all the lines to match. Oooo, they go up or down depending on how you look at them. I also like your belt buckle. But you didn't make that, just strapped it on there."

My Final Thoughts
With all the cutting snafus this project should have ended up in the trash can as an unfixable wadder. Maybe Grandma had my back on this one making sure it worked out in the end. I can tell you that she would have given me an earful about that bodice cutting error. She didn't hand out sympathy for being a dumbass and not paying attention.  ;)  She still would have made me 3 different things for lunch because she rocked.
So I've talked about plaid matching at length, but not about the actual pattern.  Please forgive me lovely pattern, I'm still a bit shell shocked from making you.  In a solid or non directional print this dress would be a snap to sew up.  It has several design details that look as nice on a real body as they do in the fashion illustration. That's always nice since fashion illustrations don't have to worry about gravity or real life bust/waist/hip ratios. In recap, great pattern, fraught construction, awesome final dress. Now excuse me I have to stare at my skirt seams while eating cake. Ooooo plaid.

It's Baaaack - Sundress Sew-a-long

6.18.2015

Hello all you fabric mavens out there.  We had such a good time sewing sundresses together last year that it seemed a shame if we didn't do it again. So I had my trusty sewing room helper Froggie put on his administrative hat and hash out all the details.  We are happy to announce that Sundress Sew-a-long 2015 is a go!
To keep things simple, the sew-a-long will be pretty much the same as last year. The only real change is the time frame.  "Someone" might have misremembered when we rolled out the sewing machines and frozen drinks last year. Alcohol is not responsible for that though.  The problem is that I don't read my secretary's memos....because she doesn't exist. Annnnyway, here's the skinny for this years sundress sewing palooza.

The Details
1. Sew-a-long runs from July 1st to August 31st. Feel free to start hatching plans before then.

2. Pick any pattern you want to sew. While the true definition of a sundress is a "sleeveless dress", I'm not a stickler about it. If you prefer a to wear dresses with sleeves, then choose a pattern that says "Sundress" to you.  Modern, vintage, self drafted patterns are all welcome. 

3. Join the flickr group. Post your finished garments so that we all can admire and be inspired. (The flickr group is by invite to keep the flickr creepers out. Everyone looking to actually sew something is more than welcome.)

4. Get social. For those of you hip to hash tagging you can use the tag #sundresssew15 to share your plans or progress. 

5. Wear that Badge with pride.  Grab the code below for this years sew-a-long badge. 
grab button for Handmade By Heather B
<div class="handmade-by-heather-b-button" style="width: 200px; margin: 0 auto;"> <a href="http://handmadebyheatherb.blogspot.com/" rel="nofollow"> <img src="http://i12.photobucket.com/albums/a223/Heather_Beckley/Smaller%20Badge_zpstlhrwddh.png" alt="Handmade By Heather B" width="200" height="175" /> </a> </div>

Now that the sew-a-long has been announced I'd better get Froggie on frozen drink duty. I know all that sewing works up a thirst. Chop, chop, margaritas for everyone. Here's to pretty dresses and summer time fun. Cheers!

Stashbusting Power Boost

6.14.2015

It's been a little quiet on the blog this month because I've been cranking the sweatshop into high gear. Frog and I have been pumping out garments for the PR Fabric Stash contest. Since this contest is won based on yardage sewn, it seemed like we might have a shot at one of those sweet Mood gift certificates.
Fabric Stash Contest 2015
Froggie and I played the Rocky 4 soundtrack over and over again, and got our "Eye of the Tiger" on. However real life conspired against us and cut our sewing time in half.  Then I decided to sew a dress that needed plaid matching and bound buttonholes.  Oh yes Heather, planning a giant time suck project is greaaat strategy for this contest......not.  Froggie also might have binged on birthday cake and not held up his end of the hemming bargain.  Long story short, Team knitnbee is way behind in the numbers and won't be taking any prizes home

On the good side, the contest has been a great motivator to use up some of that dreaded orange stash layer. All those rementants and tricky fabrics that have been lurking in my stash for years. When the shiny new fabric is off limits, amazingly I come up with pattern ideas for the old stuff.  Or at least recycle patterns that seem to fit with the yardage available.

Most of the garments team knitnbee has made are ones you've already seen on the blog.  Instead of doing my normal review format, I thought a quick overview would make more sense. The pictures aren't going to be quite as good either. It's basically just me lurking on the sidewalk in front of my house, trying not to squint into the camera. So let me show you what I've been up to.
 
Outfit #1 - Maria Denmark Day to Night Drape Top and Colette Mabel
A couple of one yard knit remnants have been the bane of my stash for some time.  Too much to throw away, not enough for most pattern ideas....unless it's these two patterns. Score! The Day to Night Drape Top is new to me, but I'd seen numerous versions on other sewing blogs.  Figured it wouldn't be too hard to fit and whipped out a size medium with no changes.  On the whole I'm pleased with it other than the armhole depth. It's a little too close to flashing my bra band for comfort. I'd raise the armholes about a half inch for any future versions.
One sewing note - Instead of using either of the suggested bindings, I went a different route. The neckline was bound with self fabric the same say you'd use fold over elastic.  The armholes were finished with self strips of fabric and then coverstitch in the manner shown here.  Both of these methods worked out to my liking and I'd use them again. The Day to Night Drape top is a great way to use up rayon jersey scraps and it also got the husband seal of approval.  Not sure why I waited so long to make one.

Some of you may remember that I was less than enthused with the ponte Mabel made last summer. Surprisingly I actually found myself wearing that skirt around the house on a regular basis.  It's great for "fat" days and crawling around on the floor cutting fabric. When the deep stash yielded a yard of black rayon ponte it seemed like a good idea to modify the pattern and give it another try.
The pattern was lengthened 5" to make it a length similar to my woven pencil skirts.  I also put 1 1/4" elastic into the waistband to get rid of the feeling that the skirt was going to fall off. Both of these changes did improve the pattern for me, but I'm still not 100% comfortable with knit pencil skirts.  Stretch wovens just give you more lumps and bumps coverage.

Outfit #2 - Kitschy Coo Comino Cap/Lady Skater mash-up
Past Heather might have gone on a mesh buying kick two years ago under the assumption she was going to sew a bunch of underwear.  Guess what she never did....yep, sew underwear.  That's OK because present Heather needed some contrast fabric to squeeze out a dress in this swanky black jersey.  The swanky black jersey fiber content has been pushed out of my brain, but I did remember two things.  The fiber blend had milk fibers in it and the price per yard was on the high side.  That's why I hoared this fabric for years instead of sewing it right up.
Pattern details - The two Kitschy Coo patterns are drafted from the same block so you can sub in the lady skater skirt with no changes.  I did add 3" of additional length since I'm an old lady that like her knees covered.  The Comino Cap bodice is sewn as instructed other than reversing the direction all the seam allowances were stitched down. It seems smarter not to have the SA's peeking through the see through mesh.  I LOVE this dress and am happy to have put the swanky black jersey and feather mesh to good use.

That's all the sewing accomplished and photographed for now. I'll be back later in the month with another quicky post of TNT's. :)

Winter's last Sweater - Audrey in Unst

6.11.2015

Winter's last sweater, aka the garment you didn't apply yourself studiously enough to finish before old man winter packed it up.  That sewing machine is a wicked, wicked distraction! "Ohhh Heather, come sew a bunch of summer dresses.....That Wasn't A Request!"  Then the sneaky machine set a cake trap and I found myself caught in the pedal unable to free myself until I lined a bodice.

Annnyway, after finishing my last sweater I was still in the mood for another cropped length cardigan. So cute with dresses, so much less to knit. Good old Ravelry pulled up a bunch of options and I was soon down a Gudrun Johnston rabbit hole.  Dear Gundrun, you've been bringing it in the cardigan department and I'm sorry it took me ohhhh something like 5 years to realize it. I blame the the small human who turned my brain into mush causing me to only be able to knit blankets and socks for a few years.  He laughs at my misfortune and sticks my hand knit socks in his mouth. Yeah, it's both gross and an affront to my handiwork. ;)
I could have cast on several of Gundrun's cardigan patterns, but went with the super popular choice of Audrey in Unst. The pattern matched the cropped cardigan requirement, the bib lace detail was very pretty and the amount of regular stockinette would make it good TV watching knitting. In fact I loved the design so much that got out the really good yarn to make it, the Sundara Sport.

Working Heather did splurge on a sweaters worth of this yarn in the mid aughts and then knit up an EPS cardigan in 2009. While knitting that sweater I came to the conclusion that this was one of the best yarns, and color, ever and wished that there was more.  For shits and giggles I visited the Ravelry sell and trade page for Sundara sport and, HOLY COW, another knitter had another sweater's worth she wanted to sell. Not sure if "TAKE MY MONEY!" was a thing in 2009, but that's pretty much what my DM message said. She happily did and sent me another 5 skeins of this precious yarn to augment my stash.
(Side note - The 2009 EPS cardigan is still going strong. The color faded a tad and I've worn off the cuff cast-on yarn and mended it twice. Otherwise the yarn has held up wonderfully, very little pilling and no holes to speak of.)
80% of this project was very enjoyable knitting. The other 20% was the horrible slog that is 36 rows of twisted rib knit flat. Oh my god how I hate knitting twisted rib, yet so many of my chosen projects feature it. I must have some sort of self torture through knitting thing going on. "It's not a real knitting project until the entire side of my neck cramps up!" *insert crazed laughter*  But anyway, after finishing up the giant waist ribbing of doom the rest of the sweater went smoothly.  The bib lace portion was fun to knit and I was kind of disappointed when that part went so quickly. I also enjoyed finally learning the technique of knitting on set in sleeves with short rows. Wow do I loooove that and want to do it all the time now.

Here are the knitting details for those of you dying to know.
- Went down a needle size on the pattern since I'm a habitual loose knitter. Hem and sleeve twisted rib was knit on 5's, stockinette on 4's and the button band was knit on 2's. Size knit was the 36" bust.

- Could not get exact row gauge in Sundara Sport, it was bigger, so the body length was shortened. I removed the 7 rows of St St before dividing for the fronts and back.

- Also shortened the armhole area a bit by stopping at at 16 rows instead of 18.

- Did not remove any of the length from the sleeves so they are more bracelet length than 3/4 length.

- Since I'd shortened the body length, I used the button band pick up numbers for the smallest size.

- I needed very little yarn from the 5th skein, only enough to knit the button bands and the i-cord neckline bind off.
Finding 10 tiny green buttons is a bit of a challenge in my area since JoAnn's doesn't stock that many colors of green. Actually if you need over 6 buttons for any sort of project good luck finding that many in stock. Etsy came to the rescue and I was able to get 10 buttons for a very reasonable price at AJ Stuff. They arrived in my mailbox very promptly too, so I'll be perusing their store for future projects.

The finished cardigan is probably the most perfect thing I've knit in a long time.  The amount of ease is just right, I like the length of both the body and the sleeves, the buttonband doesn't gap weirdly, I could go on and on.  No wonder this cardigan is so popular!  So that's my last cardigan project for awhile. In the mean time I'll be whipping out socks in front of the A/C unit, muttering about humidity and sewing summer dresses. Lots of summer dresses. 
Proudly designed by Mlekoshi pixel perfect web designs