Oh yeah, me and Briar are partners in crime. After we had our fun with the punky french knit Briar was like, "Hey, how about you sew up some of that sweater knit you've had for ages?" Well Briar, you make an excellent point and I'm supposed to be stash busting and all. How about we start with the first sweater knit I ever bought? Deep Stash Baby! You get extra points for sewing that up, right?


The other problem that does irk me is that my hem is a little ripply, especially in the back.


How to draft a cowl
1. Using a flexible tape measure, measure the back and front necklines on the seam line. Subtract the shoulder seam allowances and you'll get the length of your cowl. Mine was around 29".
2. Mark this length on a piece of trace paper. I find self healing cutting mats to be really handy for this type of drafting.

3. Decide how high you want the cowl to be and draw another horizontal line at that height. Mark that line as a fold line. For my finished sweater I made a 8.5" high cowl, here I'm drafting a slightly narrower 6" cowl.
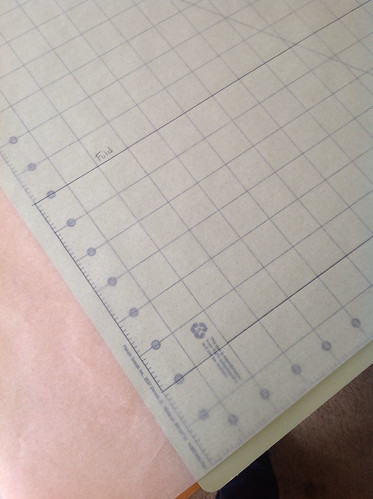 4. You'll be folding the cowl in half and sewing the two edges into the neck seam line so double the height on the page. In my example this makes the pattern 12" high.
 5. Find the halfway point on the long side of the cowl and mark it with a notch. You'll want to match this notch with a CF notch on your neckline. I've put my grainline at this location too.
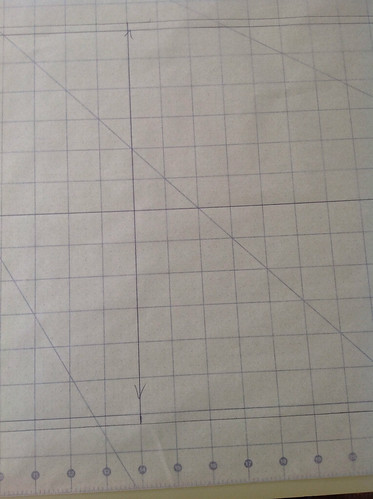 6. For wide cowls you'll want to stick with a rectangle and add a seam allowance to finish the pattern at this stage. My Brair cowl pictured above has this type of cowl.
For narrower cowls you have the option of putting triangles on the short ends of the cowl. This increases the diameter of the folded edge on the cowl which gives it more drape around your neck. The trade off is that those triangles give the CB cowl seam a pointed edge. The point is not very noticeable in a narrow cowl so I've use this technique in this renfrew hack.
 To draft this, increase the fold line a few inches and then draw a diagonal line to the seam line edges. Then repeat for the other end of the cowl. Add seam allowance and then the pattern is finished.
To sew the cowl.
1. When cutting out your front and back Briar pieces mark a notch at the CF and CB on the necklines.
2. Sew the CB/short seam of the cowl.
3. Fold the cowl in half. If you don't like lining 3 layers up at once then baste the long edges of the cowl together.
4. Set the cowl into the Briar neckline by lining the CB seam of the cowl with the CB notch on the back shirt. Line the center notch of the cowl with the CF notch on the front shirt. Stitch together all three layers, remove any basting and you're done.
5. Celebrate with a cookie. Then bring me a cookie, I'm outside your house leaning against a fence.

For narrower cowls you have the option of putting triangles on the short ends of the cowl. This increases the diameter of the folded edge on the cowl which gives it more drape around your neck. The trade off is that those triangles give the CB cowl seam a pointed edge. The point is not very noticeable in a narrow cowl so I've use this technique in this renfrew hack.
To sew the cowl.
1. When cutting out your front and back Briar pieces mark a notch at the CF and CB on the necklines.
2. Sew the CB/short seam of the cowl.
3. Fold the cowl in half. If you don't like lining 3 layers up at once then baste the long edges of the cowl together.
4. Set the cowl into the Briar neckline by lining the CB seam of the cowl with the CB notch on the back shirt. Line the center notch of the cowl with the CF notch on the front shirt. Stitch together all three layers, remove any basting and you're done.
5. Celebrate with a cookie. Then bring me a cookie, I'm outside your house leaning against a fence.


Bwahahaha! So that's YOU standing outside my apartment, looking forlornly for a cookie? I'm afraid it might be a long wait - come in and sit on the couch with me instead! ;)
ReplyDeleteLove the sweater - and thanks for the cowl tutorial!
Good to know how to draft a cowl... my first one worked just barely and it's nice to know how to do it properly. Love that print. Great job pulling it out of the depths before the deadline.
ReplyDeleteCool sweater and awesome cowl tutorial! You're always too cool for school, Heather!
ReplyDeleteOh yes, I wanted to see some snow so I decided to lurk outside your place. I'm cold now so can we have fries and pet the kitty?
ReplyDeleteI should have specified that it's a sewn on cowl. :) But you get the idea Em. :) I'm not done with stash projects yet! Last minute push to the deadline!!!
ReplyDeleteAwww shucks Leila, it's my lackadaisical leaning against a fence that makes me cool. Should have done that more in school. ;)
ReplyDeleteI love this fabric/pattern combination! Pretty! And thanks for the cowl tutorial, I'll have to put it to use someday in the not *too* distant future. :-)
ReplyDeleteI am very curious about your cutting mat--how big is it? Where'd you find it? I have one of those great big clear ones from the big green J store, but it's not self healing, and they have a tendency to "shatter" after a while, so I'm excited to hear about a big self-healing one!
Looks great! Tell me more of this knit stay tape of which you speak. Does it stretch?
ReplyDeletelooks so cozy! i need more cowls in my life. :)
ReplyDeleteExcellent, cowl it up!
ReplyDeleteMy big green J store does stock large self healing mats along with the kind you're describing. I have two mats, one is 18" x 24" and the other 24" x 36". They are both Fiskars brand and I got them during the Big green J's sales on cutting supplies.
Why yes Andera, the knit stay tape does stretch. Its tricot interfacing similar to what I buy by the yard but precut on a roll. This is the brand http://shop.emmaseabrooke.com/product.sc?productId=34 but I bought mine from the fashionable stitch shop.
ReplyDeleteYes you do Lisa, nothing as nice and cosy as a cowl.
ReplyDeleteCome in out of the snow and have one of those unnatural red double-stuffed oreos that my daughter insisted we buy at the grocery store today (maybe by next weekend I'll have real baked goods). This top looks soooo cozy! Thanks so much for the cowl tutorial - it looks great on the Briar. I really need to try this.
ReplyDeleteOMG Shar, when I look at those red oreos I get the sneaking suspicion that they are a crime against nature. "Red Oreos are make of People!!!" Snort giggle. But anyway I think a briar with cowl would suit you nicely. Do it, Do it...cause you're sewing queue doesn't already have a million things in it.
ReplyDeleteOh yeah, you definitely get bonus points for deep stash! I'm kind of wondering if something like this would work for the sweater knit I bought recently. But it's a VERY open knit, so I'm not sure what it will work for yet. Hmm. Great tutorial, and great stash-busting!
ReplyDeleteOh I knew it was for a sewn on cowl, although you're probably right to specify that.
ReplyDeleteI know, I've got a big push for the Stashbusting too... We will CONQUER!
Wooo Hooo, Bonus Points!
ReplyDeleteI'm not sure an open knit would work either....hmmmm. No pattern is coming to mind either.
I need comfy sweatery tops like this! Looks fabulous on you.
ReplyDelete