The Trifecta Top - it's Raglanrific

3.13.2014

My obsession with Kitschy Coo patterns is no secret.  I'm always planning more knit dresses or hacking up the patterns into new garments.  There is nothing as versatile as a well drafted basic, which is why my brain has a dedicated Kitschy Coo hacking area that churns away while I sleep. "Configuring new pattern cuts....loading...loading."

Well the pattern hacker area has some new data to configure because Kitschy Coo has released a new pattern. A sweet raglan T - Shirt Called the Trifecta Top.  I yonked this pic off of Amanda's blog so you could see all the neckline and sleeve combos.
Pretty nice huh?  For my testing garment I made the lower scoop neckline with long sleeves and shoulder insets.  The main knit is a cotton/spandex jersey originally from Marcy Tilton and the insets... Lillestoff baby. Oh yeah, check out my frogs.
The only fitting I did was to blend the size 4 and 5, which made an almost perfect T-shirt. The one other change I should have made was adding in a sway back adjustment.  Bad Past Heather, no cookie....especially since this was your second test garment.
That's OK, this shirt is super comfy and Froggie has given it his seal of approval. "Can I eat this bumble bee?"
Trifecta top
As a pattern addict it is my duty to inform you that Amanda is offering 20% of the pattern till Sunday with the code TRIFECTA at checkout. Go forth and increase your pattern stash.....or curse my name and stuff a few pins in a voodoo doll.  Ouch, my sewing hand!

Interviews and Skulls

3.12.2014

If you're a fan of interviews and my half serious answers to them, then pop on over to Emily's blog. Our Stashbusting Sew-a-long co-hosting queen and I talk about seasonal change and how it relates to stash busting. I also might have admitted to being one of those "V" aliens. Don't worry I'm the token friendly one.

Speaking of seasonal change, it's a balmy 55 degrees today and I was able to sneak back to my neighbor's fence for pictures of a seasonal appropriate outfit.  That gentleman did not make an appearance, probably still being confused over our last exchange.
Or maybe he was intimidated by my tough girl Espresso Leggings.  "Me and my fashionable gang of frogs are going to steal your wallet and buy clothing with studs. Maybe some more booties and silver chains. Hand the cash over, see."

My original review of Espresso is over here.  I did make this pair a little longer and will probably give myself just an inch more in the back rise on my next pair. Think I like my leggings at "old man" waist height. That might hurt my street cred, but a girl's gotta keep her switch blade somewhere.  
Want a pair of skull leggings for yourself?  Well for once you can buy a fabric from my stash,  Fabricjunkeez Etsy site still has it in stock.  Don't say I never hooked you up. :)

P.S. My blog give way winner Elisa, you have until Friday to get in contact with me or I'm going to pull another name for the Built by Wendy Book and the fabric.  My email again is knit(dot)n(dot)frog23@gmail.com

Mark your Calenders, it's Time to Cut the Precious.

3.10.2014

Have you seen on the Gorgeous Fabric blog that March 22nd is "International cut into that fabric day?"
International Cut Into That Fabric Day
This topic hits close to home since my stash holds many a "precious" that I do nothing but hoard/pet while gloating over it.  Occasionally I try to pair a pattern with a "precious" but then decide that pattern not good enough for my baby. "Only the best nonexistent future patterns for you precious. Now get back into your bin where it's safe."  Most controlling fabric mom ever.

It's all well and good to stash some fabric for a rainy day, but saving certain fabrics for the future indefinitely is a waste of money.  You bought that fabric to wear after all, so how can you get up the courage to cut it up? Well here's a couple ways I've tricked myself into using "the precious."

- Educate yourself.  If you're holding off on sewing a difficult fabric until your skills improve, then improve those skills!  Google for techniques on the internet. So many people take the time to do beautiful tutorials to share their knowledge.  Ask a friend or even take a craftsy course if you got a couple bucks to spend.

- Make a muslin or use a TNT pattern.  We don't want to ruin that perfect fabric and the easiest way to do that is with bad fit.  Work out all your fitting problems in muslin or use a pattern that you've already ironed the kinks out of.  Knowing that the garment will fit you properly will ease your mind as your shears make that first cut.

-  Imagine your fabric's future. Think about what will happen to your precious fabric if you don't use it. Odds are that people who do not value your hobby will dispose of your stash.  It's precious to you, but to everyone else it's crap you've cluttered up the house with. Is my future grown son going to lovenly move 6 rubberneck tubs of fabric to a climate controlled location? No, no he's probably going to throw them in the back of a dump truck on the way to the local incinerator. It fills me with horror too.  So sew your good stuff up now before your future children can do horrible things to them.

- Get out the alcohol. Layout out your fabric, check to see if it has a directional pattern, and layout all the pattern pieces how you want to cut them.  Then take a nice stiff drink, sometimes you just need something it steel the nerves.  Just don't have two stiff drinks or your cutting might get questionable.

To show that I'm not all talk, I did put scissors to one of my precious fabrics this weekend.
When my son was an infant I bought this quilting cotton from Tessuti in Australia and had it shipped all the way to me. This happens to be one of my favorite bird prints and past Heather bought it in two colorways. It's been sitting in the stash for years now because I didn't want to waste it on something that would never get worn. Sewdollyclackett got me thinking about Simpicity 2444 again and how much I love that dress.  Hey wait, I can sew the birds into a 2444!  Sometimes it really is that simple....I say as I shake a bit knowing this is no longer yardage.  It's going to be fine, FINE!
Actually I'm pretty OK with this because it's all for Dolly Clackett and I'm pretty sure I've just earned a new show purchase. Guess I'd better go find something else to cut on Saturday. Gulp.

Pattern Hack - Lady Skater with Pleats

3.06.2014

Hello everyone, today I'm pretty pleased with myself because operation "Secret Pajamas" is off to a great start. Soon we will rule the world in comfort.....oh no I've said too much.  Here stare into this animal print until you forget everything and find yourself dancing through the streets of London like the end of "The Prisoner" (Original version people) I give you the Lady Skater pattern with just a few tweaks, boat neck and pleats at the waist. Snowy fence not included.
Why yes I did wear 3" heels in the snow.  "It's all for you Damian, blog readers, It's all for you." Somewhere in the middle of taking these pictures, the neighbor who owns this fence came back from an errand. He got out of his car and asked me if I was "Alright".  Fine, fine, sir just taking pictures for my sewing blog.  Does that sound made up? I assure you that it's a "Thing." Then I almost fell over into the snow.  Really you can't make this shit up.

Anyway.... I mentioned earlier this week that this fabric is a jersey sweater knit.  So far as I can remember, it's a wool blend with a hint of Lycra in it.  The fabric has 2 way stretch in the width wise direction, pretty decent stretch recovery for this type of fabric, and is printed on one side. I did find that the stretch recovery was not great on the cut edges and some extra stabilization seemed in order. On the neckline I zigzagged some clear elastic on the wrong side to keep it from bagging out.
Zigzagged some clear elastic pulled taunt on there to snug it up. #ladyskater #patternhacking
The elastic was pulled taunt just a little bit as I sewed. Not so much that the fabric gathered, just enough to snug the neck edge back to it's original shape.  On the hems knit stay tape was fused to the edge before cover stitching them up.

Because the main fabric is a tad itchy and would catch on tights, I decided to put a full lining in this dress.  My lining is some cheap rayon jersey that I didn't mind sacrificing. A complete dress was made out of both the sweater knit and the rayon jersey.  After adding the clear elastic to the self fabric, the two were attached at the neckline, right sides together.  Lastly a line of cover stitch was added to the neck edge to keep the lining from popping out.
On the sleeve hems I serged the two layers wrong sides together.  Then turned the hem up 3/4" and cover stitched.
The skirt hems were left separate and cover stitched in place. Self fabric was hemmed up 3/4" and the lining 1 1/4".
Pretty cool right?  You get a nice warm dress without having to worry about wool itch or weird static cling.

OK it's time for me to drop some pattern drafting knowledge into your heads.  Open up your brain hatches right after inputting that very important number code....4, 8, 15, 16, 23....

Pleated Skater Hacking Instructions
1. Change neckline to a boat neck shape. This can be done the same way as in the Renfrew tutorial here.

2. Add extra length to the sleeves so they can be hemmed.  I added an extra 2" to the bottom of the sleeve.

3. To add pleats to the skirt trace the pattern and label the CF.
4. From the CF measure over to mark the placement for your first pleat.  I used the distance of 2 1/4".
5. From the first pleat placement mark, measure over another 2 1/4" and mark for the second pleat.
6. Use the pleat marks to draw two lines down through the length of the skirt.
7. Cut along these lines from the waist almost through to the hem.  Leave a little paper hinge at the hemline.
8. Place some scrap paper behind the skirt pattern and start spreading open the cut areas.  These will be your pleats.  I decided to make my pleats the width of 2 1/4" as well.
Measure at the waistline edge and tape down the skirt pattern when the cut areas are as wide as you want them.
9. In the pleat area measure down 2" from the waist edge and draw in a parallel line. This is the bottom of your pleat.
10. Mark the center of the pleat both at the top edge and at the bottom edge of the pleat. In my example the middle is 1 1/8".  Draw a line to connect them.
11. On the bottom edge of the pleat measure out from the center mark (1 1/8") to mark the outside edges of the pleat.  Connect these marks with the top cut edges of the pleat area.  Now you have a nice box pleat marking. The pleats will be folded to the center so you can draw arrows to remind yourself of this.
 12. Fold the pleats closed, like how you will sew them, pin in place.
Cut the excess paper off across the waistline. Remove the pins and flatten out your pattern again.
13. Down at the hem you'll need to "true" up the curve a bit because there will be small lumps from the adjustment.  Add a little extra paper and draw in a smooth hem curve.
 Trim off any excess paper and your pattern is done.
When sewing pleats in knits I usually secure them on the sewing machine first.  Make sure to switch to a stretch or ball point needle first.  Then set your sewing match for the largest zig-zag stitch and use this to baste the pleats down.  After the waist seam is sewn on the serger, the basting can be removed.
Alrighty, go make yourself some pleated Lady Skaters and then have an awkward conversation with your neighbor.  "I don't usually wear 3" heels in the snow, but I do for the blog. No I'm going to sue you or anything. I'm not going to fall over." *Almost falls over*

New Bluegingerdoll Release - The Winifred Shirtdress

3.03.2014

All weekend I've been mercilessly teasing my instagram followers with glimpses of the newest Bluegingerdoll pattern.  Well release day is finally here and I can finally reveal my Winifred in full. Here she is all sewn up in luscious Liberty Lawn.  Mmmmmm lawwwwnnnn
Head on over to the Bluegingerdoll blog to read about my pattern tweaks. I even went outside and took pictures in the cold cause coordinating shoe shots are a must. ;) 

Dreams of Spring and the Reality of Winter

3.02.2014

It that time of the year, all the stores/websites are featuring spring dresses, shorts, and hell even bathing suits.  Meanwhile outside it's 15 degrees and we're about to get another 6+ inches of snow dumped on us.  It's the kind of thing to give a sewcialist a split personality.

At least my sewing can have a split personality without causing my family any inconvenience.  Or any more inconvenience than they're already used to. (The dining room is my sewing studio, go eat your meals in front of the TV.) Right now I'm planning on splitting March sewing production into half winter clothing and half spring clothing.  That way I can have some "fun" with spring dresses, but not freeze my butt off every time I leave the house. If only you could reduce your butt that way.

I was inspired by Ginger Makes Coco post, specifically when she coined the phrase "secret pajamas." Mmmm french terry or sweat shirt dresses, I want some of those! I don't think the Coco pattern will work with my figure, but I already own Pattern Victory's Lola.  That would work perfectly with the black sweat shirt knit in the stash.  My stash also contains a few sweater knits that "could" be sewn into some sort of secret pajama.  They are a little itchy so some lining might be required.
The leopard print sweater knit is a jersey, so maybe a lady skater or hack of that pattern?  I could break out New Look 6097 again and do the longer sleeve version instead. The purple sweater knit is a rib knit so a simple pattern would work better. It's gonna stretch all over the place and I'd rather have a few seams to tweak. Maybe the new Maria Denmark Olivia shirt or something else with a kimono sleeve.

The Sew Dolly Clackett sew-a-long it gonna take care of all my fun spring clothing needs. I've got lots and lots of fabric candidates in the stash. So many that I might not be able to limit myself to one dress.  At least decisions have been made about the "first" project.   I'll be using this gorgeous border print which has been on my brain since ordering it late last year.
My pattern plan is to make the top half the By Hand London Anna dress and put a full skirt on it. You know like Dolly Clackett would. Then I might continue to channel her and buy some new shoes.  It's what she would want. ;)

Stash Busting Theme - Sewing For Others

2.27.2014

I jumped whole hog on the Stash Busting theme bus this month and did a slew of non selfish sewing.  Perhaps I was converted to a Stepford wife in the middle of the night. I do have a sudden urge to sew fluffy dresses and bake everything in my cupboard.  Where's my strand of pearls!!! Everyone knows you have to fully accessorize to vacuum!

Moving on....my boxes of sewn goodies all landed at their destinations this week.  You already know about the girls and boys knit garments that were made up, but that's not all that lurked inside. Muhaaaaa.

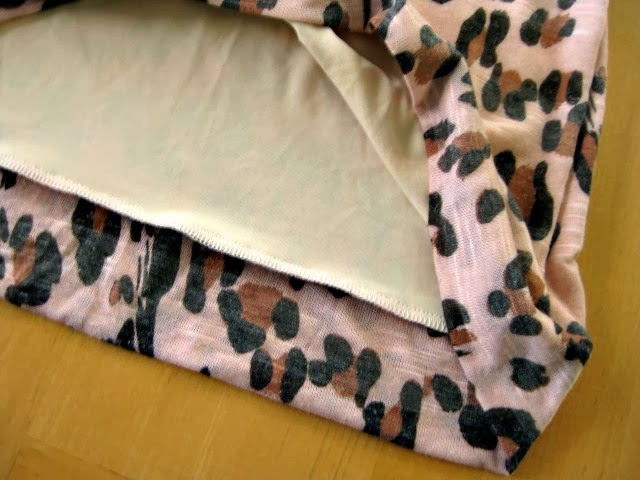
1. Gingermakes generously gifted me with a fierce leopard knit last month.  It had a semi-sheer pink background with brown leopard spots and a very subtle woven in stripe. The colors screamed my sister's color palette and I immediately know what to make her. Leopard Cowl Necked Renfrews For Everyone!
Like the one one I made for myself, there's some knit lining in the body to reduce any bra show through. This particular fabric is the venezia 4-way stretch lining Emmaonesock sells. I had a whole hunk of the nude color in the stash. High five past Heather for purchasing just what I needed.
My sister already posted a photo of herself wearing it.  My evil plan...sewing plans are complete!  Thanks again for the fabric Sonja. :)

2. My older niece received her own Sewfearless PJ eater after checking that this was still considered cool at her age.  Dang older children and their ability to voice opinions. (Just kidding Court.)
The PJ eater appeared to attack my Brother-in-law once released from the box.  Hope that doesn't make next Thanksgiving awkward.

3. Each box also contained a Bodobo Box Bag.  My stash had some half yard cuts of cotton/linen prints that were a little heavier weight.  I thought an excellent way to use them up was to make some box bags.
I needed to buy zippers and some fusible fleece, but all other materials came from the stash. Past Heather had also bought coordinating Kona solids for the lining.  Past Heather thinks of everything.
Thumbs up for this pattern.  The instructions are good and you can knock one out in a couple of hours. I also like that the pattern gives you 3 different sized bag dimensions. That way I can use up even small sized precious scraps.
The boxes pictured are both the largest size with handles attached.  Perfect for your frog assistant to lounge in.  Just don't zip him up in there, that makes him grumpy.
Proudly designed by Mlekoshi pixel perfect web designs