Showing posts with label Stash. Show all posts

The Other Navy Outfit

10.14.2018

Well hello there everyone, guess who's been working a lot. Nope it's not Froggie. In fact he suddenly disappeared yesterday when I needed to hand sew two sets of shoulder pads in two dresses.  I don't keep you around just for your looks Frog!  You'd better get to covering a 3rd pair of pads while I finally write a blog post.  On a related note working on 3 garments simultaneously can be fun....except for that part where you have to cover and sew in 3 sets of shoulder pads in two days.  *And no, shoulder pads are not optional in my sewing room. No Saggy Shoulders!

I'd planned on getting my last summer garment posted in September, but pesky things like feeding my family, cleaning their clothing and sleeping took my available free time.  Desmond might have licked a few classmates and brought some germs home as well. (Confession - he probably didn't lick anyone. I'm sure the germs were spread in an equally gross manner.) However Fall weather didn't show up in PA until yesterday, so I'm not feeling too bad about a semi late Summery make.
This summer I managed two navy outfits to complement the growing collection of navy hats. After finishing up the Hollywood shirtdress it was time to get working on some separates. It was pretty egregious that the only solid colored skirts in my closet were black. (The devil on my shoulder screams "But Black Goes With Everything! So does red and pitchforks. Just go with me on that last one." OK, Ok dude, chill out. You don't have to sell me on pitchforks. They're awesome.) But sewing plain skirts is boring so I decided to make it a matching set with a bolero.  Mostly because I had Hollywood 1326 in my stash already and wanted to sew it More Than Anything!
AHHHHHH! It's so cute! I even want the outfits in the color combos/patterns on the envelope.  Shouldn't a pink and black polka dot silk be something you can go anywhere and buy? Why is it not? Who am I kidding, the jade/pink floral is the one I really want. Stupid past Heather for sewing up the stashed jade green cotton into a Beignet. To be honest I did like that Beignet a lot but it will never be worn now. Oh well, you must sew for the body and style you enjoy now or your child will throw all your fabric in a dumpster after you kick the bucket.  This has been your stashbusting message for the year.
So yeah I bought some navy linen to make this happen. (Stashbusting, what?) And got to work musling this one up.  Turns out that cute pointy waistband is not a waistband. It is a seperate belt that buttons on the side. It also turns out that it's not so cute if your bust line is so low that the points are poking you in the underboob.  One does not need their own waistband harassing them so that had to go.

It was nice to sew a slightly different skirt style than the plain 4 gore style that has been my go to. It's just as easy to put together and paired well with the medium weight linen I'd closen.  The linen also sewed up great in the bolero.  The little fold back collar just makes me squeal with delight! It would have been an easy sew as well if I hadn't complicated it by adding a lining.  However I've never said after the fact, "Oh God, why did I put this luxurious silk lining in my garment? I wish I was starting at bare cover stitched seams instead!"

This large scale ikat print had been sitting in my stash since Desmond was an adorable toddler. I've been a little concerned that it's too bold for any garment. But you know what I'm not concerned about being bold?  A lining.  What's that? Oh you're saying, "Umm Heather, you appear to be wearing a top out of this fabric?"  Yes, Yes I am.  Well after you finish you lining and have 1.5 yards left and have recently watched all of Ms. Masel then a matching bold top seems like a fine idea.  Due to yardage constraints I turned to an old pattern friend, Simplicity 1155 of the darted neckline.  Past Heather had even traced the short sleeve pattern back in 2017.
Once again you can barely see the the decorative neckline darts. One day I'll feel like torturing myself by sewing it in a solid. Until then you'll just have to enjoy the glorious button back.
One final thing, the sleeves on this are kind of odd, but odd in a way that I enjoy. The first thing that popped in my head is that they are vaguely Romulan. A google search tells me that I'm incorrect, but I think we both understand the importance of a strong shoulder.
Pssss Taris, what kind of sleeve heads/pads/scaffolding you have in that thing? I need to know.

Pattern
Hollywood 1326 - Bolero and Skirt. (Pictured Above)
Simplicity 1155 - Button back blouse.

Fabrics used
Linen from Sawyer Brook for the main part of the bolero and skirt.  Stashed Silk crepe de chine for the bolero lining and blouse.

Pattern changes/alterations
1. Standard 1/2" forward shoulder adjustment to the shoulder and sleeve cap
2. Added 1/2" extra ease to the hip of skirt. - This style seemed a bit narrow in that location.

Confessions/Advice
I don't remember much of anything because this was finished about 3 months ago. That means I didn't do anything real stupid or stab myself.

Husband Comment
"Ooooo, I like that the lining is the same as the shirt. What is that paisley? Seems Eastery."

Bonus Son comment - "In case you don't know, that brooch is a pear."

My Final Thoughts
This is the button back blouse that launched a bevy of button back blouses in my sewing room so brace yourselves for that.  I'm also pro bolero now. Next summer I'll probably revert back to type and sew a black one cause Black Goes With Everything!  *Cue devilish cackle.*

*I've been in 40's clothing land so long that double shoulder pads is starting to look good.

Bandwagon Sewing - Simplicity 1554

10.09.2017

Hello everyone, hope you are enjoying the beginning of Fall. Or as I call it about these parts, "Just die already summer."  Oh course summer is aware it almost succeeded in breaking me this year and is sticking around trying to finish the job. Not gonna work summer, all my Halloween window clings are elevating my mood. I'm also on a sugar high from bite sized Halloween candies. (A 10 pound bag will last me till Halloween proper...right? God, when will I learn never to break the candy bag seal.)

The small upside of it being 85 and disgustingly humid is that I got photos of all the summer sewing you know nothing about. Let me quantify that, photos of all the summer garments.  Not all my summer sewing was seasonally appropriate. Two fully lined wool jackets and one unlined wool blouse/jacket were also completed during the season of too much sun.  One lesson I have learned is that Christmas garment sewing (for yourself) doesn't get done if you wait till the 4th quarter.  This year my closest has more red/green/black garments for my Christmas theme dressing needs. I can barely wait!

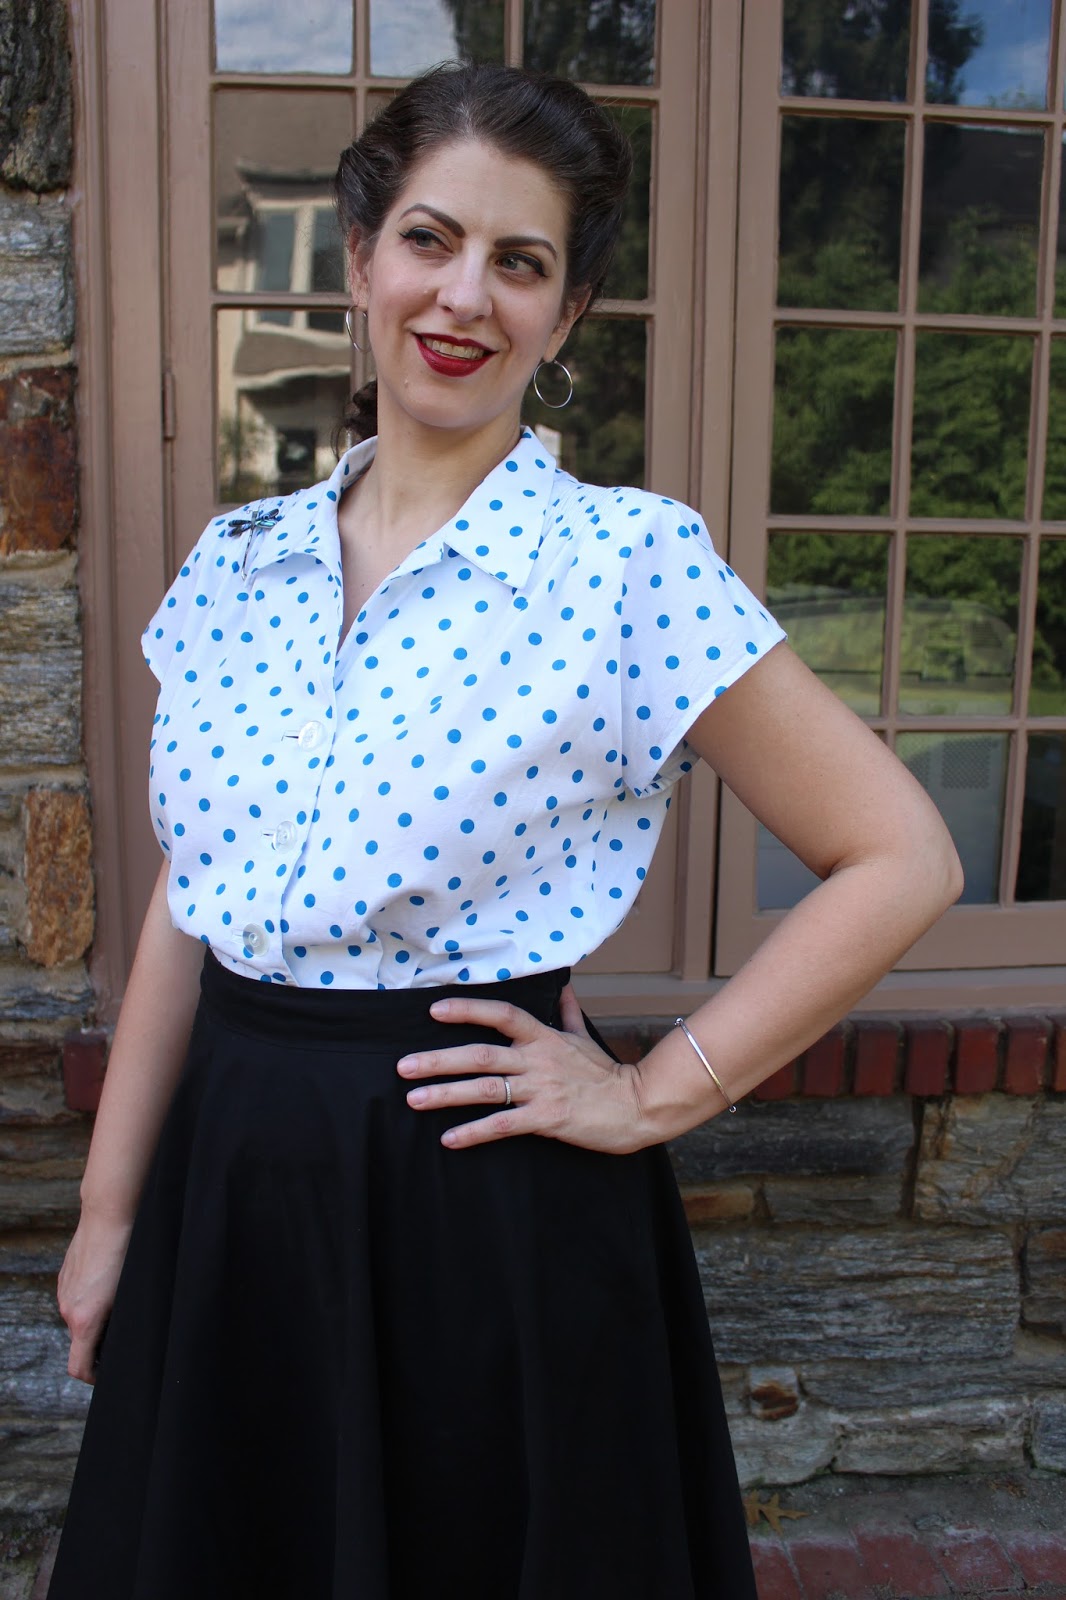
Let's put a pin in the merits of wool and roll the clock back to June to some of the last bit of stash busting that happened this summer. (Hazards of working at a fabric store.) May I present Simplicity 1554, my second favorite blouse pattern.
OK so usually I buy vintage patterns just because of the look of the fashion illustration or the design details.  I've rarely seen a completed garment on someone else and then went to look for a copy of the pattern. However this blouse kept popping up on Instagram on other vintage ladies accounts.  They'd mention the pattern number and I'd look it up every time. After about the 3rd of 4th time it was obvious I'd better just buy the damn thing already.
This one is labeled "Simple to make" which is mostly true. I'd guess that making bound buttonholes wasn't as big of a deal in the 40's if it was your only option.  The style is easy to fit due to the kimono sleeve and the waist area not being especially fitted. There are two tucks in the back waist mostly to reduce bulk in the hip area.

The pattern gives you a variety of neckline options but they all share the same shirred detail at the shoulder.  This particular design element will join the category of button buttonholes in that it's fiddly AF to make, but you're happy to have done it afterwards.  The pattern comes with a stay piece for the gathered area. You have to hem the stay piece, run 5 parallel lines of gathering on  the shoulder of the blouse, tie off the gathers, then hand stitch the stay piece on the wrong side of the blouse to reinforce everything.  The thought, "why am I doing this?" ran through my head more than once.
However current me is pretty pleased about this picture. Gathers and a dragonfly brooch? Sweeet.

The rest of the construction is straight forward if you've had prior shirt making experience.  The collar on version 1 has no stand, so you just sandwich it in the facings and call it done.  All the hems are rolled, which you can do by hand or machine.

Pattern 
Simplicity 1554 -View 1.


Fabrics used
Polka dot stretch cotton from Gertie's etsy store.  That glorious summer in 2013 when she sold yardage from NY and I bought soooo much fabric and wish I'd bought even more.  This may be the last piece from that stash building hull.

Pattern changes/alterations
1. Graded up the pattern to a 36" bust.
2. Put in standard 1/2" forward shoulder adjustment.

Confessions/Advice
Those of you who follow me on Instagram may remember that I completed all the bound buttonholes on the front only to discover they were not evenly spaced.  I had to cut a new front and start from scratch. Why do these things always happen with bound buttonholes? Pretty sure someone cursed me for stealing their bite sized candy bar.

Husband Comment
"More polka dots for my sours!"  (He is "sweets", I am "sours" and as they say, the shoe fits.)

My Final Thoughts
This blouse was my most worn make of the summer.  While it didn't knock McCall's 4265 out of the top blouse spot, I keep wishing a black windowpane plaid version would spontaneously appear in my closet.  The kimono sleeves and loose fit made it great for all but the hottest weather. Most of the time I paired it with this black circle skirt, but it also looks nice with an A-line skirt of pants.  Overall I'd highly recommend getting your hands on a copy of Simplicity 1554 if you're looking for a good wardrobe builder.
I've got two more summer dresses to show you....hopefully before December. Maybe frog can hide all my electronic devices until the blogging is caught up. Bad bloggers don't get match 3 games or 10 pound bag of Halloween candy.

Deep Stash Sew-a-long Results

5.27.2017

If it wasn't obvious by now intermittent blogging is the new normal. If you could call blogging every couple of months intermittent.  Hmmm let's call it a quarterly "gift" instead. Gift or flaming poop on your door step, take your pick. ;)

Today's gift/poop is an overview of the garments completed for the Deep Stash Sew-a-long challenge. I don't expect you to remember what that was all. I'll just put a link to the particulars if you're interested. With the help of my trusty sewing helper Froggie, we were able to finish about 2 garments a month and complete the challenge on time. We might have had a cake celebration about about it...just like we do about everything else.  Cake, it's not just a dessert, it's a lifestyle.

Most of that productivity was due to TNT's.  Even Froggie can't muslin and sew 8 new garments in a four month time period.  How would we fit in our cake celebrations if so much time was devoted to sewing?  Anyway I'm pretty sure none of you are derisively shaking your heads while muttering, "How dare you sew more of a pattern you like Heather! What kind of monster are you?" (A monster who likes cake obviously.)  I'll link to my review blog posts for any of the TNT patterns in case more detail is desired.  So let's get on the photos shall we?

Garment #1 - Wearing History Smooth Sailing Trousers (4th pair of these) in some tencle denim we have at EOS.

Garment #2 - My hacked Grainline Studio Lark Tee pattern in some cotton jersey from Marcy Tilton.


Garment #3 - McCall's 3242 in some wool plaid that my father got me as present last year.  


Garment #4 - Hollywood 1214 in wool coating from Gorgeous fabrics many years ago. You'd remember this one since it was my last blog post in......February.


Garment #5 - McCall's 4265 in washed silk. Also a very old Gorgeous fabrics purchase. This was my first time making the long sleeve version and as some of you know I had to make the sleeves twice. On this pattern the single notch on the sleeve head was the back of the sleeve. (Which I didn't notice) Thanks to my standard forward shoulder adjustment I couldn't just rip the sleeves out and swap them. At least there was enough fabric to fix my mistake.

Garment #6 - Hollywood 1032 (Skirt Half) in some black wool suiting from Mood Fabrics.


Garment #7 - Hollywood 1025 (Blouse Half) in an cotton sateen which was an old EOS purchase.


Garment #8 - Mae Blouse from Blueginger doll in some cotton oxford. I got this from the brick and mortar Steve's Sewing.  (Holy crap, my photography skills have improved since that last Mae post.)

A couple of good things came out of doing this sewing challenge.
- All of the fabric used was from the stash.  Sure 3 pieces I bought in late December before the challenge started but It Got Sewed.  ;)  You know how planning garments doesn't necessarily mean they happen.

- The challenge got me to sew a few basics that have come in handy. The trousers, back skirt and black knit top weren't exciting to make but I've been thankful to have them in the closet.

- The challenge got me to sew a few projects that have been "bucket list" items. I stole this term from Crystal in the stash busting group because it perfectly describes those garments that have been on your "to sew" list for years.  The gray coat and green blouse were my bucket list items and also used some deep stash fabrics. Feels good to clean out some of that old stash layer.

On the flip side after 3 months of sewing only stash fabric and patterns my sewjo died.  In early April I even posted in the group I might be tapped out at 6 garments. At the start of the challenge sewing those long planned items felt good. After about two months I started to itch for something new. A new pattern to sew some long stashed fabric would have been fine. Or some lining to make any number of jacket patterns I already have wool for. (Poor planning on my part here. Could have gotten the lining during the last minute December buying spree.)  You can see that I had to psych myself up at the finish by digging out the fun prints.   At least it did the trick!

In case you're wondering, after this challenge I bought 7 yards of various linings. In May I've been lining all the things which I'll hopefully blog about before August.   In fact I'm hoping to do my regular "review format" on the new makes of McCall's 3242 and Hollywood 1025 sometime in June.  Maybe Froggie could plan a cake party for me if I complete them? Let's hope so.

My Annual Winter Coat Project - Hollywood 1214

2.26.2017

I think most of you guys know by now that I'm not much of a planner.  Usually I cast my little squirrel eyes around and sew what ever seems bright and shiny at the current moment in time.  Funny though, I looked through the blog archives this week and discovered that my squirrel brain always likes sewing a coat in January/February.  It's almost like the cold weather sets off a craving to cocoon myself in coating weight wool.
This year I finally broke out the coat pattern snagged off of ebay months ago for $5.00, yes $5.00!  Oh I was sooo pleased with my bargain pattern acquisition of Hollywood 1214 that it was never even pulled it out of the envelope. When I did so to trace it in December that's when it was discovered there were no directions. Crap!
Now I don't rely on directions that heavily, but they do come in handy on non printed patterns. I use them while tracing a copy of the pattern to correctly label all the pattern pieces. It's also nice to have a reference for things like top-stitching and any sort of vintage sewing technique that has fallen out of fashion.  I was also a little concerned about the pockets on this design. I've sewed a lot of garments, but never one with pockets that look quite like this.  After mulling it over for a day I decided to give it a shot.
Between several years of coat sewing experience, 1 year of familiarity with non-printed patterns and an excellent fashion illustration it all worked out. When sewing the muslin I turned off my brain and my hands figured out how the pockets went together without a hitch.  Isn't it nice how a lot of garment constructions is common sense? The rest of the sewing was standard coat/jacket stuff that I can do without any directions. Hooray!  I also lucked out that the 40's fashion illustration was very detailed and showed where all the top-stitching should go. You'll probably have to look at the illustration yourself to be able to see any top-stitching details. My light gray on light gray stitching mostly gets lost in the photos.  I do want you to know that I spent hours trying to get smooth top-stitching curves on my coat lapels. ;)
On to the review portion of the blog post..

Pattern
Hollywood 1214


Fabrics used
Stashed gray wool coating - originally from Gorgeous Fabrics
Stashed floral viscose as lining - originally from Emma one sock

Pattern changes/alterations
1. Standard 1/2 forward shoulder adjustment to the shoulder and sleeve head.
2. Added 1" extra ease to the hem line and hem.
3.  Removed 3" of ease out of the sleeve cap. Some was removed by making the dart at the top of the sleeve wider. Some was pinched out.
4. Drafted my own lining for the coat.

Confessions/Advice
- This pattern seems to have been drafted with shoulders that are supposed to jut out past the natural line. Despite all the extra shoulder padding I added in that area it still looks like I didn't fit the coat right.  If I had to do it over again I would take the shoulder line in to met my natural shoulder edge.

- I do like all the little details this pattern has. Lots of top-stitching, the little faux belt at the back, the lovely big pockets. It's really hard to keep your hands out of them!

- Compared with all my other coats, the lack of buttons below the waist feels a bit odd. I'm always thinking that I've forgotten to fasten a button or two. Thanks to the thickness of the coat there isn't too much problem with the bottom half blowing open unless it's a really stiff wind.

- Confession, the bugs got to this piece of wool too. One yard was badly compromised, but there were nips taken out here and there through out the yardage. The bugs seemed to favor the fuzzier side which probably was the right side of the fabric. I decided to use the "wrong side" and not worry about cutting around any nips in the fabric.

Husband + Son Comment
Steve - "Looks like there's a lot of room in that coat."
Desmond - "Room for 100 people the size of ants!"
Steve - "I was thinking along the line of thick sweaters or smuggling goods, but sure."

My Final Thoughts
Not gonna lie, my red McCall's 6800 is still my favorite coat. You know how a looooove red.  However this project was an interesting sew and gave me a real ego boost. It's nice to find out that you can finish something without out any directions.
Can you guys believe this is the last of my stashed wool coating? I'm going to cry big crocodile tears next year when I have to fork money over for my seasonal coat.

PR Hacks - Decorative Darts

8.12.2016

Mid August already, how did that happen?  I certainly must be getting old if all I do is exclaim that, "Time is going so fast!"  Soon I'll be pinching children's checks and saying how much they've grown.  Anyway, things continue to be quiet on the sewing front because my sewing mojo is still no where to be found.  I think it took a nice European vacation without me.  In it's absence I've been knitting socks and ...... cleaning things. Good god it's come to that! My husband is happy, but I started missing having a new dress to wear. To scratch the itch I dusted off the sewing machine and come up with a new dress and pattern hack to share.
The month the base pattern is McCall's 7279 and I'll be teaching some dart rotation principles to spice up the bodice.  The hack shows how to rotate the waist dart into the shoulder and split it into 4 darts of varying lengths.  Then you can leave them as is or top-stitch them like I did. Hop on over to the PR blog for all the details.


Taming the Lime Leopard

4.17.2016

In March I had one of those fabric buying binges brought on by thoughts of Spring/Summer clothing. My stash busting spreadsheet assured me that this is an annual occurrence. Once florals and hawaiian prints start popping up I get all weak at the knees and scream,"Take my money!"  Even so there was a certain amount of guilt about adding almost 15 yards of fabric to the stash in the space of the month. What to do, what to do?  Maybe sew up some old stash into transitional clothing? Sounds like a plan. I even doubled down and choose one of the patterns that was in my "to sew" January post. Namely the Du Barry wrap blouse. Good blogger, you get all the cookies.
The Du Barry blouse was another one of those 32" bust patterns that I just "had to have" even though I'm a 36" bust.  Grading never seems easier than when you're pushing the purchase button on Etsy. But when it comes time to do the grading work I feel like a complete fraud. "Don't know what I'm doing, tra la la la la. Look over there instead." So after pulling out the pattern I waited for the usual sense of panic and dread to overtake me. Instead my brain said, "Hey we just graded that whole Hollywood pattern and it turned out fine. Just do the same thing knucklehead." It was then that I realized that maybe, just maybe, I wasn't a fraud but had learned to do a pretty good 4" grade. Huzzah!

 Incase you're wondering what my personal grading steps are I'll break out for you.
1. Trace the pattern...of course.

2. Since I'm pear shaped 1/2" is added to the waist and hip area along the side seam. In the case of 40's skirts I usually add that extra 1/2" of width down the whole length.

3. For pattern pieces on the quarter, I draw 3 grading lines and slash the spread the pattern. Two of the lines are spread 3/8" and the third is spread a 1/4".  (Was pretty pleased with myself for remembering the front blouse on this pattern is not on the quarter and needed to be slashed and spread 2".)

4. Finally I add 1/2" of extra height to the pattern along the shoulder and neckline. If there's some sort of attached neck facing, like on the Hollywood blouse, I usually walk the pattern on the seamline to see how much extra length is needed.

At this point I'll make any standard fitting adjustments for my figure and then sew a muslin.  Usually the muslin fits pretty decently and I can tinker with seam placement, lengths, etc.  The Du Barry wrap blouse was an easy fitting job since the shoulder pleats give you plenty of bust room and the tie makes the waist width easily adjustable. After the first muslin all that needed to be done was remove some of the height from the sleeve caps. Those babies were impossible to ease in without puckers.
For the fabric I choose some silk crepe de chine that had been in the stash for a couple of years. Sewing pleats in silk wasn't exactly my idea of a good time, but froggie and I got through it with a minor amount of ripping. We also learned from past mistakes and hand sewed the neckline bias binding on out of the gate. Better to do the hand stitching first thing then after you've ripped out your machine stitches 3 times. A person could go leopard blind doing a thing like that.


Pattern
Du Barry 5510, blouse portion only.

Fabrics used
Silk Crepe de Chine from the stash.

Pattern changes/alterations
1. Graded the pattern up from a 32 bust to a 36 bust.

2. Did standard 1/2" forward shoulder adjustment to the shoulder and sleeve cap

3. Reduced the sleeve cap height by 1/2" because they seemed to have too much ease to set properly.

Confessions/Advice
- I said on my instagram feed that this isn't a blouse made for raising your arms. Even with an at waist skirt any upward arm movement results in some bare midriff.

- The downside of a silk wrap blouse is that the ties starts to loosen as you wear it.  I haven't had a wardrobe malfunction, but do need to retie the blouse during the day.

- Put 1/4" shoulder pads in this because I've been brainwashed by the 40's into worrying about droopy shoulders.

- In case you were wondering how does this particular wrap blouse wrap, then here's a handy illustration from the instructions.
The pattern has a short tie and a long tie, the short tie goes on the blouse half that crosses in front. On the other blouse half the long tie comes out of a hole you leave in the side seam, wraps around the back and ties to the short tie.

Husband Comment
"Never seen a green leopard before but it's silky and nice."

My Final Thoughts
Despite my confession about the length occasionally causing accidental bare midriff, I've worn this blouse every week since finishing it. It just feels so elegant in both style and fabrication.  Figure I need to add a pair of high waisted trousers and high waisted skirt into the sewing list. Then I can pair them with this blouse and wave my hands in the air like I just don't care. Cause I won't because my hats are too fabulous. ;) Have a great friends. Next time we "talk" I'll have a dress that's refreshing as a tall glass of lemonade. Mmm delicious.

Rosey Easter Dress

3.30.2016

Well hello there, I blinked my eyes and suddenly the month of March was just about over. Must have been some sort of Easter candy induced coma.  My love for things coated in chocolate has no bounds other than my now too tight clothing.

Between scarfing down egg shaped treats, I got to work sewing up this year's Easter dress.  You might remember that there were two pattern contenders, Hollywood 1159 and Simplicity 4958. Well I got super cocky and decided to muslin both patterns. Then threw them in a ring and let the dresses battle it out for supremacy.....er I mean easy sewability?  The Simplicity pattern won by not needing any sort of major alterations and by flashing it's curved sleeve hem at me. Oooo pattern eye candy, Momma likes.
There's not too much to say about this this project because it was pretty much smooth sailing from start to finish.  The bodice of the dress has V shaped waist darts that radiate from the CF and the back is gathered at the waist instead of darted. This results in a semi fitted top that cinches in at the waist and then flows out in a narrow 4 paneled A-line skirt. All of that was easy to fit and assemble.
Most of my sewing time was spent is getting smooth curves on the neckline and sleeve areas. Usually I mark my own guidelines for scallops, but this pattern helpfully included them on all the facing pattern pieces. All I had to do was transfer the punch outs onto the fabric and get stitching.
Since a strong shoulder was such a big part of a fashionable silhouette in the 40's pretty much every pattern calls for shoulder pads. This sometimes gives me 80's flashbacks of the terrifying kind. NOOOO, linebacker shoulders everywhere!!!  Right now I'm making the shoulder pad decision on a pattern by pattern basis. On this dress I did end up adding 1/2" pads because the semi fitted bodice needed a big shoulder to anchor the blousines of the design. At least that's my story and I'm sticking to it.

Pattern
Simplicity 4958

Fabrics used
Cotton Sateen from the Gertie/JoAnn's line from 2015. I noticed she has this fabric for sale in her Etsy shop now if you're dying to have some. I enjoyed sewing sewing it and wouldn't make padding my stash with a bit more.

Pattern changes/alterations
1. Bumped out the waist and hip 1/2" for my larger lower half

2. Made my standard 1/2" forward shoulder adjustment to the shoulder and sleeve.

3. Dropped the bust dart 1".

Confessions/Advice
Nothing to disclose on this project other than this rose pattern placement being entirely accidental. I loooove it.

Husband Comment
"Hey pretty rose covered lady, I like your sleeves."

My Final Thoughts
These photos don't really do the dress justice. It was one of those days where the sun piercing my eyeballs threw off all the picture taking mojo. This dress makes me feel pretty and comfortable, but I didn't feel that translated into these pics. Next time I bring some sunglasses and pick a different location that isn't a bunch of uneven steps. Future goals right? To sum it all up, enjoyable vintage pattern to sew/wear, cotton sateen is still my favorite fabric of all time, and shoulder pads are sometimes good.  See you guys in April!

Vintage Pledge #1 - Hollywood 1032

3.09.2016

After much blathering on about this pattern for many posts, I'm pleased to unveil my finished Hollywood 1032.  Not in red, as previously discussed, but PLAID! A lady has the prerogative to change her mind after all.
After "discovering" that Hollywood 1032 was drafted to be a blouse and skirt instead of a suit, I still wanted a jacket like feel to the blouse. Exactly how to do this didn't cross my mind until stumbling across this plaid cotton shirting. "Perfect!" I thought, "This totally reads as jackety blouse to me."

Perfect except for two things
1. The back peplum was impossible to plaid match along the side seams. If I'd started cutting with that pattern piece it probably could have been managed. Of course I started with the front like I always do because that's the area you really don't want to mess up.

2. Elbow darts and plaid are not the best mix. This honestly didn't even cross my mind until the blouse was done and I hung it on a hanger.  Ooops, weird biased plaid at the bottom of the sleeves, too late to fix that now.

But whatever, I'd probably do it again because plaid is awesome and I really like this outfit.
This was my first time sewing an unprinted pattern and it went pretty well.  Transferring pattern pieces to new paper is a bit tricky because they are hard to see through the paper. Then I got some good advice off of Instagram to put dark paper behind the patterns. What a difference this makes! You still need to do some "pattern braille" for the darts/other punch outs but it works wonders for everything else.
The pattern illustration compared to the actual drafting was mostly accurate. The only glaring difference was that the peplum length was drafted to be much shorter than drawn.  I added an 1" of length to make it match up to the illustration and because that's more flattering for my figure.  Sewing wise this one was easy to whip up after all that waffling over fabric.  I'd definitely buy more Hollywood patterns in the future. :)

Pattern
Hollywood 1032

Fabrics used
Stashed Plaid cotton shirting - Originally from Fabrics and Trimmings on Etsy
Stretch wool suiting maybe from EOS.

Pattern changes/alterations
1. Graded the size 32" bust up to a 36" bust.  I used the same 4" grade described here. This worked for all the pieces other than extending the collar that becomes the back facing. Here I lucked out and was able to properly guess how much to add thanks to some notches.
BTW - It's interesting how extending the front facing and collar up to finish the back of the neck in this manner was a pretty standard drafting technique in the past.  Now it's something we only do for if there's a wrap around collar.

2. Added standard 1/2" forward shoulder adjustment to the shoulder and sleeve head.

3. Dropped the bust dart 1".

4. Added a scant 1/4" to the bottom part of the princess line seam. The placement didn't look proportionally correct on my body without it.

5. Shortened the waist length 1/2" above peplum.

6. Added 1" additional length to the peplum.

Confessions/Advice
1. Don't forget about your elbow darts when you pull out a plaid. Derp.

2. Confession - I might be addicted to hug a snug and need an intervention.  It's something I'd never ever bought until the Veronica coat and now I can't stop putting it on hems. But see, so pretty.

3. I also covered shoulder pads with self fabric for the first time. All the pretty insides!

Husband Comment
"Are you going to a fancy business meeting?"  Why yes, I like to meet my donuts at the boardroom before eating them.

My Final Thoughts
Great start to my Vintage Pledge year.  I like the silhouette of both of the pieces and love that I can mix the skirt with various other tops. This should be the last "winterish" project for awhile. Look forward to lots of flora patterns in the future.

Proudly designed by Mlekoshi pixel perfect web designs