Showing posts with label Simplicity. Show all posts

2017 Flashback - Suit Jackets Galore Part 1

5.13.2018

Confession - I have always loved suits.  Back in high school I had a black pinstriped pantsuit with a double breasted jacket that was my pride and joy.  It was a cheap ass polyester blend purchased at *Fashion Bug but I felt like a million bucks in it.  One year I wore it to school with on Halloween with heels and told people I was a lady mobster.  No one was charmed by my "creativity" or fashion sense. However this was one of two instances that my highly insecure self said...not outloud but internally.... "Fuck you guys, I look good in this suit." (The other time was when a boy I'd known for years  disparagingly said I was the only girl he knew that had sideburns. That time I internally said, "Fuck you I have great hair.)
All of this is a roundabout way of saying that in the summer of 2017 I blocked out about a month and a half to make a couple of suit jackets.  During the previous winter I'd been constantly annoyed about not having enough dressy options that worked with the weather. I didn't sew anything then for some reason, probably distracted by cake.  Instead I just bought several new pieces of wool while cackling with glee. Oh wool, you complete me. Let's go get brunch. Honestly though, who wouldn't fall in love with this plaid? Only a monster.....or maybe someone who looks terrible in green. I'll cut you a little slack if that's the case.
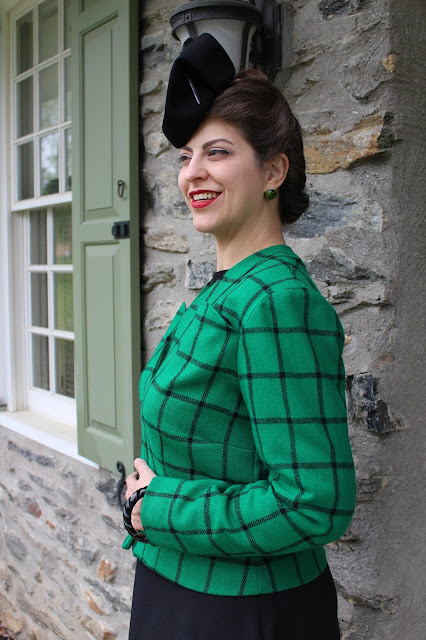
You guys know how I feel about plaid, we're soul mates. Also it's super hard to even find a predominately green plaid. As soon as I saw this on the Mood website I was practically screaming, "TAKE MY MONEY! I NEED THIS IN MY LIFE!" Didn't want this one to languish in the stash for a few years, so sewing it up was priority number 1. One needs all the green or red garments they can get for Christmas season theme dressing. Aka the best season of the year because everyone wears my favorite colors.
For once my existing pattern stash was rummaged through for a suitable pattern. Memory fails me but I think I bought Simplicity 1207 on a whim during one of my random Etsy pattern browsing bindges. Nothing de-stresses me like staring at new patterns.  That shoulder detail intrigued was very intriguing. I didn't realize it was a pocket until looking at the pattern pieces.  Sure the lady on the left has a handkerchief in hers but sometimes I'm oblivious. Probably distracted by the shoes the lady in red has on. Would buy! **Can I get Royal Vintage shoes on the phone and make this happen?  Also if you're wondering why the pattern number is different on this picture it's because Simplicity re-released the pattern about a month after I completed my jacket.  I haven't bought the new version check if the patterns have been tweaked to make them easier to sew.  Even so it is nice to be able say, "If you want to make this pattern you can easily get a copy."
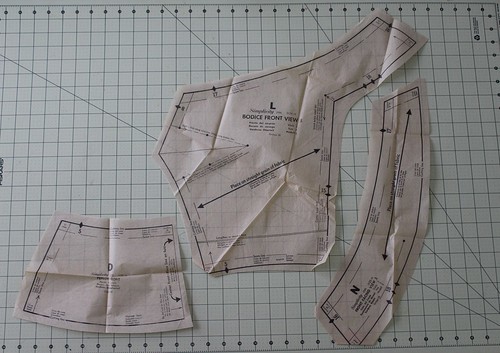
Anyway, back to the yoke detail! Sewing it together was one of the most interesting construction processes I've had in awhile. It's a good thing I did have the original instructions to refer to because it still made me go......huh? Here's a photo I took mid sewing process to document the yoke area. What you see here is the back on the left with the yoke/back half of the pocket bag attached at the shoulders. On the right is the front with the back yoke area attached. The fronts have the other half of the pocket bag sewn in already. They're in lining fabric and you top-stitch the edge of the pocket before getting to this point.
To put these two pieces together press the seam allowance under on the "band" portion of the front. Then you lay it on top of the back and top-stitch everything into place. Pretty sure the pattern drafter wasn't thinking, "And maybe some crazy person will do this on plaid. That will be fun!" He was probably thinking the opposite. Of course I was that crazy person and was already past the point of no return.  Time for a walking foot, lots of pins and maybe a burnt sacrifice to the sewing goddess.  Though I like to think of her as a cousin of Jobu from "Major League" and she really just wants some alcohol. P.S. "Jesus, I like him very much, but he no help with curve ball."
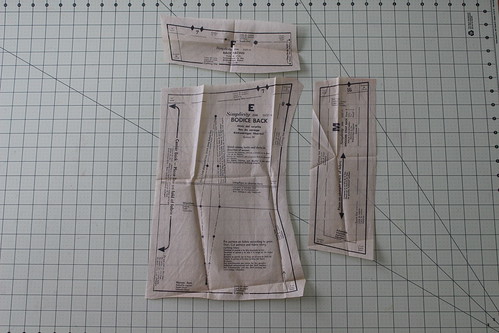
As you can kind of see in this poorly lit photo, it worked! Bless whichever relative gave me the anal retentive fabric cutting genes.  All....The...Plaids....WILL...Match. Then months later you can smile smugly into your camera about how awesome your yoke plaids match.

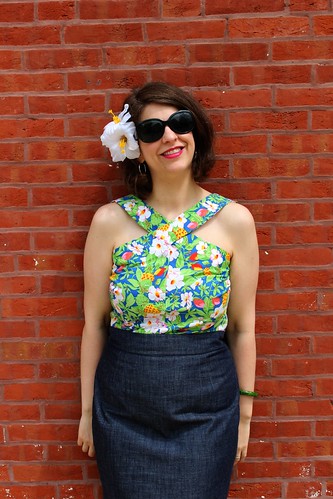
The other detail to talk about is the buttons. You might have noticed that my version has 2 instead of 1 like on the pattern illustration.  Well when I muslined this up it seemed like the button was way too low to keep all of the jacket in place. The upper portion was gaping a bit in a non flattering way.  If I had to guess my low bust point might be to blame. Lurking down low and pushing everything about with abandon. Solution, more buttons!  I added another button 4.5" above the original button location. After wearing the jacket once I also added a snap to keep the bottom half in place. Gotta keep all those plaid lines in place.


Pattern
Simplicity 1207.  Since making my version this pattern was re-released by the company as Simplicity 8461.

Fabrics used
Wool plaid from Mood fabrics, black bemberg from Emmaonesock

Pattern changes/alterations
1. Graded pattern up from 34" bust to 36" bust.
2. Added 1/2" ease to the waist and hip.
3. 1/2 forward shoulder adjustment.
4. Added another button to the CF.

Confessions/Advice
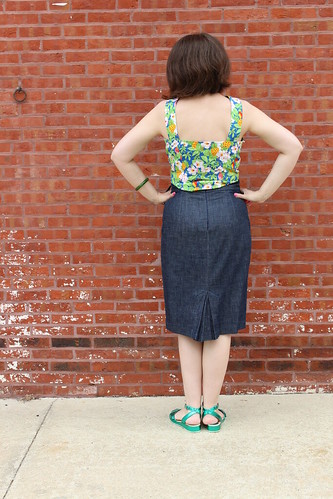
The plaid matching might be on point, but on the other end of the spectrum we have the back of this jacket.  I had no idea this suit was so puffy there until taking these photos. Checked the pattern and yes I did neglect to put in my normal sway back adjustment.  Oops.  At least I've got plenty of ease to move around.


Husband Comment
"It has a lot of real estate for pins. Also the pattern illustration looks like an air hostess. Not you though."

My Final Thoughts
One good thing about blogging months after completing a project is that you know how successful of a wardrobe item it is.  I wore this one as often as possible from December to April. In fact I was always pissed if I'd worn it to church last week and didn't want to repeat my outfit.  I will admit that the color had a lot to do with that.  Pros for the actual design is that it's very comfortable and warm thanks to the wool and full lining. I do like the pocket yoke detail and it makes me think I need to pick up a pair of dress clips.  Simplicity 1207 isn't a pattern that I'm planning on sewing again, but I'm 100% happy that I did make one up.
During the summer of 2017 I made two other jackets, one successful, one that's a bit of a mess. It may be salvageable if I rip out the lining and maybe replace a collar.  Of course I hate taking apart finished garments so that one may never see the light of day. You'll definitely see the one that worked out even though it's a pattern repeat. Until then buy plaid and cake. I already am.

* Don't know how prevalent the Fashion Bug chain was but it was slightly better quality than Walmart but not as good as Macy's. Anyway the price was right so my Mom let us do a lot of our High School wardrobe shopping there.

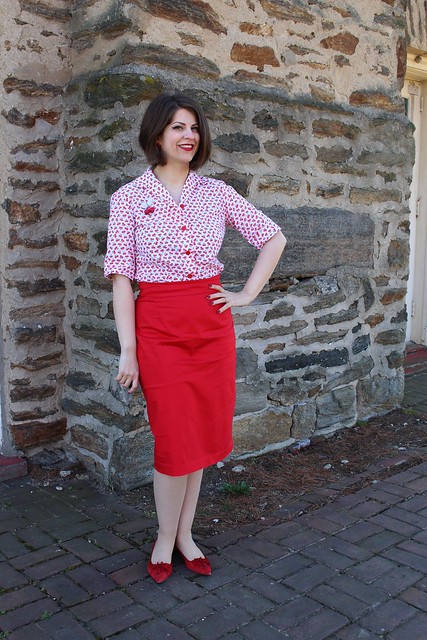
** I happen to wearing the Royal Vintage Marilyn pumps in these photos and I'd give them a thumbs up.

Bandwagon Sewing - Simplicity 1554

10.09.2017

Hello everyone, hope you are enjoying the beginning of Fall. Or as I call it about these parts, "Just die already summer."  Oh course summer is aware it almost succeeded in breaking me this year and is sticking around trying to finish the job. Not gonna work summer, all my Halloween window clings are elevating my mood. I'm also on a sugar high from bite sized Halloween candies. (A 10 pound bag will last me till Halloween proper...right? God, when will I learn never to break the candy bag seal.)

The small upside of it being 85 and disgustingly humid is that I got photos of all the summer sewing you know nothing about. Let me quantify that, photos of all the summer garments.  Not all my summer sewing was seasonally appropriate. Two fully lined wool jackets and one unlined wool blouse/jacket were also completed during the season of too much sun.  One lesson I have learned is that Christmas garment sewing (for yourself) doesn't get done if you wait till the 4th quarter.  This year my closest has more red/green/black garments for my Christmas theme dressing needs. I can barely wait!

Let's put a pin in the merits of wool and roll the clock back to June to some of the last bit of stash busting that happened this summer. (Hazards of working at a fabric store.) May I present Simplicity 1554, my second favorite blouse pattern.
OK so usually I buy vintage patterns just because of the look of the fashion illustration or the design details.  I've rarely seen a completed garment on someone else and then went to look for a copy of the pattern. However this blouse kept popping up on Instagram on other vintage ladies accounts.  They'd mention the pattern number and I'd look it up every time. After about the 3rd of 4th time it was obvious I'd better just buy the damn thing already.
This one is labeled "Simple to make" which is mostly true. I'd guess that making bound buttonholes wasn't as big of a deal in the 40's if it was your only option.  The style is easy to fit due to the kimono sleeve and the waist area not being especially fitted. There are two tucks in the back waist mostly to reduce bulk in the hip area.

The pattern gives you a variety of neckline options but they all share the same shirred detail at the shoulder.  This particular design element will join the category of button buttonholes in that it's fiddly AF to make, but you're happy to have done it afterwards.  The pattern comes with a stay piece for the gathered area. You have to hem the stay piece, run 5 parallel lines of gathering on  the shoulder of the blouse, tie off the gathers, then hand stitch the stay piece on the wrong side of the blouse to reinforce everything.  The thought, "why am I doing this?" ran through my head more than once.
However current me is pretty pleased about this picture. Gathers and a dragonfly brooch? Sweeet.

The rest of the construction is straight forward if you've had prior shirt making experience.  The collar on version 1 has no stand, so you just sandwich it in the facings and call it done.  All the hems are rolled, which you can do by hand or machine.

Pattern 
Simplicity 1554 -View 1.


Fabrics used
Polka dot stretch cotton from Gertie's etsy store.  That glorious summer in 2013 when she sold yardage from NY and I bought soooo much fabric and wish I'd bought even more.  This may be the last piece from that stash building hull.

Pattern changes/alterations
1. Graded up the pattern to a 36" bust.
2. Put in standard 1/2" forward shoulder adjustment.

Confessions/Advice
Those of you who follow me on Instagram may remember that I completed all the bound buttonholes on the front only to discover they were not evenly spaced.  I had to cut a new front and start from scratch. Why do these things always happen with bound buttonholes? Pretty sure someone cursed me for stealing their bite sized candy bar.

Husband Comment
"More polka dots for my sours!"  (He is "sweets", I am "sours" and as they say, the shoe fits.)

My Final Thoughts
This blouse was my most worn make of the summer.  While it didn't knock McCall's 4265 out of the top blouse spot, I keep wishing a black windowpane plaid version would spontaneously appear in my closet.  The kimono sleeves and loose fit made it great for all but the hottest weather. Most of the time I paired it with this black circle skirt, but it also looks nice with an A-line skirt of pants.  Overall I'd highly recommend getting your hands on a copy of Simplicity 1554 if you're looking for a good wardrobe builder.
I've got two more summer dresses to show you....hopefully before December. Maybe frog can hide all my electronic devices until the blogging is caught up. Bad bloggers don't get match 3 games or 10 pound bag of Halloween candy.

40's Casual Style

9.17.2016

This summer my Sister-in-law gave us the option to join her family on a cabin camping trip up in Rickett's Glen. They usually do some sort of camping trip during summer vacation and had plenty of extra room in their cabin for the three of us. Steve and I though Des would enjoy running around the woods and cooking with fire so we accepted.  Which meant it was time for every seamstress's favorite activity.... planning some trip sewing!

Seriously though, as someone who is a "lifetime fancy dresser" the amount of casual clothing I own is 3 pairs of yoga pants and some ratty old Renfrews.  My suitcase was in desperate need of a few items of clothing that could handle a slog through the woods.  Guess I just "had" to buy some new patterns to fill this hole in my wardrobe.  (Let's pretend I wouldn't have bought a new pattern for any type of vacation.)  What I ended up purchasing was the recently mentioned Simplicity 3885.  The bottom half of the pattern worked out a lot better than blouse portion of the pattern.

View 1 is the button up skirt with some nice little patch pockets.  Pockets which happen to be big enough to stow your sunglasses when the hiking trail turns out to be deeply shaded.

Then maybe it gets hot or you want to go play tennis with the girls....assuming you are far more coordinated than I. Unbutton the skirt layer to reveal.....

View 2 Flirty Shorts! Here I am doing "Vanna hands" to show off the pocket welts of the nonexistent pockets.
The plan was to have pockets, but the residual post baby fat shelf caused some major gapping issues. In a perfect world I should have muslined with pockets and figured out how to adjust for that. Instead this was deadline sewing and some corners were cut.

Pocket issue aside, these were very easy to fit to my lower body.  Mostly thanks to 40's styles being really loose around the lower derriere area.  Not having to worry about under butt wrinkles is a giant relief.


Pattern
Simplicity 3885, Shorts and Skirt.

Fabrics used
Light weight stretch denim from Emmaonesock.com

Pattern changes/alterations
1.  Graded up the bottom pieces one size.

2. Raised CB of shorts 3/8".

3. Removed side seam pockets from the shorts.

4. Took in CB of skirt 1/2".

6. Let out side seams of skirt 3/8".

Confessions/Advice
- I didn't muslin the skirt portion figuring how much fitting does a button up A-line skirt need?  Ummmm plenty if your me. Ended up having to take in or let out most of the seams and I'm still not happy with the waistband fit. You'd think I'd learn by now that muslins are not optional for me.

Husband Comment
"Hey pretty lady, I like your grandma shorts."

My Final Thoughts
Both garments served me well on the camping trip. I ended up wearing yoga pants for the long hike and used these garments for short walks and trips to the lake.  It got me thinking that adding a few more causal garment projects to the sewing list would be a good idea.   Occasionally....only occasionally a dress isn't appropriate for having fun with your kid.

Speaking of him, let's just say he had a blast.

Rosey Easter Dress

3.30.2016

Well hello there, I blinked my eyes and suddenly the month of March was just about over. Must have been some sort of Easter candy induced coma.  My love for things coated in chocolate has no bounds other than my now too tight clothing.

Between scarfing down egg shaped treats, I got to work sewing up this year's Easter dress.  You might remember that there were two pattern contenders, Hollywood 1159 and Simplicity 4958. Well I got super cocky and decided to muslin both patterns. Then threw them in a ring and let the dresses battle it out for supremacy.....er I mean easy sewability?  The Simplicity pattern won by not needing any sort of major alterations and by flashing it's curved sleeve hem at me. Oooo pattern eye candy, Momma likes.
There's not too much to say about this this project because it was pretty much smooth sailing from start to finish.  The bodice of the dress has V shaped waist darts that radiate from the CF and the back is gathered at the waist instead of darted. This results in a semi fitted top that cinches in at the waist and then flows out in a narrow 4 paneled A-line skirt. All of that was easy to fit and assemble.
Most of my sewing time was spent is getting smooth curves on the neckline and sleeve areas. Usually I mark my own guidelines for scallops, but this pattern helpfully included them on all the facing pattern pieces. All I had to do was transfer the punch outs onto the fabric and get stitching.
Since a strong shoulder was such a big part of a fashionable silhouette in the 40's pretty much every pattern calls for shoulder pads. This sometimes gives me 80's flashbacks of the terrifying kind. NOOOO, linebacker shoulders everywhere!!!  Right now I'm making the shoulder pad decision on a pattern by pattern basis. On this dress I did end up adding 1/2" pads because the semi fitted bodice needed a big shoulder to anchor the blousines of the design. At least that's my story and I'm sticking to it.

Pattern
Simplicity 4958

Fabrics used
Cotton Sateen from the Gertie/JoAnn's line from 2015. I noticed she has this fabric for sale in her Etsy shop now if you're dying to have some. I enjoyed sewing sewing it and wouldn't make padding my stash with a bit more.

Pattern changes/alterations
1. Bumped out the waist and hip 1/2" for my larger lower half

2. Made my standard 1/2" forward shoulder adjustment to the shoulder and sleeve.

3. Dropped the bust dart 1".

Confessions/Advice
Nothing to disclose on this project other than this rose pattern placement being entirely accidental. I loooove it.

Husband Comment
"Hey pretty rose covered lady, I like your sleeves."

My Final Thoughts
These photos don't really do the dress justice. It was one of those days where the sun piercing my eyeballs threw off all the picture taking mojo. This dress makes me feel pretty and comfortable, but I didn't feel that translated into these pics. Next time I bring some sunglasses and pick a different location that isn't a bunch of uneven steps. Future goals right? To sum it all up, enjoyable vintage pattern to sew/wear, cotton sateen is still my favorite fabric of all time, and shoulder pads are sometimes good.  See you guys in April!

Vintage Summer - Simplicity 2086

5.19.2015

It's not the first time I've said it but it bears repeating, the on-line sewing community is pretty amazing. It's full of encouragement, knowledge and generosity.  Last month I was lucky to be the recipient of some sewing community generosity when Lori of "Girls in the Garden"  sent me an email. "Would I be interested in some vintage patterns she's gotten from an Aunt?"  Yes Please!  Lori then proceeded to mail me not one, but three boxes of patterns to make Gollum like cackling noises over. All the preciouses!

The patterns spanned from the 40's through to the 70's and I had a good time looking at style changes and picking out my favorites. Not surprisingly most of my picks were 50's area designs and I decided to bump one of them to the top of the sewing queue.  Let me present Simplicity 2086, View 3. (You can see the original pattern illustration below in the review area.)
IMG_1999
The pattern comes with two classic looking halter views and then BAM, a non halter variation you weren't expecting. View 3 has straps that come out of the bodice, crossing under the neck.  The straps then continue around the back for a normal strappy top look.  So chic.
IMG_1973
The pattern was a one size smaller than my bust so some slash and spread grading was needed  Two grading lines were drawn on each pattern piece and I spread each area 1/4". That gave an extra 1/2" width on the quarter, for an extra 2" in increased width on my entire pattern. (See Christmas dress post for more details on this type of grading if you're interested.)
After making muslin number one I found that this pattern must run small because the entire bodice was very tight. There was also a problem with the strap shoulder seam being too far forward. The straps themselves hadn't been graded so I had to go back and add 3/8" to both the front and back straps at the shoulder seam. On the body I decided to go the easy route and add extra ease to the side seams instead of regrading. Muslin number two was much better, but I needed to tinker with the ease at the side seam a bit. Since my bust line is low I had to take some ease out at the top of the blouse and add a bit more at the bottom. (Final amounts are in the alterations area.) Even with the added task of the grading this pattern was very easy to fit.  I was especially impressed with how nicely the straps lay against the body straight out of the envelope.
IMG_2011
My blouse was sewn up in a vintage tropical print cotton that was bought earlier this year. The real fabric behaved a bit differently than the muslin, stretching out under the arms. This wasn't too surprising since the upper bodice is cut on the bias and only had stay stitching to tame the stretch. In hindsight I probably should have fused some extra interfacing on that edge. Instead some "on the fly" alterations were needed to take in the top of the side seam. Thankfully this wasn't hard to do since the directions instruct you sew the facings on before completing the side seams.  I only had to go back in, sew a new side seam and the top fit great. Hooray!

Pattern
Vintage Simplicity 2086. Here it is in all of it's original fashion illustration glory. "Judy" is busy calling people on her shell phone.

Fabrics used
Vintage cotton print from Etsy.

Pattern changes/alterations
(Made after grading)
1. Dropped bust dart 1.5".

2. The side seams needed to be rebalanced to fit me.  The top part of the blouse was taken in 1/2" and the bottom area was graded out 3/4" at the hem.

Confessions/Advice
- The pattern suggested using a separating zipper for the closure. I decided to go with an invisible zip instead.

- The other sewing change made was to attach the back straps by sewing them into the facing/body seam. The vintage directions said to hand stitch them into the facing.

- I catch stitched all the facings down so they wouldn't flip out. The busy print helps to hide the thread "picks" on the right hand side.

- There was a lot of interest in this pattern and since making a ton of copies isn't something that's easy for me to do, I'm going to show you the pattern pieces. I hope this will hope those of you with drafting skills come up with something similar.

Front pieces
The front bodice has a waist seam, a CF seam, and the front half of the strap. During construction you would sew the CF seam up to the dot and then leave the strap area to be sewn to the facing.  The facing is also the back part of the strap. It finished both the upper edge of the front and the two strap edges.
IMG_2415

Back Pieces
The back does not have a waist seam, it's a standard sleeveless block with a fish eye dart. It also has a facing to finish the upper edge.  There is a strap back piece that sews to the front strap at the shoulder. This piece is cut 4 times to completely finish the edges of the strap.
IMG_2418

Husband Comment
"I like it. Great shoulder exposure and looks good from all angles."
IMG_2000

My Final Thoughts
Dear Simplicity, please re-release this pattern so that all my friends can have one. I'm pretty sure you'd sell a lot of copies. The design is classy, comfortable to wear and bonus, quick to sew up.  I'd high recommend it if you can get your hands on a copy.  Thank you so much Lori for sending me one!

Cherry Picking Shirt

4.13.2015

Is there a type of garment that you always buy patterns for? Even though you know that the stash doesn't need another. You might resit for a few minutes but a new pattern finds it's way home with you in the end. I'm like that with button down shirts. The variations between them are usually small but I love them just the same.
I also love bitchy looking fashion illustrations, so it's no wonder that Simplicity 2195 was recently added to the pattern collection. These girls are like, "Sew? We don't sew, we have people sew for us and bring us drinks. And we don't eat cake...ever. *With judgmental stare at my waistline.*"Ha haa haa! You judgy snitches are a  riot, excuse me while I finish my cake.
IMG_1435
Not too much to report on the fitting and sewing process on this one. My fitting process on button down shirts works for most patterns and this one was no exception.  (All the fitting details are in the normal spot below.) I will mention that the ease in the bust looks just fine with sleeves on, but wouldn't work for the sleeveless version.  There would be way too much armhole gapping without any adjustments.
IMG_1426
With the sleeves on the shirt has an area appropriate blousey feel without being oversized. I did feel the back had a little too much fullness and converted the tucks into fish eye darts to take some out.
IMG_1431
I'm pretty pleased with the body but have some issues with the collar.  Instead of being being drafted like a standard all in one collar, the upper collar and facing are attached. I feel this shortcut keeps the collar from folding over nicely. It also limits how low you can button the blouse before the facings start flipping out.  If you like the period appropriate button placement then this wouldn't be an issue, but for me it is. (I'll be discussing this further in a sewing notes post.) 

Pattern
Simplicity 2195 (This one seems to be easy to get your hands on.)

Fabrics used
Vintage flocked cotton that was probably also a polyester blend. It has a stink that is only now fading. Sneaky cherries.
IMG_1438
Pattern changes/alterations
1. Dropped bust dart 1 1/2".

2. Shaved off 1/4" at the top of the side seam and added the same amount in the hip area.

3. It felt like the pattern was drafted for a longer torso, but I didn't want to shorten the length. Instead I moved the top of the tucks up 3/4".

4. Turned the back tuck into a fish eye dart.

5.  Made a 1" sway back adjustment.

6. Made a 1/2" forward shoulder adjustment to the sleeve cap.

7. The pattern does not have a shoulder seam so my usual 1/2" wide upper back and forward shoulder adjustment had to be done creatively.  Usually I would add the extra width to the lower part of the back and then put a dart in the shoulder seam of the back yoke.
This pattern not having a shoulder seam is messing up my wide back/forward shoulder adjustments. Going to give this try first. If that doesn't work I'll break the yoke into two pieces. #simplicity2195
Here's a picture of my adjustment before the excess areas were cut off. The lower part of the back was adjusted like normal.  Then I slashed and spread the entire yoke 1/2", so that the two back seams matched.  On the front of the yoke I took off 1/2" at the shoulder edge so that those seams would match.  For the forward shoulder adjustment I moved the yoke seam line forward and reduced the front as normal.  The shoulder line mark on the pattern also needs to be moved 1/2" forward but that's not shown here.

Confessions/Advice
- I checked the suggested buttonhole placement before sewing them and decided the placement was great. After the garment was completed I changed my tune and wished that the buttons had been shifted lower.

- Pattern is only drafted to have 3 buttons, I added some extra on the lower portion of the blouse.

Husband Comment
"I like it. I like the apples, the pairs of apples." - They're cherries, are we talking about the same thing?

My Final Thoughts
I think this pattern has good bones, but that it needs further modifications before it matches my preferences. Having the collar and facing as one unit doesn't work for me. It doesn't fold the way a collar with a seam does and the facing want to flip out. I also have an issue with wearing tucks. In theory they are fine, but on my body I'd rather have a fish eye dart. All these issues are easily fixable on the pattern. I should go back and tweak it and make another version. In conclusion, decent first attempt but needs a little more work. Hey don't we all. ;)
IMG_1421

Summer of Dresses - Simplicity 2443 The Tree Dress

7.24.2013

Early last week my in-laws called and invited us to an outing at the Morris Arboretum. You know what you need for an arboretum trip? Yes a Tree Dress! I sewed one up real quick with some stuff that's been laying around in the stash.
 My husband's a little rusty with non toddler photo work so it's a bit hit and miss here.  I told him that I was going to send him to photography school........ he was not amused.

 Pattern
Simplicity 2443, I tend to like all the Cynthia Rowley patterns and buy them during the dollar sales even if I don't know if they'll ever get made.  Did I buy this one for the dress or the jacket?  Who knows, maybe it was purchased to stare at those shoes.  What dainty ankles you have vaguely grumpy model! *Whispers behind hand* You can totally tell she hates that jacket.
Fabrics used
Tree print rayon/lycra jersey from Marcy Tilton and black jersey mystery remnant.
Pattern changes/alterations
I found this pattern to run big and had to take in the bodice just about everywhere.
1. Took in shoulder seams 3/4".
2. Took in side seams 3/4".
3. Cut 2" off the bodice length.
4. Wanted the entire tree repeat in the skirt so 6" of length was added.
5. Instead of constructing the skirt with two rectangles I used the entire width of the fabric and seamed it in the back.  Since I had no side seams the pockets were left off.

Confessions/Advice
1. Either the instructions for this pattern were copied and pasted from something else or the pattern writer was high on crack.  Half of the steps would make sense if you were making a woven dress but are ridiculous for a knit dress, WHICH IS WHAT THE PATTERN ENVELOPE SAYS TO USE!  Stay stitch the bodice pieces so it doesn't stretch?  It's a knit, what the hell are you talking about?  Put a side seam zipper in the dress?  Ummm you know this is a knit right and you can pull that over your head?

2. The straps are a complete bitch to put on and my tiny brain couldn't come up with an alternative way.  The instructions have you stitch the neckline and armholes together, then turn the pieces right side out and stitch the shoulder seams together.  This results in a bulky shoulder seam but you can't turn the straps right side out if you do it another way.
3. The curves on the straps and the bodice did not match up for me. The black jersey and the tree knit stretched a different amount which could have been part of the problem. I trimmed down the bodice to make the curves fit and it looks fine.

4. Because of the giant print repeat I had to get a little creative with the cutting. There was only one complete repeat of the trees in the two yards of fabric, so I decided just to make the skirt one piece.

Husband Comment
He LOVES this dress and told me so enough times that I've forgotten exactly what he said.  I just remember him shouting, "Why did you take that dress off!" when I was showering at the end of the day. Would showering in your dress count as doing laundry?

My Final Thoughts
I'm a bit ambivalent about this FO.  While I'm pleased to have found a use for this fabric the dress seems vaguely maternity to me. The length is a little weird but I really don't want to cut down the tree print and there isn't enough of the black contrast to make a hem band. If I could go back in time I'd make the skirt maxi length instead.  At least my man likes so it's not a totally wash.
 
And on that note I leave you with this idyllic family portrait right before the giant ant apocalypse.
Just biding my time until I eat their puny human brains.
Proudly designed by Mlekoshi pixel perfect web designs