Showing posts with label Shirt. Show all posts

Cherry Picking Shirt

4.13.2015

Is there a type of garment that you always buy patterns for? Even though you know that the stash doesn't need another. You might resit for a few minutes but a new pattern finds it's way home with you in the end. I'm like that with button down shirts. The variations between them are usually small but I love them just the same.
I also love bitchy looking fashion illustrations, so it's no wonder that Simplicity 2195 was recently added to the pattern collection. These girls are like, "Sew? We don't sew, we have people sew for us and bring us drinks. And we don't eat cake...ever. *With judgmental stare at my waistline.*"Ha haa haa! You judgy snitches are a  riot, excuse me while I finish my cake.
IMG_1435
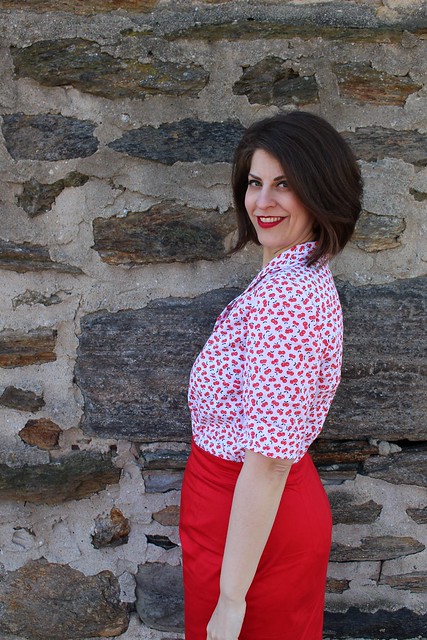
Not too much to report on the fitting and sewing process on this one. My fitting process on button down shirts works for most patterns and this one was no exception.  (All the fitting details are in the normal spot below.) I will mention that the ease in the bust looks just fine with sleeves on, but wouldn't work for the sleeveless version.  There would be way too much armhole gapping without any adjustments.
IMG_1426
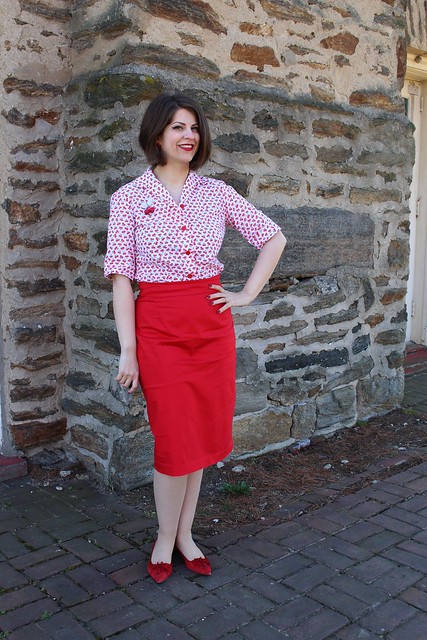
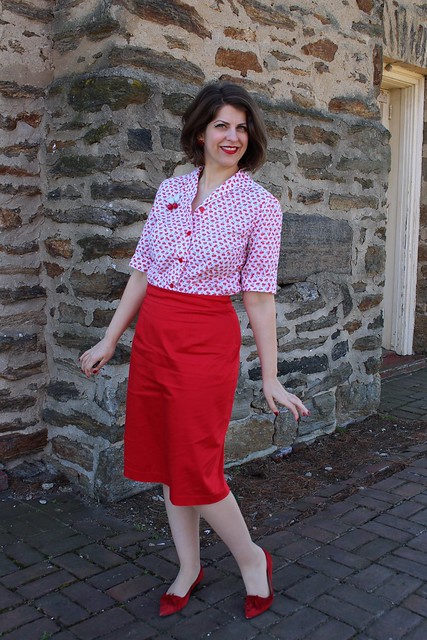
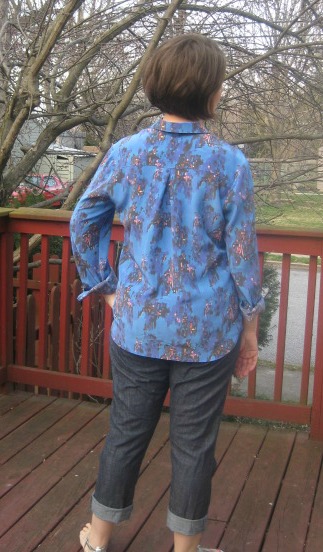
With the sleeves on the shirt has an area appropriate blousey feel without being oversized. I did feel the back had a little too much fullness and converted the tucks into fish eye darts to take some out.
IMG_1431
I'm pretty pleased with the body but have some issues with the collar.  Instead of being being drafted like a standard all in one collar, the upper collar and facing are attached. I feel this shortcut keeps the collar from folding over nicely. It also limits how low you can button the blouse before the facings start flipping out.  If you like the period appropriate button placement then this wouldn't be an issue, but for me it is. (I'll be discussing this further in a sewing notes post.) 

Pattern
Simplicity 2195 (This one seems to be easy to get your hands on.)

Fabrics used
Vintage flocked cotton that was probably also a polyester blend. It has a stink that is only now fading. Sneaky cherries.
IMG_1438
Pattern changes/alterations
1. Dropped bust dart 1 1/2".

2. Shaved off 1/4" at the top of the side seam and added the same amount in the hip area.

3. It felt like the pattern was drafted for a longer torso, but I didn't want to shorten the length. Instead I moved the top of the tucks up 3/4".

4. Turned the back tuck into a fish eye dart.

5.  Made a 1" sway back adjustment.

6. Made a 1/2" forward shoulder adjustment to the sleeve cap.

7. The pattern does not have a shoulder seam so my usual 1/2" wide upper back and forward shoulder adjustment had to be done creatively.  Usually I would add the extra width to the lower part of the back and then put a dart in the shoulder seam of the back yoke.
This pattern not having a shoulder seam is messing up my wide back/forward shoulder adjustments. Going to give this try first. If that doesn't work I'll break the yoke into two pieces. #simplicity2195
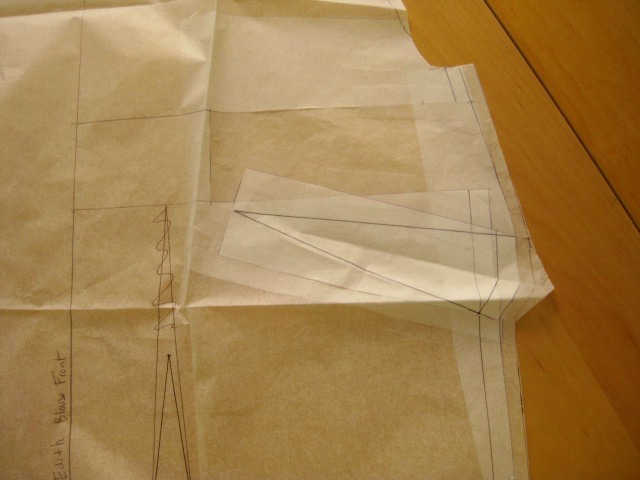
Here's a picture of my adjustment before the excess areas were cut off. The lower part of the back was adjusted like normal.  Then I slashed and spread the entire yoke 1/2", so that the two back seams matched.  On the front of the yoke I took off 1/2" at the shoulder edge so that those seams would match.  For the forward shoulder adjustment I moved the yoke seam line forward and reduced the front as normal.  The shoulder line mark on the pattern also needs to be moved 1/2" forward but that's not shown here.

Confessions/Advice
- I checked the suggested buttonhole placement before sewing them and decided the placement was great. After the garment was completed I changed my tune and wished that the buttons had been shifted lower.

- Pattern is only drafted to have 3 buttons, I added some extra on the lower portion of the blouse.

Husband Comment
"I like it. I like the apples, the pairs of apples." - They're cherries, are we talking about the same thing?

My Final Thoughts
I think this pattern has good bones, but that it needs further modifications before it matches my preferences. Having the collar and facing as one unit doesn't work for me. It doesn't fold the way a collar with a seam does and the facing want to flip out. I also have an issue with wearing tucks. In theory they are fine, but on my body I'd rather have a fish eye dart. All these issues are easily fixable on the pattern. I should go back and tweak it and make another version. In conclusion, decent first attempt but needs a little more work. Hey don't we all. ;)
IMG_1421

Bronte in Blue - with Bonus Fitting Info

6.28.2014

First a quick thank you about the Martini/Bellini post. I was afraid that my normal practice of answering in the comment section might mess up the rafflecopter counts for the give away. I appreciate your feedback and big internet hugs to you all.

Now on to the real meat of this post, Jennifer Lauren's Bronte pattern.
My socks were knocked off when upon seeing this pattern. The vintage 40's shoulder detail really rocked my world and doing it in a knit fabric was a stroke of genius.  I bought, downloaded and traced this baby the day it was released.  The pattern was muslined and it seemed to fit great.  So off I went to make a real version out of some striped Lillestoff and that's when the shit hit the fan.

Yes it was the dreaded, "real knit fabric behaves differently than the muslin fabric."  Sewing Goddess, why have you forsaken me? Sewing Goddess said, "Snitch please, you know what you did wrong." Oh yeah, was it muslining in a different weight knit? Or was it using a wild print that made the fitting problems hard to see? Was it both things? It was both things.  My gut then yelled, "I told you not to do that, but did you listen? NOOOOOO. Think you're smarter than me? Nobody's smarter than me!"

Ok, Ok, you two. I get it, I screwed up this time. Excuse me while I don the ribbons of shame to figure out what my fitting problems are. My gut yelled again, "It's your forward shoulder, like I told you the first time. What are you deaf?" God, why is my gut a surly old man? Dude needs to mellow out. Anyway my gut was correct that my forward shoulder was a good place to start. Long story short, I had to flex my brain muscles and knock out a few more muslins before figuring out the entire fitting problem.  More on that in the fitting section. Let's look at pretty pictures first.

My final version is in a lovely royal blue bamboo knit, a little darker in real life.  The white polka dots are 3 dimensional ink that's been painted on. Kind of like 80's puffy paint, but a little classier. (Please tell me that some of you also had a puffy pant stash.)
Bronte/pencil skirt combo is my favorite. Better put a black denim pencil skirt on the top of the sewing list.

The shoulder detail and I are still having a torrid love affair.  Ahhhh look at the cute flower buttons that were in the stash.  Not knitting baby sweaters in a timely manner finally paid off. There were only 5 on the card so I put 4 buttons on the top instead of the suggested 6.
The buttons also anchor the top overlap so that it doesn't slide backwards on the shoulder. Or at least they do on me.

Pattern
Bronte from Jennifer Lauren Vintage  I made a combo 12/14.

Fabrics used
Polka dot bamboo jersey from Marcy Tilton, but you can get it a few bucks cheaper for Harts. Harts also has this fabric in a number of other colorways.

Pattern changes/alterations
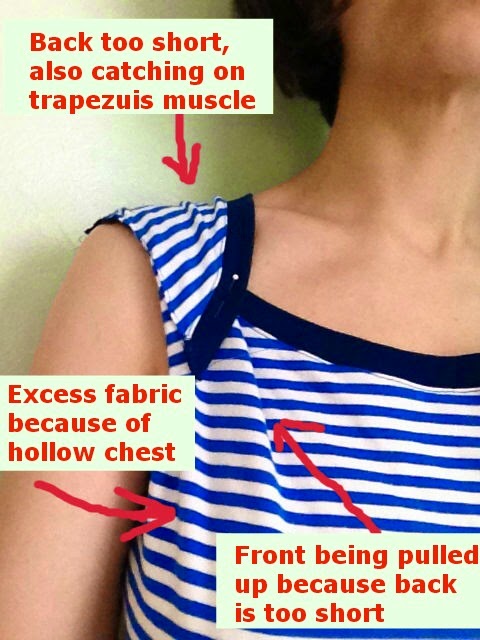
Here's a breakdown of my fitting problems with a little photo assistance.
The biggest problem was the very noticeable drag lines from the bust up to the shoulder overlap.  I also had drag lines coming over the shoulder on the back piece and excess fabric wadding above the bust.

So what's causing all of this?  It's combo of a forward shoulder and a hollow chest.  The shoulder juts forward causing the back length to be too small, which in turn pulls the front up. Meanwhile on the front, the bust fullness is low, which causes pooling of the fabric near the underarm.

To counteract these fitting problems, the back pattern piece needs to be lengthened at the neck and armscye. The front pattern piece needs to be shortened only at the armscye. On my frame the armhole felt like it was the correct diameter. That told me that the same amount needed to be added/subtracted to the back/front to retain the diameter. To determine that amount I did the following...
-Unpick the basting on shoulder area so that the top and back were unattached.
-Tried the shirt on and moved the back overlap backwards until the drag lines on the front disappeared. Then pinned it in place.
- Took off the shirt and measured the distance between the back shoulder notch and the tip of the front neck binding.  On my muslin that measured 1.5"  With that information it was time to move on to the pattern adjustments.

How to Adjust Bronte for a Forward Shoulder and Hollow Chest.
Start with a forward shoulder adjustment to the back.
1. Draw a line across the shoulder overlap. I used the shoulder notch as a guide for my placement.

2. Cut the pattern apart on the line

3. Insert paper to make the overlap portion longer.  I added 1.5" to my pattern.   Tape the other part of the pattern on and use a french curve to true up the neckline.

4. Trim off the extra paper and the back piece is finished.

5. The back neckband needs to be lengthened to match the change made to the shoulder.  Cut it in half on the center fold line.

6. Add double the amount added to the back. So for my band I added 3".  Draw in a new center line and the back neckband is done.

Finish with the hollow chest adjustment.
7.  Draw a line perpendicular to your grain line across the upper part of the pattern.  Because the excess seemed to be pooling near the underarm I placed mine near the bottom of the armscye.

8. Draw another line parallel to the first at the distance that being removed. For my sample it's 1.5".

9. Fold the pattern so that the two lines touch.

10. Add some paper to your armscye and use a french curve to true up the seam.

11. Cut off the paper and all the pattern edits are done.

Note - You can also do a forward adjustment to the sleeve. Tutorial for that here. I was lazy and skipped this step, figuring the knit fabric would disguise the problem.

Confessions/Advice
- I neglected my sway back adjustment again.  Wow, denial on that fitting problem runs deep.

- This jersey is lighter weight than than recommended by the pattern. That does lead to some "draping" in the front.

- I used my normal 1/4" seam allowance rather than the suggested 3/8".

Husband Comment
"Is that a fancy onesie?"

My Final Thoughts
Had to work for this one, but it was worth it in the end.  Besides if everything goes well you don't get to bask in the "successfully triumphed over fitting problems" warm, fuzzy feeling. Ahhhh feels like velvet.
I found the Bronte pattern to be well formatted and the directions well written. It's a nice beginner pattern construction wise and not having to do a circular neckband insertion was a welcome change of pace. I'd recommend it to anyone who like vintage influenced looks.

Now don't you guys worry about that abandoned Lillestoff Bronte, I got plans of it. Muhhhhaaaa *Rubs hands together evilly*

Maria Denmark Edith Top - You'll be Retro Fabulous.

8.12.2013

Hello fellow sewcialists, some of you know I've been drooling over the Maria Denmark Edith blouse since first seeing the prototype garment. It pretty much has everything I like in a summertime button down blouse.
Kimono sleeve...check, collar...check, darts galore...check.  Can I make this up in that narrow vintage cotton I have in the stash, YES I CAN!

So I dropped everything and whipped one up just in time for a trip to the in-laws.  One must put decorative landscaping/fences to good use after all.  Thankfully they don't ask questions when I break out the tripod.
This was the first pattern I used since Maria redesigned the formatting for her PDF downloads and I loved the change.  Every page had a nice red dotted line where the pieces should overlap.  It was easy peasy putting the whole thing together.

Now on to the proper review....
Pattern
The new Edith top/dress from Maria Denmark.  I used a combination of size 42/44.

Fabrics used
Some vintage cotton snagged on Etsy.  This was probably quilting cotton but I liked the cherry gingham print and decided to purchase it for a top.  (Shop is Leona's Old Linens, if you're interested.)

Pattern changes/alterations
1. My usual 1" drop and diagonal tilt of the bust dart.  I've found through past trial and error that this placement works best for me.
2. Dropped the top point of the front fish eye dart 3".
3. Increased the dart intake of the back fish eye dart 1/4".
4. The collar felt a little tight and the bottom of the armholes were digging into my underarms. It fix this I took 1/2" off the shoulder seam at the outer edge and graded it into nothing at the collar side.  Then I dropped the bottom of the armhole 1/2".  This took care of both my fitting problems and put the blouse waist at my natural waist.
5. Normal 1/2" forward shoulder adjustment.
6. Added 1/4" more ease to the hips.
7. Slightly curved the hem at the side seam on both the front and the back.

Confessions/Advice
1.  I used a bias band finish for the armholes.  It was a bit tricky since kimono sleeves have a tighter curve at the bottom than a normal sleeveless blouse. I'm still pretty pleased with the finish.
2. Next time I'd make the front facing slightly wider so I don't feel like it wants to flip out.
3. I never do sway back adjustments on blouses with back fish eye darts but it's probably something I should do.
4. There is no button placement on the pattern so what I did was to put on the shirt and decide where the bust level button should go. Then divide the space evenly for 5 buttons.  On my shirt the top button is 14" from the hem and the rest are spaced 2 1/4" apart.
5. My version has a shirt tail hem in the contrasting hot pink top-stitching....which I seem to have forgotten to take a photo of.

Husband Comment
"You did a really good job on the hems. What are these, cherries?"   I did unpick and redo that hem, so husband points for noticing.

My Final Thoughts
I feel all Bettie Draper put together when wearing Edith with some Colette Clovers.  Now I just need to work on my Nordic bitch stare while sucking on some menthols. "No one likes a liar Sally, now make me a drink."
In closing I think this is a great little pattern and would recommend it to anyone comfortable with making buttonholes.  So make yourself one and find a fence to pose in front of....maybe your husband will photobomb you too.

Me-Made-May Day 19 - Buttonhole Rage

5.19.2013

This is usually what I feel like doing after having to use the button hole attachment. Somehow I don't think that will improve things.
MMMay Day 19
Today's Me-Made is my third Archer completed at the beginning of the month. Oh Archer, you are the perfect shirt.  This one is silk/cotton in a deconstructed paisley print or as my husband calls it "moldy wallpaper print."
And because my son was being naughty on the other side of the window there is also this pic. 
Archer Number 3 - Oops

Me-Made-May Day 18 - YeeeeeeeHaaaaaa

5.18.2013

MMMay Day 18  
It's probably a good thing that we have major tree cover between the deck and dog walkers.  "I'm just taking pictures of me and my pony. What, is that strange?" 
Anyway today the ubiquitous Simp 2246 based shirt block rides again in some ikat cotton I wish I had a giant bolt of.  You ever have that happen?  Of course you have, so tell me what it was cause inquiring minds want to know. ;)
P.S. The boy was like, "Hey mom, these are MY toys."
Howdy Partner, how bout we rustle up those cows now?
 

Silky Spring Archer

4.13.2013

Once upon a time this garment maker strayed across the Wiksten site and fell in love with everything she was doing.  Being out of her size/price range I made due with just snapping up all her sewing patterns and then serially stalking her blog.

I might have drooled on myself when she collaborated with Dealtry and made the most lovely print imaginable.  I think it's frowned upon to put your kid up for adoption to get money to buy silk tanks and dresses, so again I had to admire from afar.

Fast forward to last year when Jenny tweeted that she'd set up a spoonflower shop with several of her prints.  I threw some goldfish crackers at my kid and grabbed my credit card.  "Don't bother Mommy she's buying custom printed silk." Muhaaaa all the pretties will be mine!  I'm still surprised by my restraint only buying the fall colorway in silk crepe de chine.  It seems that all of you love it too because it was the number one choice between blog comments and tweets for the Archer sew-a-long.
I might have already finished mine, over achiever that I am.
Come closer while I strike a pose
On the back I increased the sway back alteration another 1/2" and think it looks better than the first shirt.
And now the real test, toddler action shots.
This was a perfect fabric/pattern pairing so thanks blog readers, you were so right.

FYI - The pants are Hotpatterns Weekender boyfriend jeans made last year.  They do not fit exactly right because "cycle of pant fitting hate," but I still like them.

My TNT fitted buttondown - McCalls 5138

3.30.2013

Hey All, it's time to round out Button Down March with a fitted button down. This one was inspired by the PR fitted blouse contest and the fact that I already had a properly domesticated pattern.

McCalls 5138 and I went 12 rounds last year but in the end I was able to beat it into submission. Then I lifted my arms in the air and yelled Adrian!!!!   Umm no wait, then I made a Joan Holloway inspired blouse. For all the gory details on that, check out this post

And now for the photos of me trying to look nonchalant in my front yard as neighbors walked by with their dogs. Laa laaa laaa, pay no mind to the self obsessed women next to the hedge....damn it's cold out here.
I call this one, Hey is that a plane....or maybe Superman!
While I have a strong preference for two piece collars, the combination of the one piece collar and no button band gives this pattern a vintage feel that I love.  Full flickr set here for more detail shots.
The linen was a Marcy Tilton purchase from last year.  She cleverly sent a book of linen swatches with another order and I was hooked. Why didn't I buy the metallic gray color too!

An now a final shot of this shirt properly styled for the current weather with past FO Burda leather jacket.
 Hey there ladies, just leaning up against a tree. Wanna come over and talk about sewing?

Silks for the Archer Sew-a-long

3.15.2013

In preparation for the Archer Sew-a-long, the silk stash was tossed and several likely candidates appeared.  I'm having trouble deciding, so which one do you like the best?*  All silks are crepe de chine and have plenty of yardage for a button down.

1. Black/Green/Taupe Feathers.

2. Dealtry + Wiksten print from Spoonflower.

3. Skulls, flowers, harnesses extravaganza.
* I retain the right to pick something not even shown here. ;)

Archer Shirt - Final Fitting Alterations

3.15.2013

Yesterday I showed you the finished photos of Archer.  Today I'm going to show you what changes were made and how they were done. Most of these are standard stuff you find in fitting text books, but sometimes it's nice to see them done on a pattern. OK, let's get started....

Forward Shoulder Adjustment -  I'm both a sloucher and have done a lot of computer work in the past, both reasons for forward shoulders.   My standard adjustment is 1/2".
Add 1/2" to the outer edge of the shoulder seam on the back yoke.  Since the sleeve head is not on the seam line make sure to also move the sleeve head notch 1/2" forward as well.
Subtract 1/2" to the outer edge of the front shoulder seam. I'm showing the front seam with the new seam drawn in but before cutting the old one off.
Doing a forward shoulder adjustment means you can't set the sleeve in flat.....unless you don't mind shaving off a little of the sleeve/back bodice.  This is not "proper" pattern drafting but I did it and the shirt still fit great.  Take 1/2" off the front of the sleeve, I took that amount off the entire length of the sleeve and adjusted the cuff as well.  You could also take the 1/2" the sleeve cap and slowly blend it into the original side seam.  Then take 1/2" off the side seam on the back.  Here I did take that amount only off the top of the side seam, blending it into the hip.

Adding a dart with out an FBA -  Sometimes you need a dart but not extra width in the garment.  No worries you can just draw a dart in. For a semi fitted look I've found what works best for me is a dart about 4" down from the armhole angled up to the bust apex.

First I mark the bust apex which I've found through a lot of trail and error on other patterns.  If you have no idea where your bust apex is, holding the pattern piece up to your body is a good way to start.  (My breast tissue is very heavy so my apex is usually way below where the big 4 mark it.) Draw a line from the bust apex to the side seam right around where you want the dart.
Now draw in a dart around that line.  Again due to past projects I know my dart needs to be 1 1/2" wide.  I found that out by making muslins, pinching out fabric for darts and measuring how much was pinched out.

You'll need the proper shape for the dart intake so add some more paper to the side seam, fold the dart like you would when you're sewing it and then cut the paper straight along the side seam.  When you open the dart back up it will have the correct angle on the edge. (Sorry about the multiple dart, had to move that sucker up)
By adding a dart you've make the side seam smaller, so more length needs to be added. Split the amount of the dart intake (in my case 3/4") and put that amount at both the top and bottom of the side seam. True the armhole and hem so that you have a nice smooth line.

Wide Upper Back - My upper back is a bit wide through the arm scye so I always add a 1/2" extra ease for free arm movement.  Usually I slash through both the yoke and the back shirt and put a small dart in the back shoulder seam.  However Archer has a wrap around yoke and a dart would look very strange coming over the shoulder to the front.  Fortunately compared with my shirt block, Archer had about the right amount of width in the yoke.  So today I'm only going to be enlarging the main back piece.
First a slashing line was drawn on the back - measures in 2 1/2" from armhole edge on the yoke seam and 1 1/4" down from the armhole seam.
This line is cut and slid out 1/2"  Then the side seam is trued up and the size of the pleat increased so that the back will fit into the yoke.

Sway Back - Lots of extra fabric at your center back that pools up when the hem of your shirt hits your butt? I got that in spades. My usual sway back alteration is to pinch out 1".

The lengthen/shorten line is usually a good place to put the sway back alteration.  I put mine right above it.  Mark out the amount of fabric you want to remove, (in my case 1") pleat the pattern so that you take out the full amount at CB but none at the side seam. Tape that sucker down and you're done.
Huzzah, fitting changes are done!  Finger guns for everybody. Phew Phew Phew!  Now go make this wonderful pattern.
Proudly designed by Mlekoshi pixel perfect web designs