Showing posts with label Archer. Show all posts

Archer Addict

10.02.2013

Hey look it's another Archer, number 5 if you're wondering.
No, no I don't have a problem. I can stop making them at any time.  I'm not frantically searching the internet for cotton flannel or anything. *Closes browser tabs* I don't have another mid process in a box...um yeah I do, sooooo never mind that.  
OK fine, I do have a "problem".... lack of closet space for all my Archers.  Do you think we can get a tardis closet, bigger on the inside and all that?  With it's own Archer room, Yes?  Do you think "The Doctor" subcontracts? Do you think he likes red pants?
While I'm looking for "The Doctors" number let me tell you about this fabric.  I found it during one of my numerous Etsy searches for vintage fabric. My brain immediately thought it would make a fantastic Archer. Gingham and ikat, it's double the awesome! I didn't buy it right away it because it wasn't a bargain and 2.5 yards might not be enough.  But gradually the though of someone else owning "MY" gingham ikat caused me to click the buy button and I can't say I regret it. 
When the fabric arrived I realized it had to be a hand woven textile. The hand of the fabric was kind of spongy and the design had lots of fun irregularities.  However fun irregularities do make plaid matching a big PITA, here are the the issues I had.

1. The size of the checks were not the same though out the whole fabric.  I didn't realize this until sewing and found one of my button bands matched perfectly and the other only half haphazardly. The first band was cut next to it's corresponding front and the other in a different location.  Doh!  Thankfully the one that matches the front is the one with the button holes.
2. The fabric next to the selvages was very biased so all pieces needed to be cut about 2" inward. Talk about a nail bitter when you're trying to match the gingham and only have 2.5 yards.

3. I forgot that I need to match the gingham and ikats motifs.  On my pockets the gingham matches perfectly but the ikat motifs are not the same.  Guess who didn't notice this until 2 days after the shirt was finished...this girl.
4 There was a weaving error/fiber flaw in the fabric where the fibers broke and created a "run" in the ikat. Thankfully I noticed it before starting and was able to lay everything out in a way where I didn't need this area. 

It took a little dubious gingham matching in some locations, but I was just able to squeeze out an Archer in the yardage available.  On the plus side, this hand woven cotton is super comfy to wear. So so cozy, it feels like my Archer is gently hugging me while I wear it.  I love you too Archer, never change.

Well I'm having no luck getting in touch with "The Doctor." about my closet situation.  Guess I'm gonna have to manufacture an emergency situation.  GRRRRARRRRR, I will eat you all and take your fabric. Nom, Nom, Nom.

Me-Made-May Day 19 - Buttonhole Rage

5.19.2013

This is usually what I feel like doing after having to use the button hole attachment. Somehow I don't think that will improve things.
MMMay Day 19
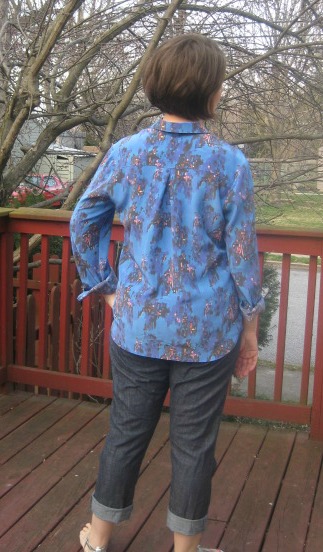
Today's Me-Made is my third Archer completed at the beginning of the month. Oh Archer, you are the perfect shirt.  This one is silk/cotton in a deconstructed paisley print or as my husband calls it "moldy wallpaper print."
And because my son was being naughty on the other side of the window there is also this pic. 
Archer Number 3 - Oops

Silky Spring Archer

4.13.2013

Once upon a time this garment maker strayed across the Wiksten site and fell in love with everything she was doing.  Being out of her size/price range I made due with just snapping up all her sewing patterns and then serially stalking her blog.

I might have drooled on myself when she collaborated with Dealtry and made the most lovely print imaginable.  I think it's frowned upon to put your kid up for adoption to get money to buy silk tanks and dresses, so again I had to admire from afar.

Fast forward to last year when Jenny tweeted that she'd set up a spoonflower shop with several of her prints.  I threw some goldfish crackers at my kid and grabbed my credit card.  "Don't bother Mommy she's buying custom printed silk." Muhaaaa all the pretties will be mine!  I'm still surprised by my restraint only buying the fall colorway in silk crepe de chine.  It seems that all of you love it too because it was the number one choice between blog comments and tweets for the Archer sew-a-long.
I might have already finished mine, over achiever that I am.
Come closer while I strike a pose
On the back I increased the sway back alteration another 1/2" and think it looks better than the first shirt.
And now the real test, toddler action shots.
This was a perfect fabric/pattern pairing so thanks blog readers, you were so right.

FYI - The pants are Hotpatterns Weekender boyfriend jeans made last year.  They do not fit exactly right because "cycle of pant fitting hate," but I still like them.

Silks for the Archer Sew-a-long

3.15.2013

In preparation for the Archer Sew-a-long, the silk stash was tossed and several likely candidates appeared.  I'm having trouble deciding, so which one do you like the best?*  All silks are crepe de chine and have plenty of yardage for a button down.

1. Black/Green/Taupe Feathers.

2. Dealtry + Wiksten print from Spoonflower.

3. Skulls, flowers, harnesses extravaganza.
* I retain the right to pick something not even shown here. ;)

Archer Shirt - Final Fitting Alterations

3.15.2013

Yesterday I showed you the finished photos of Archer.  Today I'm going to show you what changes were made and how they were done. Most of these are standard stuff you find in fitting text books, but sometimes it's nice to see them done on a pattern. OK, let's get started....

Forward Shoulder Adjustment -  I'm both a sloucher and have done a lot of computer work in the past, both reasons for forward shoulders.   My standard adjustment is 1/2".
Add 1/2" to the outer edge of the shoulder seam on the back yoke.  Since the sleeve head is not on the seam line make sure to also move the sleeve head notch 1/2" forward as well.
Subtract 1/2" to the outer edge of the front shoulder seam. I'm showing the front seam with the new seam drawn in but before cutting the old one off.
Doing a forward shoulder adjustment means you can't set the sleeve in flat.....unless you don't mind shaving off a little of the sleeve/back bodice.  This is not "proper" pattern drafting but I did it and the shirt still fit great.  Take 1/2" off the front of the sleeve, I took that amount off the entire length of the sleeve and adjusted the cuff as well.  You could also take the 1/2" the sleeve cap and slowly blend it into the original side seam.  Then take 1/2" off the side seam on the back.  Here I did take that amount only off the top of the side seam, blending it into the hip.

Adding a dart with out an FBA -  Sometimes you need a dart but not extra width in the garment.  No worries you can just draw a dart in. For a semi fitted look I've found what works best for me is a dart about 4" down from the armhole angled up to the bust apex.

First I mark the bust apex which I've found through a lot of trail and error on other patterns.  If you have no idea where your bust apex is, holding the pattern piece up to your body is a good way to start.  (My breast tissue is very heavy so my apex is usually way below where the big 4 mark it.) Draw a line from the bust apex to the side seam right around where you want the dart.
Now draw in a dart around that line.  Again due to past projects I know my dart needs to be 1 1/2" wide.  I found that out by making muslins, pinching out fabric for darts and measuring how much was pinched out.

You'll need the proper shape for the dart intake so add some more paper to the side seam, fold the dart like you would when you're sewing it and then cut the paper straight along the side seam.  When you open the dart back up it will have the correct angle on the edge. (Sorry about the multiple dart, had to move that sucker up)
By adding a dart you've make the side seam smaller, so more length needs to be added. Split the amount of the dart intake (in my case 3/4") and put that amount at both the top and bottom of the side seam. True the armhole and hem so that you have a nice smooth line.

Wide Upper Back - My upper back is a bit wide through the arm scye so I always add a 1/2" extra ease for free arm movement.  Usually I slash through both the yoke and the back shirt and put a small dart in the back shoulder seam.  However Archer has a wrap around yoke and a dart would look very strange coming over the shoulder to the front.  Fortunately compared with my shirt block, Archer had about the right amount of width in the yoke.  So today I'm only going to be enlarging the main back piece.
First a slashing line was drawn on the back - measures in 2 1/2" from armhole edge on the yoke seam and 1 1/4" down from the armhole seam.
This line is cut and slid out 1/2"  Then the side seam is trued up and the size of the pleat increased so that the back will fit into the yoke.

Sway Back - Lots of extra fabric at your center back that pools up when the hem of your shirt hits your butt? I got that in spades. My usual sway back alteration is to pinch out 1".

The lengthen/shorten line is usually a good place to put the sway back alteration.  I put mine right above it.  Mark out the amount of fabric you want to remove, (in my case 1") pleat the pattern so that you take out the full amount at CB but none at the side seam. Tape that sucker down and you're done.
Huzzah, fitting changes are done!  Finger guns for everybody. Phew Phew Phew!  Now go make this wonderful pattern.

Archer Button down - Wearable muslin #3

3.14.2013

Guess what, that wearable muslin turned out pretty good. Dare I say it gets the upgrade to finished object?
The fit on the front of the shirt is perfect, enough ease for comfort but not to much.
Archer Front
On the back I probably need a bigger sway back alteration.  Though the pleat is messing up my assement since that's not a design feature I use on my own shirt block.
Archer Back
And the pockets! Usually pockets and my boobs do not mix (mini pockets are the devils work) but these are fantastic. I feel like people will look at the shirt and say, "Cool that has pockets," instead of, "What's going on with your boobs?"
Archer pockets
Also angled sleeve cuffs = perfect shirt
Archer Cuffs

My love for Jen's designs just grows and grows.  Full flickr set here if you like non modeled detail shoots of collars and cuffs.  A detailed post about my final fitting changes is almost done, so stay tuned for that.  There are still plans to make a silk Archer, but I'll do that with the official sew-a-long.  That way I have a couple of days to stare at the giant pile of silks....too many lovelies to choose from.

Archer button down - Fitting process

3.11.2013

Back to button down March!  Both Archer and McCall's 5138 are making some progress on the old sewing machine. You won't see McCall's 5138 till it's done, it being a TNT there's nothing much to talk about.  But today I'm going to "lift the veil" on my half hazard fitting process.

When picking your size know that Archer is drafted to be roomy, so pick the size closest to your bust measurement.  This fact would have been clear to me had I measured that pattern.  But that would be a smart thing to do, so I naturally skipped over it and guessed what size to make.  I started off with a size 14 bust/shoulder and a 16 through waist/hip. (Blending two sizes together like this is pretty standard for me since I'm pear shaped)  On to the pics....

Muslin #1
A 14/16 size combo with the following adjustments - standard FBA that added a dart and 1" additional bust ease on the half (so 2" total), 1/2" extra width in the back on the half (1" total), 1/2" sway back adjustment and a 1/2" forward shoulder adjustment. 
Archer muslin 1

Findings -  Shirt way to big every where. I like a lose shirt but not one that looks like a smock. I also forgot to move the notch for the sleeve head so the forward shoulder adjustment was not successful. 

Conclusion- Need to go down a size, add only a bust dart but not extra width, move shoulder notch, remove back width adjustment and slim sleeve down.

Muslin #2
A 12/14 size combo with the following adjustments - Bust dart added but without full FBA, 1/2" sway back adjustment and a 1/2" forward shoulder adjustment with sleeve head notch properly moved.
Archer muslin 2

Findings -  Shirt much closer to the size I'd prefer.  Bust dart was properly pointed at the bust apex but visually looked too low on the side seam.  Decided that the back was too tight without my standard width adjustment.

Conclusion-Add 1/2" additional upper back width to the pattern again, pivot bust dart further up side seam, gently curve side seams for a trimmer look.

I'm currently sewing muslin #3, which will be in some navy cotton inherited from my grandmother's stash.  Felt like the fit was close enough in muslin #2 that I could risk some free to me fabric.   If the fit of that shirt is to my liking then archer will get an upgrade to some  fancy shmancy silk. Oh Boy!
Proudly designed by Mlekoshi pixel perfect web designs