Showing posts with label Coat. Show all posts

My Annual Winter Coat Project - Hollywood 1214

2.26.2017

I think most of you guys know by now that I'm not much of a planner.  Usually I cast my little squirrel eyes around and sew what ever seems bright and shiny at the current moment in time.  Funny though, I looked through the blog archives this week and discovered that my squirrel brain always likes sewing a coat in January/February.  It's almost like the cold weather sets off a craving to cocoon myself in coating weight wool.
This year I finally broke out the coat pattern snagged off of ebay months ago for $5.00, yes $5.00!  Oh I was sooo pleased with my bargain pattern acquisition of Hollywood 1214 that it was never even pulled it out of the envelope. When I did so to trace it in December that's when it was discovered there were no directions. Crap!
Now I don't rely on directions that heavily, but they do come in handy on non printed patterns. I use them while tracing a copy of the pattern to correctly label all the pattern pieces. It's also nice to have a reference for things like top-stitching and any sort of vintage sewing technique that has fallen out of fashion.  I was also a little concerned about the pockets on this design. I've sewed a lot of garments, but never one with pockets that look quite like this.  After mulling it over for a day I decided to give it a shot.
Between several years of coat sewing experience, 1 year of familiarity with non-printed patterns and an excellent fashion illustration it all worked out. When sewing the muslin I turned off my brain and my hands figured out how the pockets went together without a hitch.  Isn't it nice how a lot of garment constructions is common sense? The rest of the sewing was standard coat/jacket stuff that I can do without any directions. Hooray!  I also lucked out that the 40's fashion illustration was very detailed and showed where all the top-stitching should go. You'll probably have to look at the illustration yourself to be able to see any top-stitching details. My light gray on light gray stitching mostly gets lost in the photos.  I do want you to know that I spent hours trying to get smooth top-stitching curves on my coat lapels. ;)
On to the review portion of the blog post..

Pattern
Hollywood 1214


Fabrics used
Stashed gray wool coating - originally from Gorgeous Fabrics
Stashed floral viscose as lining - originally from Emma one sock

Pattern changes/alterations
1. Standard 1/2 forward shoulder adjustment to the shoulder and sleeve head.
2. Added 1" extra ease to the hem line and hem.
3.  Removed 3" of ease out of the sleeve cap. Some was removed by making the dart at the top of the sleeve wider. Some was pinched out.
4. Drafted my own lining for the coat.

Confessions/Advice
- This pattern seems to have been drafted with shoulders that are supposed to jut out past the natural line. Despite all the extra shoulder padding I added in that area it still looks like I didn't fit the coat right.  If I had to do it over again I would take the shoulder line in to met my natural shoulder edge.

- I do like all the little details this pattern has. Lots of top-stitching, the little faux belt at the back, the lovely big pockets. It's really hard to keep your hands out of them!

- Compared with all my other coats, the lack of buttons below the waist feels a bit odd. I'm always thinking that I've forgotten to fasten a button or two. Thanks to the thickness of the coat there isn't too much problem with the bottom half blowing open unless it's a really stiff wind.

- Confession, the bugs got to this piece of wool too. One yard was badly compromised, but there were nips taken out here and there through out the yardage. The bugs seemed to favor the fuzzier side which probably was the right side of the fabric. I decided to use the "wrong side" and not worry about cutting around any nips in the fabric.

Husband + Son Comment
Steve - "Looks like there's a lot of room in that coat."
Desmond - "Room for 100 people the size of ants!"
Steve - "I was thinking along the line of thick sweaters or smuggling goods, but sure."

My Final Thoughts
Not gonna lie, my red McCall's 6800 is still my favorite coat. You know how a looooove red.  However this project was an interesting sew and gave me a real ego boost. It's nice to find out that you can finish something without out any directions.
Can you guys believe this is the last of my stashed wool coating? I'm going to cry big crocodile tears next year when I have to fork money over for my seasonal coat.

Lady in Red - McCalls 6800

2.23.2016

Ooooo what's this? Did someone finally wrestle her startitus into submission and finish something? By Grabthar's hammer I Did!  It took a lot of cookie eating, muttering crazily to myself and putting on my "Big Girl Decision Making Pants." One does need bigger pants after so many cookies.
My startitus trouble was caused by the inability to choose fashion fabric. After the muslin stage I hit a wall trying to figure out what fabric to use, get frustrated and start a new project. Then multiply that process a few more times. This problem was a new one to me because Past Heather would have solved it by shopping for more fabric. It's not that new fabric purchases are banned around here or anything. It's just that I've been trying to rifle through the stash first to make sure there isn't something appropriate. Then it seemed like it was always too much trouble to actually go look in the stash. My husband was sleeping the room or it was only 10 minutes until it was time to pick up Des or I felt too tired to pull everything out.  Those of you without dedicated sewing areas know how it is.
In the case of this project, McCall's 6800, I did know exactly what fabric to use but there wasn't quiet enough yardage. I must have spent a week and a half thinking of all the different ways to squeeze this pattern out of 4 yards.

1. Shorten the skirt length like I did on Butterick 5824.
2. Buy some faux fur to use on the collar, hem and cuffs.
3. Switch to the funnel neck option and sew the short version offered in the pattern.

All good options, unless you get stubborn and decide the coat must be sewn like you imagined it. Not living up to being a stereotypical Taurus, not at all.  Anyway, I inconvenienced everyone else in the house by putting 4 yards of 60" coating on the floor and spending a few hours working my cutting layout tetris. "No you can not have any food while I do this. The kitchen is closed....literally because I've blocked the way with fabric."

Aided by the fact that this wool coating doesn't have a visible nap, I rotated all the side fronts/backs in the opposite direction to the middle fronts/backs. Being able to nest the pieces with large skirt sweeps together freed up a lot of yardage. After that the only piece that wouldn't fit was the facings. Being so close to victory I decided to piece the facings together at the waist thereby using the two small chunks of yardage that was left. Voila, my stubbornness paid off. "HA HA! I Told You I'd Make It Work," I yelled at nobody in particular. Des just sighed and asked if he could finally have a snack now. (He'd eaten 4 things in the previous hour so don't feel sorry for him. He's got his mother's "must always be foraging" genes.)
Now that I've woven my tale of fabric cutting drama let's talk about McCall's 6800 a bit. This is one of those patterns that popped up on my radar after seeing some FO's appear on the internet. My interest was peaked enough to go have a gander at the technical drawings and Holy Cow this is Big 4 patterning done right.

1. Pattern Comes With A Two Piece Sleeve! Granted coat patterns with one piece sleeves might be my own personal pet peeve instead of a conspiracy of lazy drafting. Seriously though it's better drafting for outerwear meant to be sewn in a heavy weight fabric.

2. Collar and Hem Options Huzzah! This is the sort of thing that fills me with goodwill towards a pattern. When you're working from the block these sort of variations don't take too long to draft. But if I was trying to reverse engineer a coat with lapels to higher neckline it would be a total pain in the ass.

3. Additional Design elements. Just having the various collars and hems was swell but they didn't stop there. The pattern also comes with a button in hood or faux fur collar and a belt option. Good on you McCall's, this pattern is stuffed with ways to customize your coat.

I do have two very minor niggles about the pattern. The first is that the pocket bags are very shallow. I subbed in the ones from Butterick 5824 since they were perfect.  The second is that the button placement might be a bit too far apart.  I say might because I'm not 100% sure that my button choice isn't to blame. Anyway both of these "problems" are easy to fix and do not detract from my obvious love of the pattern.
My version is mostly View B. Instead of the waterfall hemline the straight hemline from View D was swapped in.  I also decided to put the pockets in the side seam area instead of using the front princess line seam. The pattern marks pocket placement in both locations, so that's easy peasy. You'll see in the review area that I also lucked out and didn't have to do many fitting alterations on my muslin. In fact the only Oops moment was not accounting for the weight of the skirt changing the fit around the waist.  My muslin fit perfectly, but in the heavier wool that area had lot more ease than I was looking for. This would have been slightly less of an aggravation if the lining hadn't already been sewn closed. Derp.  In these photos the side seams have been taken in about 1.25".  Afterwards I went back and took in the CB seam about 1" and moved that top button a bit.

Pattern
McCall's 6800 Model is like, "I can't hear you over my sassy coat."

Fabrics used
Italian Wool Flannel coating originally from Gorgeous Fabrics. I bought mine in 2013 but they seem to stock it regularly every year. This is the same coating that I used for both Butterick 5824 and the Ottobre coat I made for my sister.

Rayon/Acetate Lining. Also a stashed GF purchase but they seem to have it/something like it still in stock.

Pattern changes/alterations
1. Blended together sizes 16 and 18.
2. Made my standard 1/2" forward shoulder adjustment to both the shoulder and sleeve.
3. Took in the back 1" spread evenly between the side back seams.

My on the fly alteration of the waist was to curve in the seam just at the waist area.  I took a total of 1.25" out at each side seam and 1" out of the CB seam.

Confessions/Advice
- If you're using a medium weight wool like me I'd suggest fitting the muslin very close to the waist. The weight of the skirt will pull the waist area out giving you more ease.

- If you don't sew muslins then don't be like me and do a final fit check after sewing the bottom of the lining to the coat. You know so you don't have to rip up a bunch of hand sewing to take in some side seams.

- I am wearing a petticoat in these pictures to fluff the skirt out a bit. The coat does look nice sans petticoat but I forgot to take any pictures.

Husband Comment
"Hey princess, I like all your seams." Then he grabbed the lapels and folded them up towards my neck and asked why there wasn't a button there to secure them.  I think he must have been sneakily staring at the technical flats.
P.S - We had a disagreement that my scarves wouldn't fill in the neckline area.  Feast your eyes on the photographic evidence Steve. ;)

My Final Thoughts
You already know I think the pattern is pretty great. Lots of design options, great drafting, you can buy it on sale right now for 3.99 on the McCall's website. The only downside might be the amount of yardage you need for the longer view. If you don't have 5+ yards of coating in your stash, Gorgeous Fabrics does have all the Italian Wool Flannel Coating on sale right now for $15.00 a yard. I'm sure Fabric Mart has some even better deals on coating if you do a bit of browsing.  And with that I will stop being an enabler and leave you with the sort of twirling picture necessary when full skirts are involved. Until next time my friends.

Veronica Enters the Scene

1.18.2016

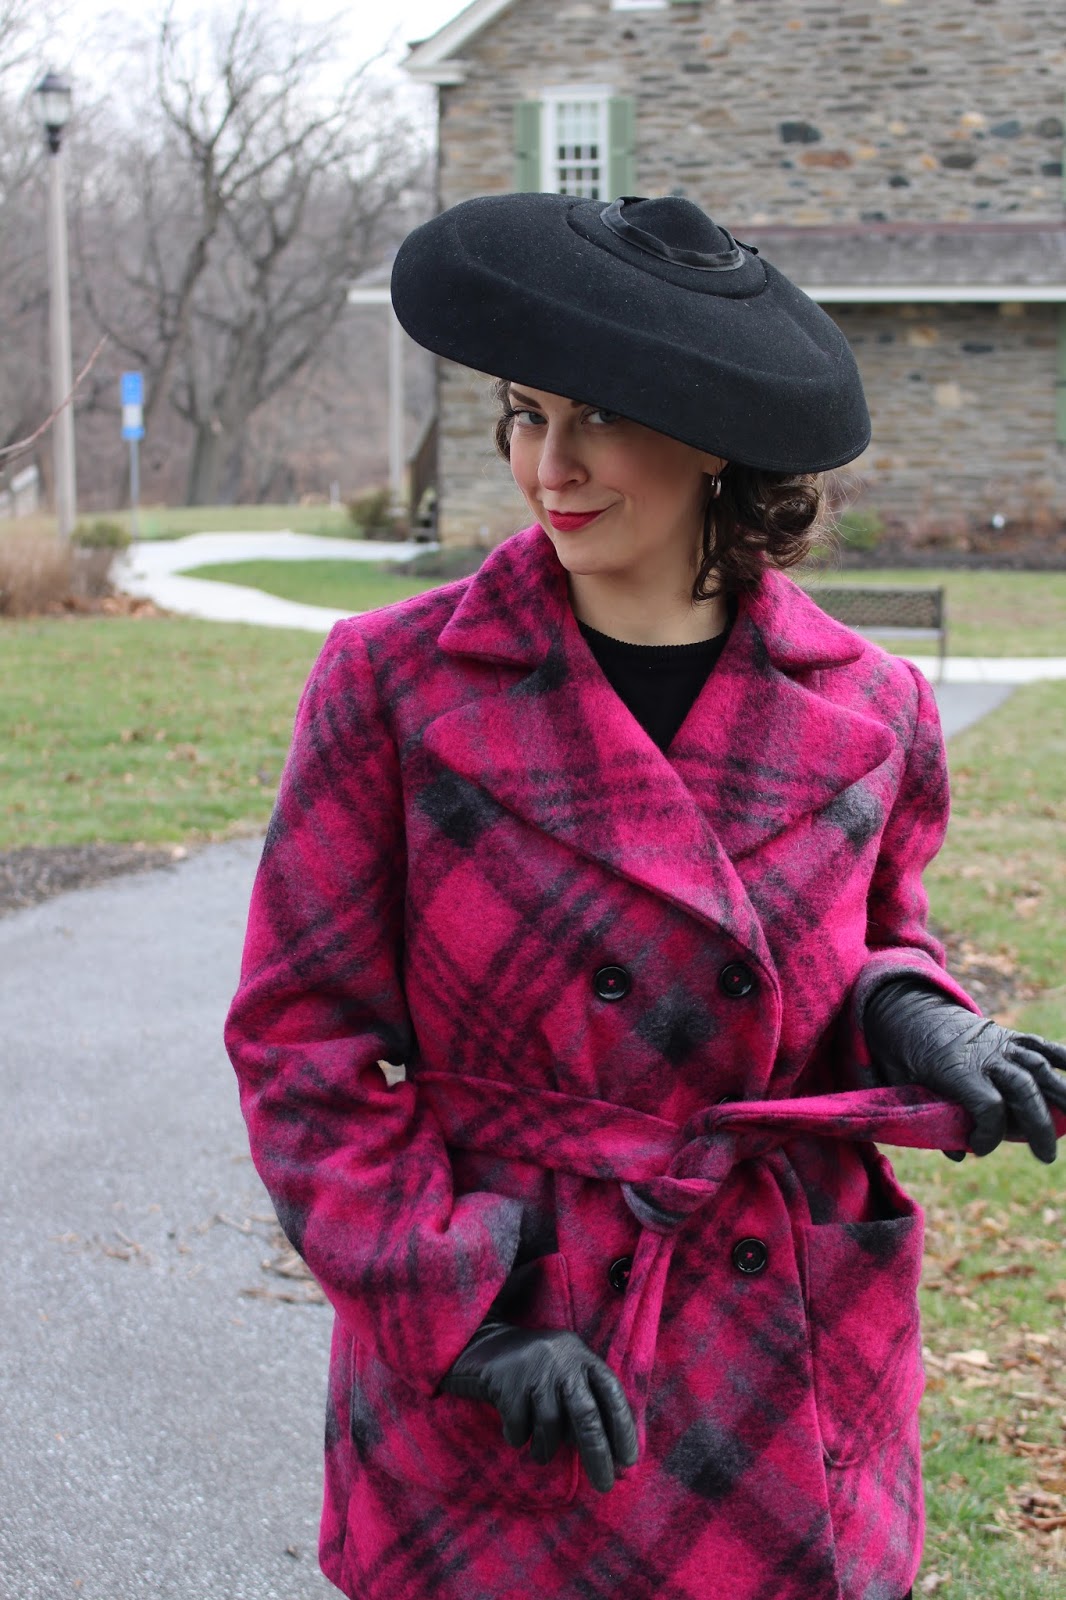
As someone who hoards a lot of fabric it's no surprise that there are several pieces "waiting for the right pattern to come along."  Yes I know this is a recipe for disaster ending with adult Desmond chucking yards of fabric in a waste bin while grumbling about his mother. (Don't do it future Desmond, I will come back and haunt the poop out of you.) The horror of my pretties being incinerated should light a metaphorical fire under my butt and it often does.  However there are certain yardages that seem to be immune to this. They are still waiting for their perfect pattern and every once in awhile that right pattern does magically appear  This was the case when the Veronica coat popped up in my IG feed in mid December. I immediately thought, "Squuuuueeeee, this is the perfect thing for the 3 yards of plaid magenta coating that has been in the stash forever."
This fabric is so old that I'm not quite sure how old. It predates both my son and the purchase of our house so it's at least 6 years, but could be a little older than that.  Those of you with 15-20 year old pieces in your stash are laughing at me right now.  ;) For my stash this is pretty much the bottom layer as long as you don't count the accumulated years of inherited pieces of fabric.  This coating was originially purchased from Emmaonesock.com in one of those, "It must be mine......I don't care what it costs....take my money please," sort of moments.  Between the lovely colors and the plaid being woven on the diagonal it was too awesome to pass up. It was also too awesome to sew. No pattern pairing ever seemed right for it, which is why it was still sitting in the back of the closet in late 2015.
Thrilled to have finally found this fabric's pattern mate, the PDF pattern of the coat was purchased so I didn't have to wait to start it.  The pattern was assembled, traced off and a muslin was made in about a week. Can you tell I was excited?  Everything looked great so I got out the plaid coating, unfolded and found......it was covered in bug holes. NOOOOOOOOOOO!!!!! This picture doesn't look too bad, but it was actually the heaviest part of the damage being the outside layer when the fabric was folded. The bugs seemed to like the magenta parts and would eat down to the backing layer which is black.  You can see the biggest hole in the photo, but there were a lot of smaller one's peppered throughout the fabric. I thought the project would have to be scraped right then and there.
After some self pity induced cookie eating, I took a closer look at the fabric and found that the left side of the fabric was in pretty good shape.  Sometimes what looked like holes were actually areas where black fiber had clumped when the fabric was being made. On the flip side more holes were found in the right side of the yardage, which made plaid matching a big concern.  Damn you bugs!!!!  In the end I just got stubborn and started cutting the coat out thinking, "I am going to make this work!"  Long story short, there was enough undamaged fabric to cut all the pieces out and I got pretty good plaid matches.  One side seam is off because the plaid repeat seemed to bias a bit at the fabric edges. I could either plaid match the CB or the side seam, but not both. I did find two small bug holes that escaped my notice while sewing. Thankfully neither went all the way through the fabric or was that noticeable. Since there was literally no more undamaged fabric to work with I'm going to call it a win.

After all the drama of cutting out this project the rest of it went pretty smoothly. I did need to thread trace all the buttonhole and pocket placement lines because no marker/chalk/wax showed up on this fabric. Thread tracing was a bit annoying, but it turned out to be good TV watching project. That must have given me the hand sewing bug because it suddenly sewn in interfacing seemed like a great idea! I got out the lightweight horsehair interfacing and and hand sewed it all into the body of the coat 1940's style. Yeah, I don't know what came over me either. After that it was mostly straightforward machine sewing, with the exception of the hems.  I did hand sew them up with some rayon seam tape like the instructions suggested. The final bit of drama was the buttonholes.  Now my Bernina is an absolute trooper with buttonholes when compared to my last sewing machine. This wool/mohair blend was just a bit more than it could handle, soo sooo squishy. During the 4 hour buttonhole sewing process I was pretty jealous the NY girls who can pay someone to put buttonholes in using an industrial machine. NY ladies, that is money well spent. Saves you from having to use every screaming/crying emoji on your iPad and inhaling so much mohair fluff that you feel like you've been licking goats. I'm sure someone enjoys licking goats as recreation, but I'll pass.
Let me talk about the pattern for a minute. The Veronica coat is what Wearing History categorizes as a "Resto-Vival" pattern. This means it is a vintage pattern that has been slightly reformatted and graded to include a number of sizes.  For example this 40's coat was originally an unprinted pattern with holes punched out to indicate darts, grain lines, etc. Wearing History transfered all this info into printed lines similar to more modern patterns. The actual drafting of the garment remains the same, which the exception of there being two sleeve cap options offered. (More on that in the Confessions/Advice area) The directions are also the originals with a few added notes from the Wearing History clearly marked "WH Notes."  The 1940 directions are sparse compared to modern ones, but if you have prior coat making experience this won't be a problem. Personally I preferred this sort of reissued pattern to ones where the drafting gets dumbed down for modern sewist. And as someone who barely reads instructions for any project, using the original ones was no problem.

Pattern
Veronica - 1940's Coat from Wearing History. I sewed View 2.

Fabrics used
Wool/mohair coating from the stash.
Warm coat lining from Emmaonesock.com
Pattern changes/alterations
1. 1/2" Forward shoulder alteration to the shoulder and sleeve.

2. I added a 1" pleat to the CB of the lining.

Confessions/Advice
- This is a large PDF pattern.  Those of you who feel like PDF patterns are puzzles to put together will be fine with it. There's a printed version available for those of you who think PDF patterns are the work of the devil.

- When you look at the pattern sheet you'll see that there is an modified sleeve cap option towards the top. WH explains that as drafted the sleeve is much puffier than what the fashion illustration shows.  They provide the smaller cap that can be swapped and give you the flatter look of the illustration.  If you want to be 100% authentic you can trace the sleeve as is and use the original sleeve cap.  For my coat I used the modified sleeve cap with the shorter sleeve head.

- I prefer to have some waist definition in my coats, which is why I went with the belted view 2.  Some of you don't have the same tastes so I took an unbelted photo just for you.
- I think there is a typo on page 4 of the instructions. There is says most of the pattern has a 1/2" seam allowance but the side seams, underarms and CB all have a 3/4" seam allowance. I found my collar did not fit in properly with a 3/4" CB seam.  Went back and made it 1/2" SA and then the collar fit perfectly.  (The 3/4" SA was used for the side seams and underarms on my coat.)

- I did forget about that 3/4" SA on the lining and sewed the whole thing at 1/2".  Happily the thickness of the wool meant it fit perfectly at that size.

- The lapel buttonhole was left off because I like wearing my collars open. Also because I couldn't face trying to sew another buttonhole and my child had heard enough profanity for the day.

Husband Comment
"What fictional character are you talking to in this coat?  Claude Rains?  Are you using him or his he taking you for a ride?  Also it's got big pockets."

My Final Thoughts
I've been thanking my lucky stars that this plaid coating wasn't completely destroyed by whatever stealthily munching bugs were involved.  It would have been a crime against old man winter....or maybe just would have reduced me to eating half a pan of brownies in one sitting. Either way not a good scene.

So far Veronica is in heavy rotation with my blue Butterick 5824 and I like having a shorter coat length option in the mix. The big patch pockets are really handy for keys, gloves and about 8 rocks that your kid picked up on the way home from school. He even said, "Ooooo these pockets are so big," as he stuffed a rock into them. Oh and I got to buy a new hat to go with this so winning all around. So with that I'm off to play a dame lurking the shadows in some Film Noir. My pocket full of rocks should come in handy.

A Coat for my Petticoat

2.26.2015

At long last a sewing FO post! Sewing Goddess be praised. I've been living with this coat as a UFO for what seems like two months.  It was more like one month, but there's nothing is worse than a giant project taking up your sewing space that refuses to finish it's self.   Where is my army of sewing frogs? What do I do all this baking for if they don't show up?

The problem did not lay in the pattern or even the fabric. The problem was me.  In the past I've gleefully cranked out several coats/jackets for the blog. Usually I find them to be an enjoyable project that has a great pay off.  This time the manic desire to cut into some coating just didn't come brimming up through my pores.  It could be that "sewing a coat" has been on the mental list so long that it turned into an obligation.  It could be that the Christmas dress was a big ass project and I wasn't really ready for another one. Or it could be that it's freaking cold in my sewing area and I'd rather hide in my bedroom with some knitting needles.  Bring me a heating pad and a pie!
Now you might be asking, "Heather, if you didn't want to sew a coat, then why did you bully yourself into doing it?"  Good question and I've got three perfectly valid reasons.  Number 1 There is a lot of wool coating in the stash taking up tons of room.  Number 2 - I didn't feel like freezing my butt off outside while taking pictures of summer dresses.  Number 3 - I needed a coat that had a wide enough skirt to fit my petticoat under it......like you do.   OK, I realize that the last sentence is a bit absurd and even Past Heather would be going, "Petticoat What?"  Let's just say this whole "retro dressing" thing is a slippery slope and soon you find yourself buying petticoats and hair flowers and LOVING IT. My petticoat gets worn semi-regularly and thus I needed a coat where it didn't awkwardly stick out the back. Nothing ruins your look faster then a "tooth paste squeezing out of the tube" look around your knees.
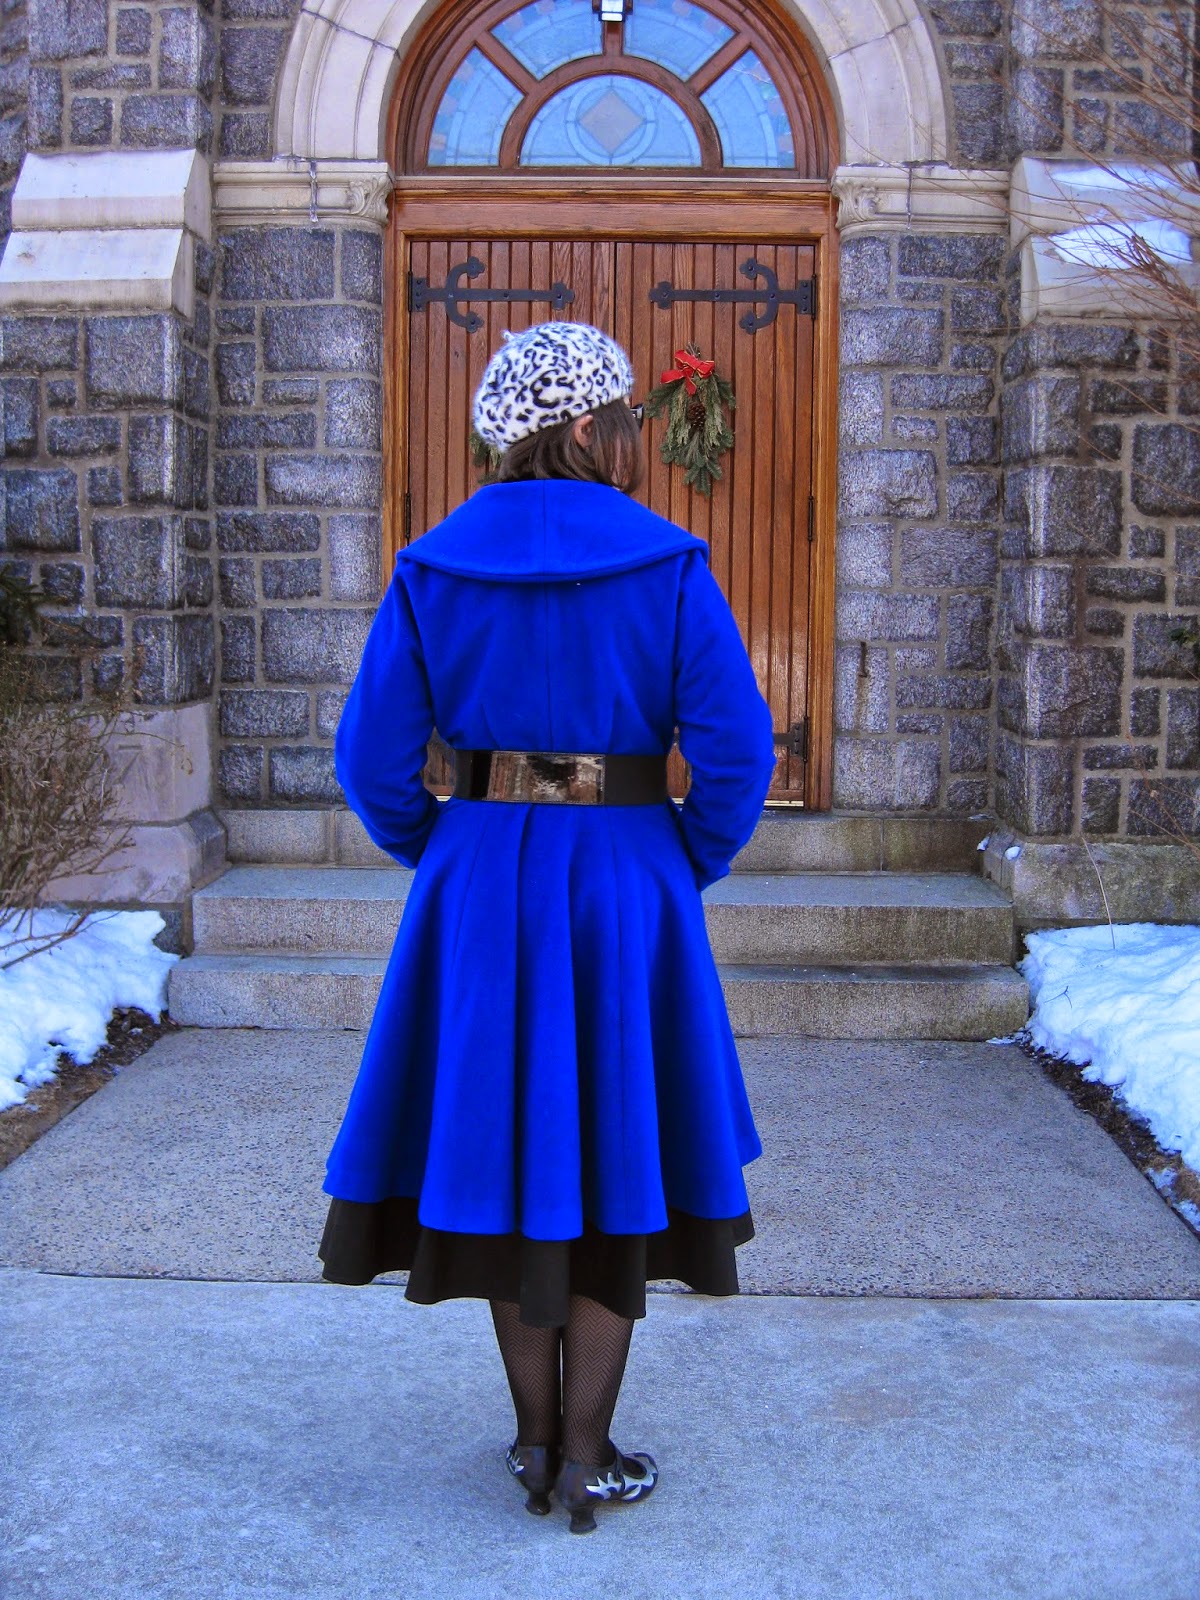
With the criteria "can fit a petticoat under it" only one pattern jumped into my mind.  Gertie's kimono sleeved, full skirted coat pattern, better known as Butterick 5824. Now that baby has petticoat room to spare. Heck I could smuggle drowsy Dashshounds under there and no one would be the wiser. "No your coat is barking. No yours!. Yip, yip, yip."
Ahem, where were we? Ah yes, coat planning. I've always liked the look of B5824, but it does need a whole lot of fabric. Did my stash have a length of coating long enough? I had to put my minions to work finding out. "Ohhhh Froggie, break out the tape measure cause you've got some measuring to do. Chop, chop." Turns out most of my coating lengths are in the 3-4 yard range, way too short for the pattern. I was about to abandon B5824 when, huzzah, the cobalt blue wool turned out to be 5 yards long. That's still a half yard short of the requirements, but with a little tweaking the pattern just might fit. I did a test layout and found that 5 yards would work fine if the coat was 2" shorter.

The original plan was to get this coat done in January for both Jungle January and the Gertie pattern contest McCall's was having. I'm sure that could have happened if I'd sewed the coat instead of doing a bunch of avoidance knitting. "Laa, Laa, Laa, what coat?  There is only yarn." Oh well, knowing you'll like a finished garment doesn't always make for speedy sewing. Hopefully Miz P. will forgive me for missing the wonderful Jungle January if she gets a flash of the lining.  Put on your sunglasses because snow leopard lining springs eternal.
As usual I've put all my fitting tweaks, scandalous confessions and husband input below. So read on for more coat goodness.

Pattern
Butterick 5824. I used a combo of sizes 16/18, but could have easily cut a straight size 16.

Fabrics used
Wool flannel coating from Gorgeous fabrics.
Snow leopard lining also from Gorgeous fabrics

Pattern changes/alterations
1. Made the same 1/2" sloping shoulder adjustment to the kimono sleeve as I did to my Christmas dress.

2. Shortened the bodice length by 3/8".

3. Increased the back dart intake to 2 1/2".

4. Did an "on the fly" adjustment of taking in the waist at the side seams about an 1" total.

5. Instead of using bound buttonholes as the closure, I used large snaps so that there was nothing to get in the way of a belt. Also I hate sewing bound buttonholes.

6. Added some thread belt loops to the side seams.

7. Pieced the pocket so that the self fabric would peak out of the seam and not the lining.


8. Reduced the length of the coat by 2". I did not use the lengthen/shorten line. Instead the length was taken off the bottom of the hem to also reduce the hem sweep a bit.

Confessions/Advice
- I did check out the sew-a-long for this pattern on Gertie's blog. Most of the coat's construction was straight forward to me so I didn't need additional hand holding. However I did appreciate some of the extra finishing tips she'd posted. For example I'd never basted down the edges of a coat and then steamed them so that they roll in the correct direction. That technique worked well and I think it makes the coat look a little more professional.

- Because of the weight of the skirt pulling on the waist, you could almost go down a waist size on the pattern.  Even with my on the fly waist alteration, the coat is still overly roomy in that location.

- I like the look of this coat with a belt on my figure. The belt gives me some more waist definition and detracts from the fact that the front closure is bulky in this fabric.

- The instructions to fuse the entire hem were followed even though it was a total pain in the ass. It probably doesn't matter in wool this thick.....but then I'm not a coat expert.

Husband Comment
"You look like cookie monster. Just kidding, it's elegant.....for cookie exchange parties."

My Final Thoughts
While I might not have been in the mood to sew a coat, I sure do love wearing it. It's all "wintertime princess" with serious twirl factor. Pretty sure you could throw this over a bath robe and strangers on the street would still ask why you are dressed up. "Because I made this coat. See, SEE!" Then they back away slowly. That's good cause I need room to twirl.

P.S.  A big thanks to everyone who nominated/voted for my blog over on Madalynne's best sewing blog series. I almost feel sheepish about getting an "award" for inheriting my father's need to be productive at all times. Still gonna put the button up though. ;)

I'm Your Personal Tailor* - Ottobre Design Peacoat

1.05.2014

*Some exclusions apply. Are you related to me and plying me with fabric gift certificates? If not then you're probably excluded. Unless you are a photogenic toy frog, he is excluded from exclusions.

My sister does meet all the above criteria which entitles her to coats.
Here's the back story on this coat - My sister is always spoiling me with lovely gifts, so I asked her if there was something she's like me to make her.  She sent me a picture of a RTW peacoat with a faux fur collar and said, "How about this?"  I went through the pattern stash and darn if I didn't have a pattern almost the same in an issue of Ottobre Design women. I picked some pretty wool and lining from my stash, bought some faux fur and made her a coat for Christmas.
Sounds great right?  Well I forgot to mention that this conversation took place in 2012.  Worst personal tailor ever, I'll never make it in this business. At least my sister is doing better than my husband, who asked for a jacket in 2009 and still doesn't have one.  And no he has not forgotten. Perhaps he should ply me with fabric gift certificates for favored sewing queue status.
Pattern
Nanette Peacoat from Ottobre Design Woman 5/2010.

Fabrics used
Wool flannel coating from Gorgeous fabrics - this color "Heathered Smoke" was purchased in Dec 2012, so it is now sold out.  The good news is that there are other colors of this coating still available. It's wonderful quality wool at a reasonable price, especially at 60" widths.  In my opinion it's also the perfect winter coat weight. Thick enough for colder climates, but not a nightmare to sew on your home machine. I might have purchased 3 yards of it in red this December.

Faux fur "Siberian husky" collar from Fabric Empire on Etsy.  This was my first time purchasing from this source and I was very pleased.  The faux fur is excellent quality, similar to $50+ a yard furs, but at $34 a yard. Their shipping was also lighting fast. I had a fluffy package on my doorstep in 3 days even though they are based in California.

Rayon leopard print lining - This was also from Gorgeous Fabrics in the year 2012.  It's long gone except for the stockpile in my closet. So put that on your "to burgle" list.

Pattern changes/alterations
OMG people, my sister is so easy to fit. I think she made a deal with the devil to be almost a perfect fit model.  I hear her yelling in the background, "But I have short legs!" Shhhhh Shhhhh, you got two good knees to wear 4" heels to get around that.  The devil deal still stands.

1. Blended sizes 38/40 because being a bit pear shaped is in our genes.

2. I assumed she would also need a 1/2" forward shoulder adjustment and put it into the muslin. She did so I went back and adjusted the sleeve the same amount for the real coat.

3. The muslin showed that my sister is also narrow in the small of her back.  She needed 1/2" taken out of the princess seams right at the waist seam. I blended this out to nothing before reaching the upper back.

4. Shortened the sleeves around 4" because my sister is petite and likes to show off her bracelets.

5.  Added 1 3/8" of length to the coat. My fitting muslin did not have the hem turned up and I liked the proportion of the coat with the extra length.

That was all the fitting changes, no moving waists, doing sway back adjustments and FBAing. It was blissful.

One other note - The pattern is not drafted to have contrast fur collar, but it is very easy to modify for one.  The roll line is well marked on the facing. I cut the pattern apart on this line and added seam allowance to each side.  The lower part was cut in wool, the upper in faux fur. Cut the upper collar in faux fur and sew as instructed.

Confessions/Advice
On the whole I found this pattern to be beautifully drafted and the majority of it was a delight to sew.  I only have two issues.

1. The collar stand/collar seam has a really tight curve.  I'm used to a flatter curve, much like what is on a button down shirt collar.  Don't even try to sew this at a 5/8" seam allowance cause that mother clucker will not fit.  Trim down the SA to 3/8", or if your daring like me 1/4", and the two pieces fit just fine.
2. The pattern does not come with a back facing pattern.  I drafted one and adjusted the back lining to fit the new piece. 

Tips for cutting faux fur
When cutting your faux fur you want minimize the amount of fur cut off a the edge of the piece.  Here are my steps with some semi dark photos. Such is the hazards of middle of the night sewing.
1. Trace the pattern on the back of the fur.
image
2. Cut a small hole on the pattern edge with a razor blade, just big enough to get your shears through.
image
3. Then take the shears and very slowly cut trying to just catch the backing with the blade.
image
Here you can see the cut out piece. 
image

Of course always remember to pick the fur out of the seams when you're finished sewing. My choice instrument for this is the large blunt needles used for seaming knitting.

Husband Comment
"Do you make that? Why does it have extra buttons."  Then I explained that a pea coat is double breasted and double breasted styles always have extra buttons for visual balance. "But those buttons aren't functional, you should just take them off."  At which point I might have mimed choking him.  Otherwise he thought the coat was great.

My Final Thoughts
Guys, I love this pattern.  I whole heartedly agree with Ottobre that it's a feminine take on the the classic peacoat.  But not too frou frou flouncy feminine, just right. It's staying in my sewing queue to make for ME!  Confession - I'll probably procrastinate another year before making another one.  See you in 2015 new coat.

Introducing Spearmint

12.13.2013

Remember back in October when I was doing a bunch of secret sewing?  Well my dears, I got my golden ticket to get on the pattern testing circuit and was knocking out this coat.  (I pattern tested this before the Brasilia dress so it's technically my first project, just not the one I blogged about first.) But enough about that, let's talk about new patterns...PATTERNS!

If you looking for a dramatic coat then look no further than Lolita Pattern's new Spearmint. With form fitting princess line seams and a large flouncy collar it's sure get noticed.

And if that's not enough you can make it fire engine red......and wear other red things with it. Let's just say I spiced up some neighbor's daily dog walk.
Did I mention the giant in seam pockets to keep your hands warm? I know you guys are in the pro pocket camp and this coat delivers.
Here's the back view. The coat has armhole princess line seams that whittle in at your waist and then flare out for a pretty full skirt.
Close up on the collar. It would be a crime not to show you one.

Pattern
Spearmint from Lolita patterns.  Amity is pre-saling the pattern at a 15% discount until Monday so if you love the pattern then you might want to jump on it right away.

Sizing Tip - Spearmint was drafted to be more of a fair weather topper. If you want to make it as a woolen winter coat, then go up a size from the suggested one.  If your size straddles the regular and plus size blocks,  like mine, then you might want get the plus sized block.
Format Suggestion - You have the option of buying Spearmint as hard paper copy or as a digital file. If you purchase the digital format I highly recommend using the copy shop file to print this coat.  You know that I LOVE putting together PDF files, but after hour one of gluing the tiled version I was no longer having fun.  It took me 2 toddler free hours to put the tiled version together and my back did not thank me.

Fabrics used
Felted wool blend boucle knit from Marcy Tilton.  She seems to have sold out of this lovely red color but still has gray and black in stock.  However I feel like this fabric was not the best choice for this pattern and will elaborate more on that the confessions section.

Rayon lining white with black polka dots is from Gorgeous fabrics and still is in stock.

Since my fabric was quite thick I did not put horsehair canvas in the collar. Instead I used pro weft fusible interfacing from Fashion Sewing Supply.

Pattern changes/alterations
Normal pattern adjustments
1. Forward shoulder adjustment on both the shoulder seam and the sleeve cap of 1/2". How to do that on a two piece sleeve here.
2. Wide upper back adjustment of 3/4" with shoulder seam dart added.
3. Sway back adjustment of 1".  This seemed to hike the hem up in the back so I added an extra 1" of length to the hem at center back and blended it out to the side seam.
4. Moved the bust apex of the princess line seam down 1 1/2". Alas god did not give me perky knockers.
5. Dropped the armholes 1/2".
6. Took in the upper back princess line seam about 3/4", blending that alteration out before reaching the armhole where I do need extra width.

Other Alterations.
1. I very aggressively FBA'ed the side front piece by 1 1/2". In retrospect I was a bit vein to think I'd fit into the size 14, no matter what the back of the envelope might indicate. This was my first time sewing a Lolita pattern so I had the whole "How does this block match my body" question.  But Colette patterns should have taught me never to use a size 14.  Like it or not I'm a size 16. However using a size 16 would mean I had to put together another PDF pattern, so I just made the size 14 work.

2. I raised the bottom of the neckline 1/2" for personal preferences, blending it out before getting to the shoulder seam. To make the collar match I took off 1/2 at the CB seam. This will keep the notches from matching, but I had no problem inserting the collar without them.

3. I raised the button hole placement 1/2" because of my neckline change. I also moved the button hole over from the edge about 3/8" because it seemed a little close to the SA with all the bound buttonhole bulk.  The finalized pattern also made this change, so no need to worry.

Confessions/Advice
Confessions
Now let's talk about the pros and cons of my fabric choice. I was very intrigued by the thought of a winter coat weight knit when I saw this fabric on the Marcy Tilton website. The fabric was described as being stable but with great drape. It also came in the perfect red color for me and I could not resist.

The fabric it's self is very thick with about 10-15% stretch in the cross grain and no raveling when you cut it.   On the pro side - the princess line seams sewed up beautifully, easing the sleeves was a snap and I got a perfect looking bound buttonhole on the first try.
image
On the con side - The knit construction created some problems that a woven wouldn't. The weight of the skirt pulls the back princess line seams out making the coat look less fitted than it is. I got drag lines from the pockets because the knit collapsing in on it's self.  Also the fabric thickness worked against me on the ruffled collar, making it want to stand upright rather than drape in nice folds. Some aggressive pressing helped but I'm not 100% happy with how it folds.
One last thing that should have been obvious to me but I overlooked at the time. Sewing a non stretch lining to a knit, even one that hardly stretches, is going to be a PITA.  Silly Heather should have brought a stretch woven lining. But hey, it looks great.

Advice 
1. I put twill tape in the shoulder seams since a lot of weight hangs from those seams.  I also put stay tape along the body neckline edge before sewing on the collar.

2. The pattern does not call for shoulder pads but I put some in because that's the look I prefer.  I used 1/2" pads and did not have to adjust the shoulder seams in anyway.

Husband Comment
"Hey you're red and white like a Canadian flag and the collar is ripply like a flag in the wind. That's nice. And you can pop the collar, cool."

My Final Thoughts
Despite my problems with the fabric not working with the pattern as much as I'd like, this counts as a successful garment. I especially like pulling the collar up like this and doing my best Cruella  De Vil impression.  "Bring me those puppies! For some reason I want a dog hair coat. Don't question my ethics or my inability to hire competent henchmen."
If you feel like giving yourself a little Christmas present then check out the holiday pattern bundle Lolita patterns has put together. You can get Sugar Plum, Gunmetal, and Spearmint for over 15% off the purchase price.  Happy sewing in the new year indeed!
Proudly designed by Mlekoshi pixel perfect web designs