Hey there folks, from time to time I'll be doing an extra post on a pattern called Sewing Notes. It's going to be a general catch all for things I find interesting, but aren't essential to the review blog post. That way the reviews don't get monstrously big and the segment can be easy skipped if it's not your cup of tea.
Now that you know what this is all about, let's talk about the scalloped neckline on Advance 9427.
After you sew for awhile you start to make assumptions about how patterns are going to be drafted/garments are going to be sewn. There might be several ways to do that same thing, but the possibilities are not endless. You try a few techniques and settle for one that works for you.
Since I'm a fan of scalloped necklines, I do have a favorite sewing technique for making them. My method is to take the facing and mark all the scallop valleys so there there is a clear pivot. Then I can easily sew them using the throat plate guide as long as I use a short stitch and take it slow.
I wasn't expecting to have to change this process when purchasing Advance 9427. Surely the pattern would be drafted the same as the other's in my stash, with scallops on both the bodice and facing pieces. Nope! This dress had a little surprise for me waiting for me.
On this pattern the scallops only appear on the neckline facings, where as the bodice pieces have a smooth edge. The seamstress is supposed to match the CF/CB circles and the shoulder notches to sew the two pieces together. I have to admit that the first time I pulled this pattern out of the envelope and unfolded a bodice piece there was a moment of panic. "Where the heck are my scallops at Advance? You dirty tricksters baited and switched me!!" Then my brain clucked into gear and remembered to check the facing patterns before losing all my shit. Lesson learned, don't try to start new projects late at night.
I've spent some time hypothesizing over why Advance chose to do it this way. Did it make it easier to grade the pattern or did they think it was easier for home sewers to use? It does give you the option of an alternate neckline if you're savvy enough to draft another set of facings. (I'm tempted to do this.)
In the interest of trying something new, I decided to sew the neckline the way the designer intended ....well kind of.
Since it was the 50's the instructions told me to cut the facing piece out of sewn in interfacing and attach it to the bodice. I went the modern route and attached fusible interfacing to the facing.
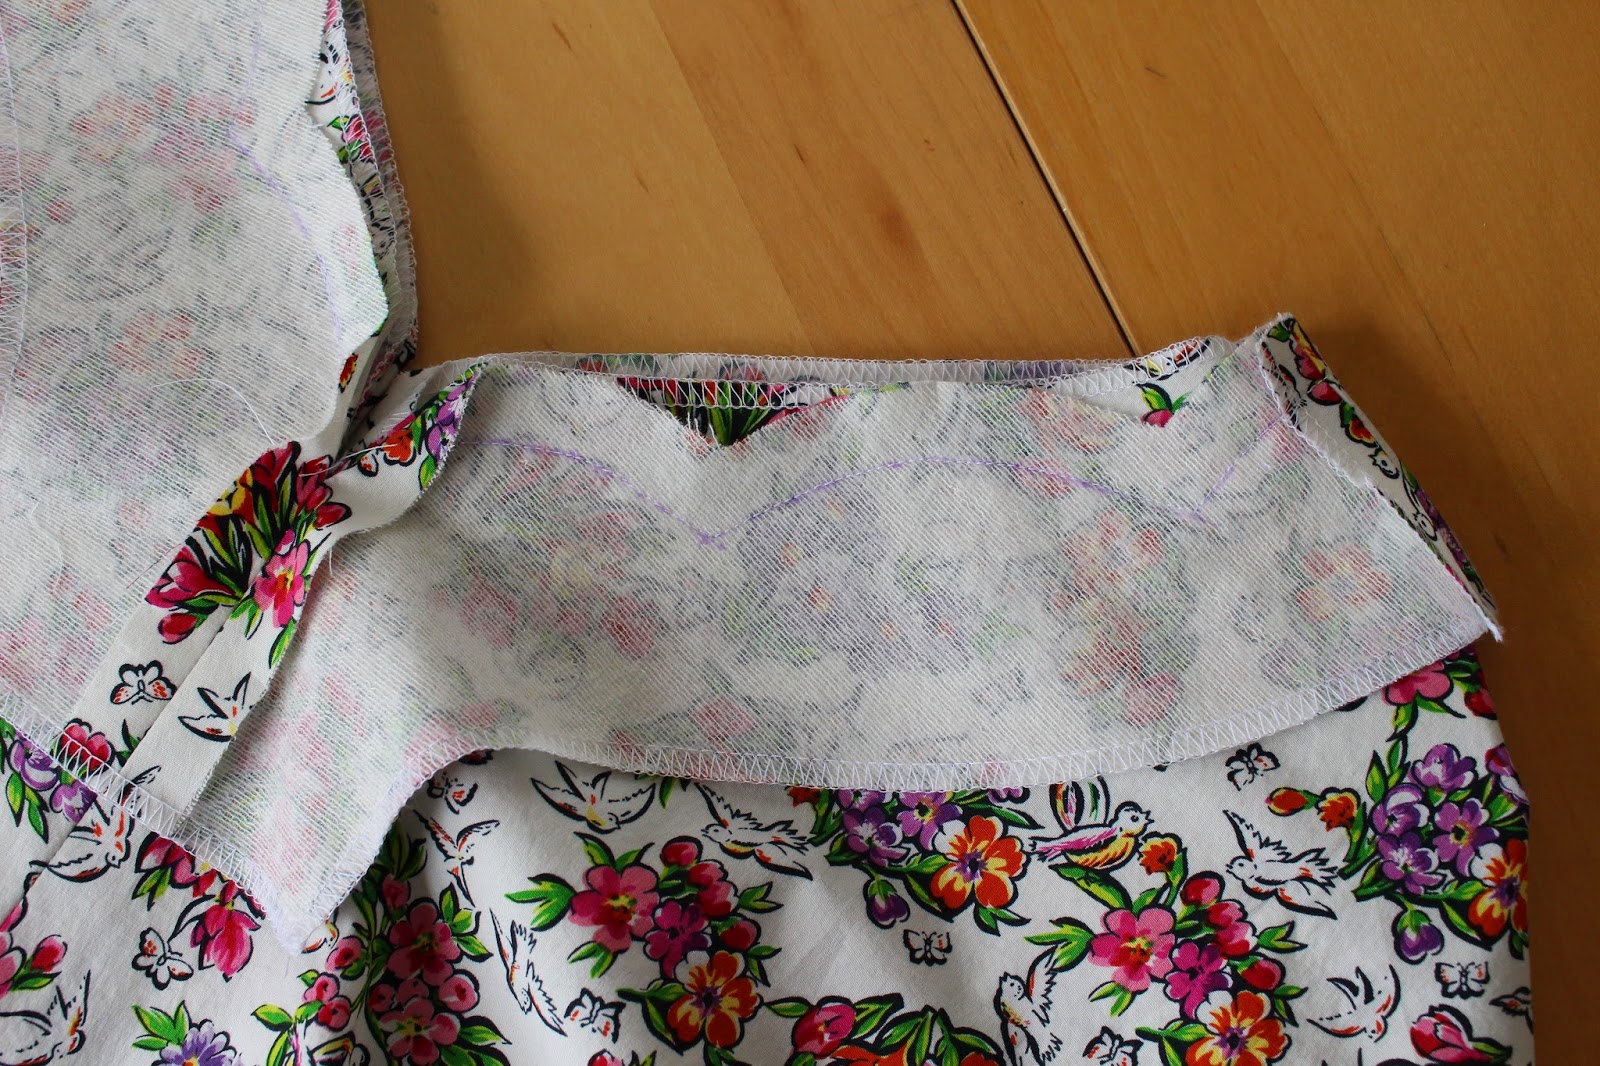
Next the CF/CB seams and shoulder seams are sewn on both the bodice and facing pieces. After those seams are pressed, the facing edge is supposed to be finished with a stitch and turn. I when the modern route here too and overlocked the edges. With all those things sorted, it was time to match the two pieces face to face and sew the scallops.
On the good side I didn't need to worry about matching curves between the pieces. On the bad side I couldn't use the throat plate guide to sew the seam. I used a purple disappearing marker to draw in the stitch line on the facings. This made the process easy other than getting the CF/CB joins nice and neat.
Once the scallops are sewn the directions instruct you to trim the bodice neckline to match the facing. Then you're to clip the scallop valley of each scallop and press the neckline Let me submit that trimming and clipping are a good start, but if you want really nice scallops then you need to do some seam grading.
I went back and graded the fused facing side down to 3/16" and the bodice edge down to 3/8." (You'd want to have a bigger seam allowance if the fabric is prone to fraying. Cotton sateen you can cut pretty close.)
Now that the seam allowances were trim, I moved to the ironing board with my point turner. I like to run the turner along the top of the scallop to make sure it's fully pushed out.
With all the work done, now it was time to press the neckline! (I'm in the silk organza press cloths fan club.)
Ta Da! Perfectly pressed scallops. I think Mary Poppins would approve.
Showing posts with label Advance9427. Show all posts
Put on your Easter Bonnet and Dress
4.03.2015
Hold on, where is my Easter Bonnet? I had it before visiting the Easter Bunny to top off my basket and waaaait.....That Darn Rabbit! Always stealing my hats and cutting ear holes in them. Well that hat's ruined now and I'm gonna need a lot more chocolate than this to forget all about it. Stupid hat snatching Rabbits, guess I'm lucky we aren't the same shoe size.
Fun headgear aside, Easter usually isn't a sewing event for me. It belongs in the pantheon of chocolate gorging extravaganzas, yes. But as far as outfit planning goes, I usually wear a recently sewn dress and call it good. This year was a bit different because one of my newer vintage pattern acquisitions begged to be sewn up in the Springiest fabric in the stash. Springiest? Is that a real word or does this fabric just demand it's creation? Flowers and Birds and Butterflies, Oh My! It's practically screaming, "Sew me into a Advance 9427 Heather. Oh please, oh please. Then kindly cover me with an apron before you go all Cookie Monster on some chocolate."
Advance 9427 has been flashed on the blog before but this time let me mention the design details.
Here's the description from the envelope, "One piece dress with a special talent for looking right anywhere....under a coat or under the sun. Slim skirted or full skirted, you'll love the way this scallop necked, short sleeved beauty fits and flatters you." - Fine ad copy Don Draper, go get yourself and Old Fashioned and throw some money at Peggy's face. Or in my face, as long as it's enough to buy something nice.
Actual design details:
-Bodice with scalloped neckline on both front and back, bust and waist darts.
-Bias bound kimono sleeves.
-View 1 has a 7 paneled full skirt. Only the side front and side back panels are gathered.
-Dress has side seam zip entry, probably to make sewing the back neckline easier.
-And hey look, the almighty technical drawing. It's not a proper sewing party without one of those.
All in all some easy sewing as long as you properly mark the scallop stitch line. No worries then because I've got Frog to sort out those details.
OK, so far we have easy to sew stretch cotton sateen and a pattern with easy to sew details. So how is fitting going to go? Guess what, sewing back to back Advance patterns made that easy too. Comparing the already altered Advance 9441 pieces with 9427 clearly showed me some of the adjustments that needed to be done. Most notably 9427 was drafted with a lot more length in both the bodice and the skirt. After those changes were made, I just had to drop in my other standard fitting adjustments to get a good fit.
The only hitch to this process was coming up with a cutting layout for the pattern. Upon spreading out the fabric, I found my memory was completely wrong about it's width and length. I would have staked my first born's soul that there were 4 yards of this fabric on the board. Nope! Past Heather only bought 3 yards of fabric and it was a lot narrower than 60" wide. Good thing I wasn't making any deals with the devil over stash usage. If was making the dress as drafted 3 yards wouldn't have worked. Happily my preferred skirt length of 27"meant it was possible if I came up with my own cutting layout. With my advanced "pattern Tetris skills" I was just able to fit all the pieces in AND cut all the skirt panels in the same direction. Now I can save my first born's soul for something really important, like a sweet pair of shoes.
Pattern
Advance 9427. Don't see this one available for purchase on Etsy at the moment.
Fabrics used
Stretch Cotton Sateen from Emmaonesock.com. According to last year's handy dandy spreadsheet this fabric was purchased in August. That's a pretty decent stash overturn time for me.
Pattern changes/alterations
1. Dropped bust dart 1.5" and shortened the waist dart 3/4".
2. Shortened bodice 5/8".
3. Make a 1/2" forward shoulder adjustment.
4. Added 1/4" to the side seams around the waist area.
5. Shortened skirt length 2".
Confessions/Advice
-After finding the waist roomy on Advance 9441, I cut the amount of extra ease added to the waist area in half. Thanks to the lycra in the cotton the waist is still too big on this dress. Maybe I don't need to add ease to 28" waist dresses after all.
-Every time a vintage bust dart needs to be dropped 1.5 inches, I remember Mary's line about "amusingly improbable dart locations" and snort giggle a bit. It's better than cursing my saggy bewb genes.
- Just like the previous Advance pattern, the skirt was drafted to be mid calf on a women of regular height. Not the "below the knee" look of the illustration. With my alterations the final skirt length of the garment is 27".
- This dress also has a deep 2.5" hem allowance. I found that it needed to be eased in a bit on the larger pieces. So I attached some lace to the skirt edge, ran some gathering stitches and hand slip stitched the hem in place.
- It's starting to look like my #vintagepledge of sewing 3 vintage patterns was a little conservative. This pattern is garment #2 and I may have already completed #3. Might be time to edit the pledge.
Husband Comment
"Hey Easter Girl! I like bumpy plunge necklines. Wait, are those new shoes?" Nope! See blog post from last year for photographic proof. *Shoves new lobster sandals under the sofa*
My Final Thoughts
A former owner of the pattern wrote on the envelope "Easy to make and neat looking." Yes, I completely agree, especially in super easy to sew stretch cotton. I'm quite the fan of the neckline and may mash it with other patterns in the future. Having a pencil skirt version would also be very nice. Gotta give the boys in the sea food department something fun to look at, you know. Now I have to run off and raid Desmond's Easter basket for chocolate while he's sleeping. Everyone have a happy and candy filled holiday.
P.S. - I promise never to accidentally leave my camera on a slower shutter speed on a windy day again. Somehow I neglected to notice any of the blurriness when checking photos mid shoot. Still have plenty to learn about the new camera.
Here's the description from the envelope, "One piece dress with a special talent for looking right anywhere....under a coat or under the sun. Slim skirted or full skirted, you'll love the way this scallop necked, short sleeved beauty fits and flatters you." - Fine ad copy Don Draper, go get yourself and Old Fashioned and throw some money at Peggy's face. Or in my face, as long as it's enough to buy something nice.
Actual design details:
-Bodice with scalloped neckline on both front and back, bust and waist darts.
-Bias bound kimono sleeves.
-View 1 has a 7 paneled full skirt. Only the side front and side back panels are gathered.
-Dress has side seam zip entry, probably to make sewing the back neckline easier.
-And hey look, the almighty technical drawing. It's not a proper sewing party without one of those.
OK, so far we have easy to sew stretch cotton sateen and a pattern with easy to sew details. So how is fitting going to go? Guess what, sewing back to back Advance patterns made that easy too. Comparing the already altered Advance 9441 pieces with 9427 clearly showed me some of the adjustments that needed to be done. Most notably 9427 was drafted with a lot more length in both the bodice and the skirt. After those changes were made, I just had to drop in my other standard fitting adjustments to get a good fit.
The only hitch to this process was coming up with a cutting layout for the pattern. Upon spreading out the fabric, I found my memory was completely wrong about it's width and length. I would have staked my first born's soul that there were 4 yards of this fabric on the board. Nope! Past Heather only bought 3 yards of fabric and it was a lot narrower than 60" wide. Good thing I wasn't making any deals with the devil over stash usage. If was making the dress as drafted 3 yards wouldn't have worked. Happily my preferred skirt length of 27"meant it was possible if I came up with my own cutting layout. With my advanced "pattern Tetris skills" I was just able to fit all the pieces in AND cut all the skirt panels in the same direction. Now I can save my first born's soul for something really important, like a sweet pair of shoes.
Pattern
Advance 9427. Don't see this one available for purchase on Etsy at the moment.
Fabrics used
Stretch Cotton Sateen from Emmaonesock.com. According to last year's handy dandy spreadsheet this fabric was purchased in August. That's a pretty decent stash overturn time for me.
Pattern changes/alterations
1. Dropped bust dart 1.5" and shortened the waist dart 3/4".
2. Shortened bodice 5/8".
3. Make a 1/2" forward shoulder adjustment.
4. Added 1/4" to the side seams around the waist area.
5. Shortened skirt length 2".
Confessions/Advice
-After finding the waist roomy on Advance 9441, I cut the amount of extra ease added to the waist area in half. Thanks to the lycra in the cotton the waist is still too big on this dress. Maybe I don't need to add ease to 28" waist dresses after all.
-Every time a vintage bust dart needs to be dropped 1.5 inches, I remember Mary's line about "amusingly improbable dart locations" and snort giggle a bit. It's better than cursing my saggy bewb genes.
- Just like the previous Advance pattern, the skirt was drafted to be mid calf on a women of regular height. Not the "below the knee" look of the illustration. With my alterations the final skirt length of the garment is 27".
- This dress also has a deep 2.5" hem allowance. I found that it needed to be eased in a bit on the larger pieces. So I attached some lace to the skirt edge, ran some gathering stitches and hand slip stitched the hem in place.
- It's starting to look like my #vintagepledge of sewing 3 vintage patterns was a little conservative. This pattern is garment #2 and I may have already completed #3. Might be time to edit the pledge.
Husband Comment
My Final Thoughts
A former owner of the pattern wrote on the envelope "Easy to make and neat looking." Yes, I completely agree, especially in super easy to sew stretch cotton. I'm quite the fan of the neckline and may mash it with other patterns in the future. Having a pencil skirt version would also be very nice. Gotta give the boys in the sea food department something fun to look at, you know. Now I have to run off and raid Desmond's Easter basket for chocolate while he's sleeping. Everyone have a happy and candy filled holiday.
P.S. - I promise never to accidentally leave my camera on a slower shutter speed on a windy day again. Somehow I neglected to notice any of the blurriness when checking photos mid shoot. Still have plenty to learn about the new camera.
Subscribe to:
Posts (Atom)