Showing posts with label SewingNotes. Show all posts

Sewing Notes - Butterick 6167 Low bust adjustments

8.31.2015

Do your boobs hang low, do they wobble to and fro? Do they hang out near your waist instead of being up by your face? Are they pointing toward the ground while you're walking around town. Do your boobs hang low? Oh yeah, that just happened and you're welcome. Now that we've gotten the juvenile humor out of the way, let's talk about how having a low bust complicates a dress with a bust shelf element.

One could make the argument that those of us with low busts should just pass on this trend. When your bust just rolls off the shelf into the "floor" is there really any reason to put a shelf there in the first place?  The answer for me would have easily been "No!" if I hadn't purchased a Bernie Dexter Paris dress. (Here's a photo of that particular RTW dress.)
Wearing that dress convinced me that girls with low busts can enjoy a bust shelf as long as you mentally relabel it as a rufflely bust dickie. It's there to cover your bust root and fill some your large upper chest area with fluffy goodness. To that I say, "Thumbs up to fluffy goodness. Let's sew some more bust dickies."

To do so we are going to have to brace ourselves for some pattern alterations.  Even on a pattern that offers different cup sizes*, the bust ease is not going to be in the correct place for those of us with "low hanging fruit." To see what I mean, let's take a look at the bust stay piece.
The bust apex is clearly marked more than half way up of the bust shelf with not much shelf height above it. (1.5" to be exact)  From this I can infer that the drafter is expecting there to a lot of breast fullness at the top of the dress.
To give you a colorful mental image of what I'm talking about let's think of the breast as a cupcake. The bust shelf is the ruffled cupcake liner with the top half of the breast, the icing, sitting above it. This is all well and good if your apex matches this point and you have plenty of "icing" to fill out the top of the bodice.  But what does this bodice look like if you have a low bust point?  Or to further our metaphor, your breasts are more like creme filled donuts than cupcakes? (Just as delicious but with less fluff on top) What you are going to get is a bodice with MAJOR gapituts along the top edge of the inset.
Sorry about the poor quality photo but I was a bad girl and threw this muslin alway some time in the last 3 months. You can still see that I have literally inches of extra fabric along the top edge since all my bust fullness in in the lower part of the bodice. What you can't see is that the front part of the lower bodice feels tight because that's where my apex actually is. My face also says, "Crap, I need to do some major fitting work on this pattern."

That muslin might make the pattern look like a lost cause, but never fear because the bust ruching is going to allow us to make an easy fix.  All we really need is elastic!  That's right ladies, we're gonna sew elastic into the upper edge of the bust shelf and make all our problems go away.  Woot, Woot, fitting short cuts!  But first let's make few minor adjustments to the front bodice.

First you can remove a bit of that extra ease at the upper edge by changing the curve of the bust stay. This will keep the lower part of the seam the same width, which is good because your boobs are in that area. On my dress I was also changing the location of the seam, so some of the width removed here was added onto the bodice piece.  (Note - I changed the height of the bust stay for aesthetic reasons, not fitting ones.)
On the lower bodice you'll want to add some extra ease to the princess line seam for your low bust point. I added 1/4" to each side of the seam. (You can also see that I added a bit to the outside curve and changed the length of the bodice. The lengthening was more for portional reasons than bust fitting reasons since my bust won't actually hit the shelf area.)
Then you may want to reduce the width of the bust inset. On this pattern the ruching ration is fairly high on the bust inset. Adding elastic to that area is only going to increase it and it may get poofier than you'd like. Of course this is more of a personal taste than fitting issue, so use your own discretion. On my dress I reduced the inset by making the same curve change to it as was made on the bust stay. Then made the pattern smaller by moving the CF fold line in and cutting off some of the ease. In total I removed 2 3/4" on the half.

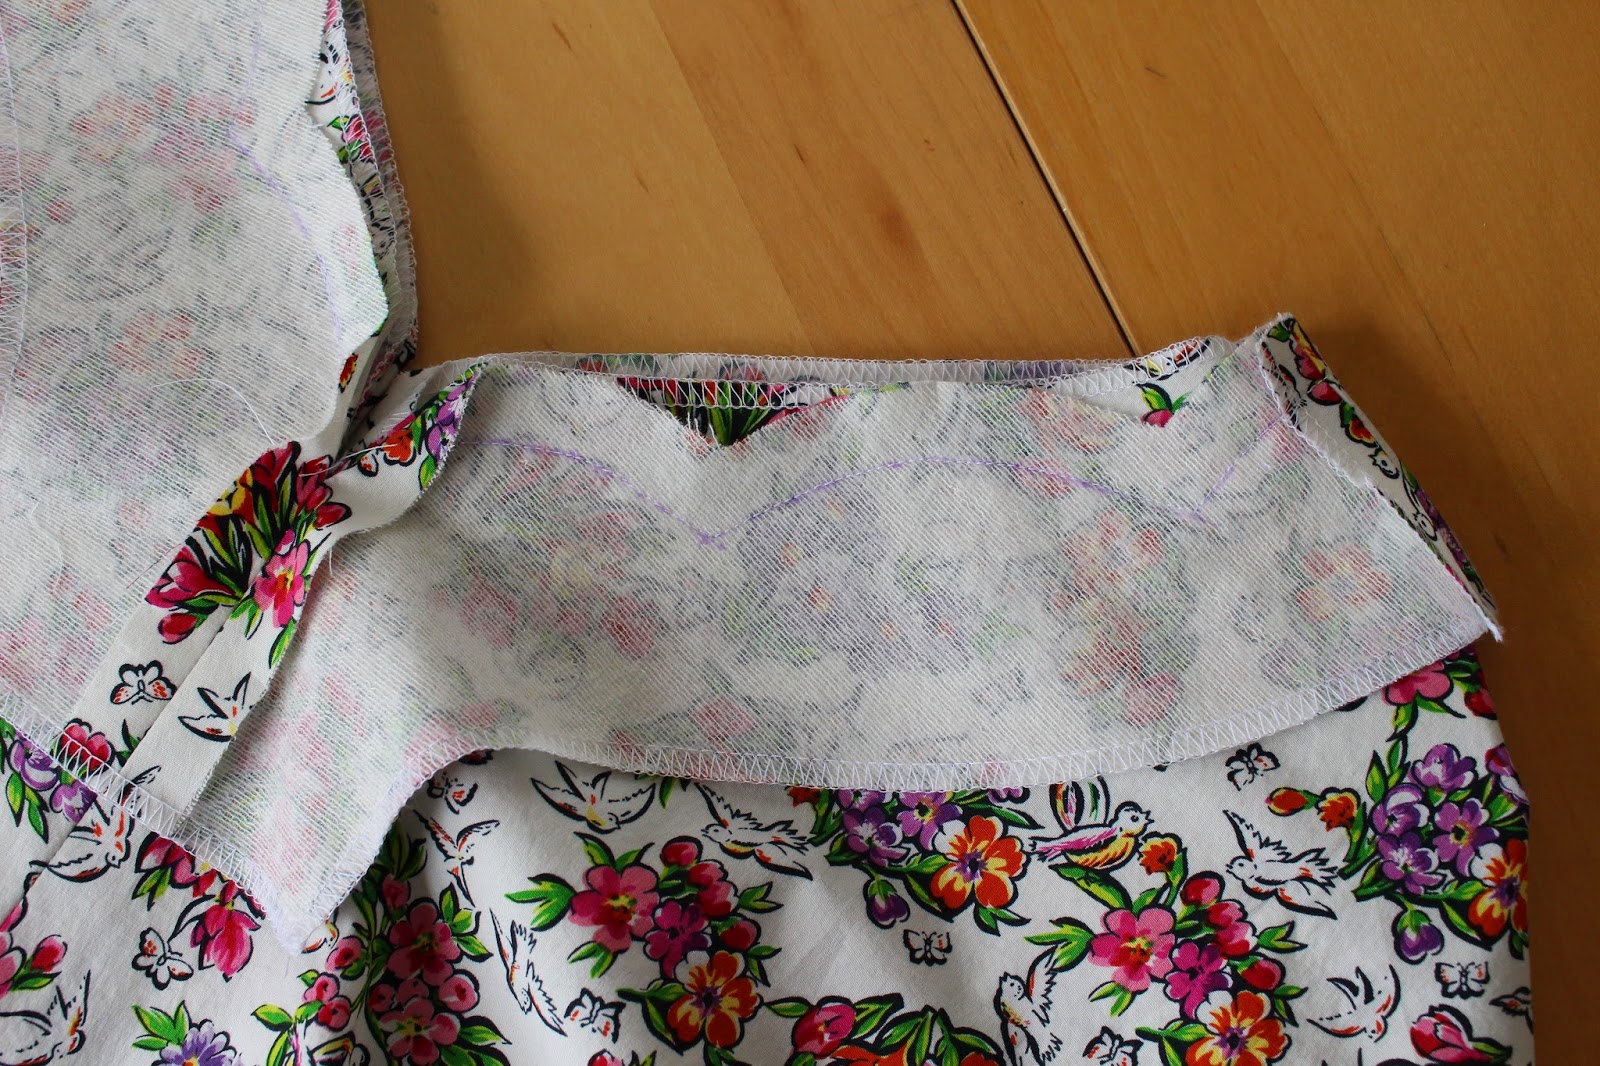
To assemble this area follow the pattern instructions for gathering the bust inset, sewing it to the lower bodice and the top edge to the bust stay. Before you do any edge stitching on the top edge, open the bodice like so.
We are going to sew in some 1/4" elastic onto the seam allowance to tighten up the area.  On my dress the inset area was 13" wide without elastic.  I wanted to gather it down to around 10" to get a nice snug fit against my chest.  After much trial and error, meaning sewing and seam ripping, I ended up inserting an 8" long piece of elastic.  Long story short, I recommend basting in the elastic and checking the fit before "really" sewing it in.

The elastic is going to be basted into the seam allowance of the bust inset area. First fold the seam allowances the same way you would for stay stitching. Pin the edges of the elastic near the edge of the bust seam.  I found it's a good idea to baste both ends of the elastic first before attaching all of it.

Stretch the elastic to that it sits flat against the inset and baste it to the seam allowance. At this point try on the dress to see if the upper edge fit is to your liking. If not you can rip out the elastic and try a different length.

Once the you're happy with the elastic length, it can be secured with some edge stitching.  On my dress I edge stitched the entire upper edge of the bodice at once, but you could just do the inset area.
Go back and remove any basting left over. Then press the edge so that the lining rolls toward the inside of the garment

Ta Da! A perfect fitting bodice. See that actually wasn't all that hard to do. Thanks elastic!

* Note about cup sizes on this pattern - The shelf pieces vary 1/4" in height between each cup size but are the same width. I did go with the recommended cup size for my bust, but don't think it's as important for women with low busts.  You could just choose the height of the shelf you prefer the look of the most. 

Sewing Notes - Simplicity 2195

4.14.2015

In my last post I said that Simplicity 2195 had good bones but needed some tweeks to meet my tastes. The main problem with the pattern is the odd drafting of the collar, which I frankly feel was done to "dumb down" the pattern.

When it comes to shirt collars my favorite construction is a separate stand and collar. I like how the collar folds when there is a seam involved.  That being said, if a vintage look is what I have in mind then an "all in one collar" and facing is the way to go. I know that the collar is going to sit against the body differently, but that's a decent trade off for the vintage style of the garment. 

Now let's look at the collar pieces for Simplicity 2195 to see how this "trade off" went from being acceptable to head scratching nonsense. (In my own opinion, of course.)
Here are the two collar pieces.  The under collar has been drafted in the standard way of an "all in one collar." I would expect this piece to be marked collar and say cut 2.  Instead the upper collar is a separate piece that also has part of the facing attached.  The front facing is pieced because if you cut the collar on the straight grain the facing will be on the bias.  The drafter correctly thought an entire front facing on the bias would be bad news and separated the pieces right under the first buttonhole placement.

To sew the garment you first attach the under collar to the neckline, much as you usually would.
Then the upper collar and facing pieces are sewn together and the outer edge of the facing is turned over and sewn. Usually I ignore this sort of finish and run a line of overlock on the facing instead. This time it was important to get rid of that seam allowance and you'll see why in a minute.
Then the entire outer edge of the shirt front and collar are sewn, trimmed and pressed. This leaves you with the upper edge of the collar not attached to anything.
To finish off the area, the edge of the collar is slip stitched to the seam allowance of the under collar. This is why the facing edge had to be finished with a stitch and turn. Otherwise the two areas would not match up.
In the final shirt the overall look is the same as a regular "all in one collar," but to the wearer it feels different.  Like I said in the original review post the facings want to flip out most of time. They were drafted narrower so that the upper collar could be slip stitched in place. The lack of seam on the upper collar also affects how the collar folds, or more accurately doesn't want to fold. I had to press the heck out of it to get it to look semi-right and still it irks me.
My plans for this pattern are to figuratively chuck the upper collar piece and cut two of the under collar. Then I'll draft a new back and front facing at a slightly wider width so that they don't flip out all the time. With a slightly shifted button placement, this pattern should work great for me. Now I just gotta put it back on the sewing list...under a million dresses.

Sewing Notes - Advance 9427

4.04.2015

Hey there folks, from time to time I'll be doing an extra post on a pattern called Sewing Notes. It's going to be a general catch all for things I find interesting, but aren't essential to the review blog post. That way the reviews don't get monstrously big and the segment can be easy skipped if it's not your cup of tea.

Now that you know what this is all about, let's talk about the scalloped neckline on Advance 9427.
After you sew for awhile you start to make assumptions about how patterns are going to be drafted/garments are going to be sewn. There might be several ways to do that same thing, but the possibilities are not endless. You try a few techniques and settle for one that works for you.
Since I'm a fan of scalloped necklines, I do have a favorite sewing technique for making them. My method is to take the facing and mark all the scallop valleys so there there is a clear pivot. Then I can easily sew them using the throat plate guide as long as I use a short stitch and take it slow.

I wasn't expecting to have to change this process when purchasing Advance 9427. Surely the pattern would be drafted the same as the other's in my stash, with scallops on both the bodice and facing pieces. Nope! This dress had a little surprise for me waiting for me.
On this pattern the scallops only appear on the neckline facings, where as the bodice pieces have a smooth edge. The seamstress is supposed to match the CF/CB circles and the shoulder notches to sew the two pieces together. I have to admit that the  first time I pulled this pattern out of the envelope and unfolded a bodice piece there was a moment of panic. "Where the heck are my scallops at Advance? You dirty tricksters baited and switched me!!"  Then my brain clucked into gear and remembered to check the facing patterns before losing all my shit. Lesson learned, don't try to start new projects late at night.

I've spent some time hypothesizing over why Advance chose to do it this way.  Did it make it easier to grade the pattern or did they think it was easier for home sewers to use?   It does give you the option of an alternate neckline if you're savvy enough to draft another set of facings. (I'm tempted to do this.)

In the interest of trying something new, I decided to sew the neckline the way the designer intended ....well kind of.
Since it was the 50's the instructions told me to cut the facing piece out of sewn in interfacing and attach it to the bodice. I went the modern route and attached fusible interfacing to the facing.

Next the CF/CB seams and shoulder seams are sewn on both the bodice and facing pieces. After those seams are pressed, the facing edge is supposed to be finished with a stitch and turn. I when the modern route here too and overlocked the edges. With all those things sorted, it was time to match the two pieces face to face and sew the scallops.
On the good side I didn't need to worry about matching curves between the pieces. On the bad side I couldn't use the throat plate guide to sew the seam. I used a purple disappearing marker to draw in the stitch line on the facings. This made the process easy other than getting the CF/CB joins nice and neat.
Once the scallops are sewn the directions instruct you to trim the bodice neckline to match the facing. Then you're to clip the scallop valley of each scallop and press the neckline  Let me submit that trimming and clipping are a good start, but if you want really nice scallops then you need to do some seam grading.
I went back and graded the fused facing side down to 3/16" and the bodice edge down to 3/8."  (You'd want to have a bigger seam allowance if the fabric is prone to fraying. Cotton sateen you can cut pretty close.)
Now that the seam allowances were trim, I moved to the ironing board with my point turner. I like to run the turner along the top of the scallop to make sure it's fully pushed out.
With all the work done, now it was time to press the neckline!  (I'm in the silk organza press cloths fan club.)
Ta Da! Perfectly pressed scallops.  I think Mary Poppins would approve.
Proudly designed by Mlekoshi pixel perfect web designs