In preparation for the Archer Sew-a-long, the silk stash was tossed and several likely candidates appeared. I'm having trouble deciding, so which one do you like the best?* All silks are crepe de chine and have plenty of yardage for a button down.
1. Black/Green/Taupe Feathers.
2. Dealtry + Wiksten print from Spoonflower.
3. Skulls, flowers, harnesses extravaganza.
* I retain the right to pick something not even shown here. ;)
Archer Shirt - Final Fitting Alterations
3.15.2013
Yesterday I showed you the finished photos of Archer. Today I'm going to show you what changes were made and how they were done. Most of these are standard stuff you find in fitting text books, but sometimes it's nice to see them done on a pattern. OK, let's get started....
Forward Shoulder Adjustment - I'm both a sloucher and have done a lot of computer work in the past, both reasons for forward shoulders. My standard adjustment is 1/2".
Add 1/2" to the outer edge of the shoulder seam on the back yoke. Since the sleeve head is not on the seam line make sure to also move the sleeve head notch 1/2" forward as well.
Subtract 1/2" to the outer edge of the front shoulder seam. I'm showing the front seam with the new seam drawn in but before cutting the old one off.
Doing a forward shoulder adjustment means you can't set the sleeve in flat.....unless you don't mind shaving off a little of the sleeve/back bodice. This is not "proper" pattern drafting but I did it and the shirt still fit great. Take 1/2" off the front of the sleeve, I took that amount off the entire length of the sleeve and adjusted the cuff as well. You could also take the 1/2" the sleeve cap and slowly blend it into the original side seam. Then take 1/2" off the side seam on the back. Here I did take that amount only off the top of the side seam, blending it into the hip.
Adding a dart with out an FBA - Sometimes you need a dart but not extra width in the garment. No worries you can just draw a dart in. For a semi fitted look I've found what works best for me is a dart about 4" down from the armhole angled up to the bust apex.
First I mark the bust apex which I've found through a lot of trail and error on other patterns. If you have no idea where your bust apex is, holding the pattern piece up to your body is a good way to start. (My breast tissue is very heavy so my apex is usually way below where the big 4 mark it.) Draw a line from the bust apex to the side seam right around where you want the dart.
Now draw in a dart around that line. Again due to past projects I know my dart needs to be 1 1/2" wide. I found that out by making muslins, pinching out fabric for darts and measuring how much was pinched out.
You'll need the proper shape for the dart intake so add some more paper to the side seam, fold the dart like you would when you're sewing it and then cut the paper straight along the side seam. When you open the dart back up it will have the correct angle on the edge. (Sorry about the multiple dart, had to move that sucker up)
By adding a dart you've make the side seam smaller, so more length needs to be added. Split the amount of the dart intake (in my case 3/4") and put that amount at both the top and bottom of the side seam. True the armhole and hem so that you have a nice smooth line.
Wide Upper Back - My upper back is a bit wide through the arm scye so I always add a 1/2" extra ease for free arm movement. Usually I slash through both the yoke and the back shirt and put a small dart in the back shoulder seam. However Archer has a wrap around yoke and a dart would look very strange coming over the shoulder to the front. Fortunately compared with my shirt block, Archer had about the right amount of width in the yoke. So today I'm only going to be enlarging the main back piece.
First a slashing line was drawn on the back - measures in 2 1/2" from armhole edge on the yoke seam and 1 1/4" down from the armhole seam.
This line is cut and slid out 1/2" Then the side seam is trued up and the size of the pleat increased so that the back will fit into the yoke.
Sway Back - Lots of extra fabric at your center back that pools up when the hem of your shirt hits your butt? I got that in spades. My usual sway back alteration is to pinch out 1".
The lengthen/shorten line is usually a good place to put the sway back alteration. I put mine right above it. Mark out the amount of fabric you want to remove, (in my case 1") pleat the pattern so that you take out the full amount at CB but none at the side seam. Tape that sucker down and you're done.
Huzzah, fitting changes are done! Finger guns for everybody. Phew Phew Phew! Now go make this wonderful pattern.
Forward Shoulder Adjustment - I'm both a sloucher and have done a lot of computer work in the past, both reasons for forward shoulders. My standard adjustment is 1/2".
Add 1/2" to the outer edge of the shoulder seam on the back yoke. Since the sleeve head is not on the seam line make sure to also move the sleeve head notch 1/2" forward as well.
Subtract 1/2" to the outer edge of the front shoulder seam. I'm showing the front seam with the new seam drawn in but before cutting the old one off.
Doing a forward shoulder adjustment means you can't set the sleeve in flat.....unless you don't mind shaving off a little of the sleeve/back bodice. This is not "proper" pattern drafting but I did it and the shirt still fit great. Take 1/2" off the front of the sleeve, I took that amount off the entire length of the sleeve and adjusted the cuff as well. You could also take the 1/2" the sleeve cap and slowly blend it into the original side seam. Then take 1/2" off the side seam on the back. Here I did take that amount only off the top of the side seam, blending it into the hip.
Adding a dart with out an FBA - Sometimes you need a dart but not extra width in the garment. No worries you can just draw a dart in. For a semi fitted look I've found what works best for me is a dart about 4" down from the armhole angled up to the bust apex.
First I mark the bust apex which I've found through a lot of trail and error on other patterns. If you have no idea where your bust apex is, holding the pattern piece up to your body is a good way to start. (My breast tissue is very heavy so my apex is usually way below where the big 4 mark it.) Draw a line from the bust apex to the side seam right around where you want the dart.
Now draw in a dart around that line. Again due to past projects I know my dart needs to be 1 1/2" wide. I found that out by making muslins, pinching out fabric for darts and measuring how much was pinched out.
You'll need the proper shape for the dart intake so add some more paper to the side seam, fold the dart like you would when you're sewing it and then cut the paper straight along the side seam. When you open the dart back up it will have the correct angle on the edge. (Sorry about the multiple dart, had to move that sucker up)
By adding a dart you've make the side seam smaller, so more length needs to be added. Split the amount of the dart intake (in my case 3/4") and put that amount at both the top and bottom of the side seam. True the armhole and hem so that you have a nice smooth line.
Wide Upper Back - My upper back is a bit wide through the arm scye so I always add a 1/2" extra ease for free arm movement. Usually I slash through both the yoke and the back shirt and put a small dart in the back shoulder seam. However Archer has a wrap around yoke and a dart would look very strange coming over the shoulder to the front. Fortunately compared with my shirt block, Archer had about the right amount of width in the yoke. So today I'm only going to be enlarging the main back piece.
First a slashing line was drawn on the back - measures in 2 1/2" from armhole edge on the yoke seam and 1 1/4" down from the armhole seam.
This line is cut and slid out 1/2" Then the side seam is trued up and the size of the pleat increased so that the back will fit into the yoke.
Sway Back - Lots of extra fabric at your center back that pools up when the hem of your shirt hits your butt? I got that in spades. My usual sway back alteration is to pinch out 1".
The lengthen/shorten line is usually a good place to put the sway back alteration. I put mine right above it. Mark out the amount of fabric you want to remove, (in my case 1") pleat the pattern so that you take out the full amount at CB but none at the side seam. Tape that sucker down and you're done.
Huzzah, fitting changes are done! Finger guns for everybody. Phew Phew Phew! Now go make this wonderful pattern.
Archer Button down - Wearable muslin #3
3.14.2013
Guess what, that wearable muslin turned out pretty good. Dare I say it gets the upgrade to finished object?
The fit on the front of the shirt is perfect, enough ease for comfort but not to much.
On the back I probably need a bigger sway back alteration. Though the pleat is messing up my assement since that's not a design feature I use on my own shirt block.
And the pockets! Usually pockets and my boobs do not mix (mini pockets are the devils work) but these are fantastic. I feel like people will look at the shirt and say, "Cool that has pockets," instead of, "What's going on with your boobs?"
Also angled sleeve cuffs = perfect shirt
My love for Jen's designs just grows and grows. Full flickr set here if you like non modeled detail shoots of collars and cuffs. A detailed post about my final fitting changes is almost done, so stay tuned for that. There are still plans to make a silk Archer, but I'll do that with the official sew-a-long. That way I have a couple of days to stare at the giant pile of silks....too many lovelies to choose from.
The fit on the front of the shirt is perfect, enough ease for comfort but not to much.
On the back I probably need a bigger sway back alteration. Though the pleat is messing up my assement since that's not a design feature I use on my own shirt block.
And the pockets! Usually pockets and my boobs do not mix (mini pockets are the devils work) but these are fantastic. I feel like people will look at the shirt and say, "Cool that has pockets," instead of, "What's going on with your boobs?"
Also angled sleeve cuffs = perfect shirt
My love for Jen's designs just grows and grows. Full flickr set here if you like non modeled detail shoots of collars and cuffs. A detailed post about my final fitting changes is almost done, so stay tuned for that. There are still plans to make a silk Archer, but I'll do that with the official sew-a-long. That way I have a couple of days to stare at the giant pile of silks....too many lovelies to choose from.
Archer button down - Fitting process
3.11.2013
Back to button down March! Both Archer and McCall's 5138 are making some progress on the old sewing machine. You won't see McCall's 5138 till it's done, it being a TNT there's nothing much to talk about. But today I'm going to "lift the veil" on my half hazard fitting process.
When picking your size know that Archer is drafted to be roomy, so pick the size closest to your bust measurement. This fact would have been clear to me had I measured that pattern. But that would be a smart thing to do, so I naturally skipped over it and guessed what size to make. I started off with a size 14 bust/shoulder and a 16 through waist/hip. (Blending two sizes together like this is pretty standard for me
since I'm pear shaped) On to the pics....
Muslin #1
A 14/16 size combo with the following adjustments - standard FBA that added a dart and 1" additional bust ease on the half (so 2" total), 1/2" extra width in the back on the half (1" total), 1/2" sway back adjustment and a 1/2" forward shoulder adjustment.
Conclusion- Need to go down a size, add only a bust dart but not extra width, move shoulder notch, remove back width adjustment and slim sleeve down.
Muslin #2
A 12/14 size combo with the following adjustments - Bust dart added but without full FBA, 1/2" sway back adjustment and a 1/2" forward shoulder adjustment with sleeve head notch properly moved.
Conclusion-Add 1/2" additional upper back width to the pattern again, pivot bust dart further up side seam, gently curve side seams for a trimmer look.
I'm currently sewing muslin #3, which will be in some navy cotton inherited from my grandmother's stash. Felt like the fit was close enough in muslin #2 that I could risk some free to me fabric. If the fit of that shirt is to my liking then archer will get an upgrade to some fancy shmancy silk. Oh Boy!
Sewing for others - Stashbusting Sewalong Feb Challenge
3.07.2013
Confession - I am a selfish sewcialist. That might not be much of a confession since you could figure that out looking at my FO's. Baby T-shirts and jammies aside everything else is for meeeee.
The fabric is left over from a pencil skirt made pre-baby. (Now sadly toooo small)) I loved that champagne snake skin brocade so much that all scraps where saved. It has a bit of lycra in it but that caused so sewing problems since all the self pieces are fused. The lining was also from the scrap bag and I have no idea what it originally was for. It's hard to see in these photos but the fabric is a nice plumy purple.
I made this for a high school friend of mine who really enjoys my sewing. Our joke is that she's going to win the lottery and hire me as her personal seamstress. I'm down for that.
I'll miss you little snaky clutch. but you've gone to a good home. Now what am I going to sew for me. ;)
But in the spirit of the Stashbusting Sew-a-long I dug deep and made one present for someone else. I'm a regular Mother Teresa.
Taaa Daaaaa, a lovely little pattern from Etsy seller Super Orange Sewing, the Emmy Clutch.
This pattern gets high marks for a super clear directions and a chic design. It was a very enjoyable process putting this little clutch together. I'm super happy with the little pleats and the zipper stop instructions, look how pretty.I made this for a high school friend of mine who really enjoys my sewing. Our joke is that she's going to win the lottery and hire me as her personal seamstress. I'm down for that.
I'll miss you little snaky clutch. but you've gone to a good home. Now what am I going to sew for me. ;)
March Begins with Button Downs
3.04.2013
It's only the 4th day of March and I already have at least 5 sewing projects planned for the month. Send help, or maybe someone to explain that space/time can not be folded like in Dr. Who.
Right now I'm working on two button down shirts in tandem. First a second McCall's 5138 out of some stashed linen that was earmarked for this project. Since I'm all about entering PR contests right now, this one is for the fitted blouse contest. I'm hoping that this TNT pattern will be a quick sewing project. (Famous Last Words)
Second shirt is a Grainline Studio Archer cause Jen is great and I can not resist her patterns. Can Jen quit her real job and make me more patterns? No?
I've planned a couple of posts on the Archer shirt since it's new and will need my standard fitting changes. Not sure if I'll get my version done before the official Archer sew-a-long starts but either way it will be fun.
| Random stack of fabric. |
| Linen in the front. Original shirt in the back. |
Second shirt is a Grainline Studio Archer cause Jen is great and I can not resist her patterns. Can Jen quit her real job and make me more patterns? No?
![]() |
| You will be mine, my pretty. |
I've planned a couple of posts on the Archer shirt since it's new and will need my standard fitting changes. Not sure if I'll get my version done before the official Archer sew-a-long starts but either way it will be fun.
Pushing Daisies Coat - a project of 8 days
3.02.2013
I don't know about you but I always get great ideas for contests right before they end. This seems to happen to all sewing on deadlines, it's like my brain needs weeks to ferment before it spits out the best idea. In senior year of college we had to make a collection of clothes each semester, at least 3 complete outfits. Both times I scrapped the whole idea/garments at midterm and started fresh. It was insane.
So basically the same thing happened with my plans for the PR RTW contest. I was going to knock off a lovely nightgown from Dollhouse Bettie, but just felt like sewing other projects first. Then on the 20th I thought, "You know what would be a great entry for the RTW contest, that Pushing Daises coat knock-off." Back when that most awesome show was actually on the air, I'd bought all the materials needed to make a version of the coat Chuck wears in the episode "Corpsicle.
Then never did it, probably distracted by something new and shiny. Here are some screen caps of that lovely coat.
Did a quick rummage through the pattern stash and Simplicity 2311 seemed like the perfect starting point. I traced off the single breasted, short length version and began by redrafting the collar. McCall's 6519 was used as a guide to make the collar wrap around the neck. For the wider lapel I just did a free form drawing while referencing the screen caps.
Since there are no good shots of the back of the original coat I decided to have a little fun and add a decorative yoke. Simplicity 2311 comes with a yoke piece so that was traced, increased in length a tad and given a curvy edge. I cut one yoke out of self fabric and another out of lining. Sewed the two together, understitched the curvy edge and then overlaid the decorative yoke over the regular one before setting the sleeves.
Speaking of sleeves, simplicity only gives you a one piece sleeve in this pattern. Shame Shame!! Lucky for me the sleeves from Colette's Anise fit right in the armholes, no drafting of my own required. I did reduce the sleeve circumference by an inch to make them a bit sleeker looking. Did this by cutting own the seam allowance on the forward most seam.
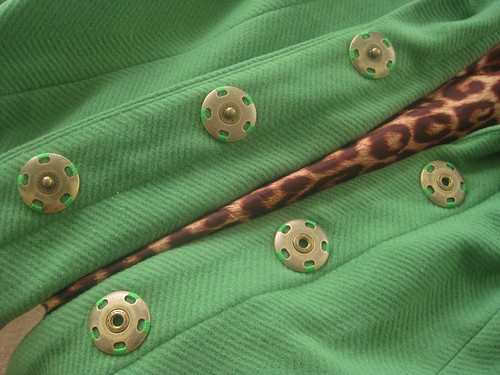
The pushing daisies coat has no visible closure other than the belt. At first I thought about making a hidden button placket, but that didn't seem like a good idea with my rather thick wool. Instead some beautiful large snaps were purchased from the wonderful Waechters.
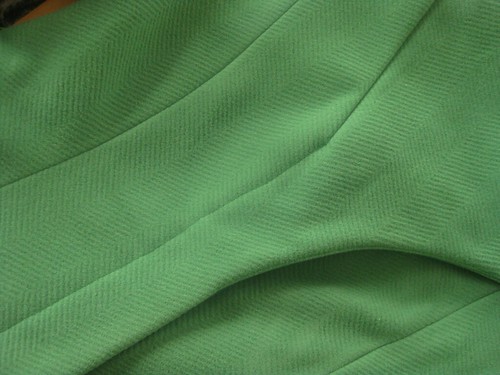
A little decorative topstitching was added to mimic a placket. In this picture you can see I topstitched from the bottom up to the point of the dart in the undercollar. This wasn't planned but it looks nice and tidy.
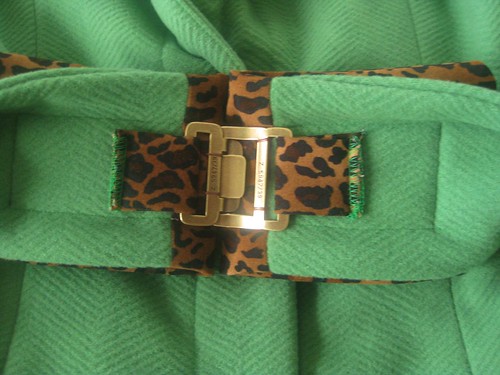
For the belt I just kind of flew by the seat of my pants. The main part is simple, more self fabric the length of my waist measurement/4"wide, with some topstitching added. The leopard print portion is some light weight suede cloth that needed some extra body. To beef it up I took some hair canvas from the stash and sandwiched it between too layers while sewing the seam allowances. This was attached to the ends of the green wool and given it's own topstitching. I really wanted a 4" belt buckle but lo and behold this is something that seems to be only made for RTW clothing. If I'd had this "bright idea" at the beginning of the month maybe I could have found a cheap one to cannibalize, but my local Target yielded nothing. With limited time to finish the coat for the PR contest I had to resort to Plan B - get creative with a 2" belt buckle.
The belt buckle (also from Waechters) was attached behind the belt with loops of the suede cloth. They were just sewed on with the machine since the stitches would be hidden. I then folded the leopard belt ends back and secured them with another row of topstitching. Finally the belt buckle pieces were secured by hand to the belt to keep the front from popping out away from the body. It actually looks pretty good from the right side.
Here's my PR review if you're interested in what fitting changes were made. Generally I had to take the coat in but that may have been because I started with with wrong size. Big 4 ease sometimes confounds me.
Be sure to check out all the beautiful entries in the RTW contest and if you feel like casting a vote my way that would be great. Now excuse me, I must get my note to Oscar Vibenius.
Did a quick rummage through the pattern stash and Simplicity 2311 seemed like the perfect starting point. I traced off the single breasted, short length version and began by redrafting the collar. McCall's 6519 was used as a guide to make the collar wrap around the neck. For the wider lapel I just did a free form drawing while referencing the screen caps.
Since there are no good shots of the back of the original coat I decided to have a little fun and add a decorative yoke. Simplicity 2311 comes with a yoke piece so that was traced, increased in length a tad and given a curvy edge. I cut one yoke out of self fabric and another out of lining. Sewed the two together, understitched the curvy edge and then overlaid the decorative yoke over the regular one before setting the sleeves.
Speaking of sleeves, simplicity only gives you a one piece sleeve in this pattern. Shame Shame!! Lucky for me the sleeves from Colette's Anise fit right in the armholes, no drafting of my own required. I did reduce the sleeve circumference by an inch to make them a bit sleeker looking. Did this by cutting own the seam allowance on the forward most seam.
The pushing daisies coat has no visible closure other than the belt. At first I thought about making a hidden button placket, but that didn't seem like a good idea with my rather thick wool. Instead some beautiful large snaps were purchased from the wonderful Waechters.
A little decorative topstitching was added to mimic a placket. In this picture you can see I topstitched from the bottom up to the point of the dart in the undercollar. This wasn't planned but it looks nice and tidy.
For the belt I just kind of flew by the seat of my pants. The main part is simple, more self fabric the length of my waist measurement/4"wide, with some topstitching added. The leopard print portion is some light weight suede cloth that needed some extra body. To beef it up I took some hair canvas from the stash and sandwiched it between too layers while sewing the seam allowances. This was attached to the ends of the green wool and given it's own topstitching. I really wanted a 4" belt buckle but lo and behold this is something that seems to be only made for RTW clothing. If I'd had this "bright idea" at the beginning of the month maybe I could have found a cheap one to cannibalize, but my local Target yielded nothing. With limited time to finish the coat for the PR contest I had to resort to Plan B - get creative with a 2" belt buckle.
The belt buckle (also from Waechters) was attached behind the belt with loops of the suede cloth. They were just sewed on with the machine since the stitches would be hidden. I then folded the leopard belt ends back and secured them with another row of topstitching. Finally the belt buckle pieces were secured by hand to the belt to keep the front from popping out away from the body. It actually looks pretty good from the right side.
Here's my PR review if you're interested in what fitting changes were made. Generally I had to take the coat in but that may have been because I started with with wrong size. Big 4 ease sometimes confounds me.
Be sure to check out all the beautiful entries in the RTW contest and if you feel like casting a vote my way that would be great. Now excuse me, I must get my note to Oscar Vibenius.
Subscribe to:
Posts (Atom)